指标(Metrics)
默认情况下,controller-runtime 会构建全局 Prometheus 注册表,并为每个控制器发布一组性能指标。
指标配置(Metrics Configuration)
查看 config/default/kustomization.yaml 可知默认已暴露 metrics:
# [METRICS] Expose the controller manager metrics service.
- metrics_service.yaml
patches:
   # [METRICS] The following patch will enable the metrics endpoint using HTTPS and the port :8443.
   # More info: https://book.kubebuilder.io/reference/metrics
   - path: manager_metrics_patch.yaml
     target:
        kind: Deployment
随后可在 cmd/main.go 中查看 metrics server 的配置:
// Metrics endpoint is enabled in 'config/default/kustomization.yaml'. The Metrics options configure the server.
// For more info: https://pkg.go.dev/sigs.k8s.io/controller-runtime/pkg/metrics/server
Metrics: metricsserver.Options{
   ...
},
在 Kubebuilder 中消费控制器指标
你可以使用 curl 或 Prometheus 等 HTTP 客户端访问控制器暴露的指标。
但在此之前,请确保客户端具备访问 /metrics 端点所需的 RBAC 权限。
授权访问指标端点
Kubebuilder 在如下位置脚手架了一个拥有读取权限的 ClusterRole:
config/rbac/metrics_reader_role.yaml
该文件包含了允许访问 metrics 端点所需的 RBAC 规则。
创建 ClusterRoleBinding
可通过 kubectl 创建绑定:
kubectl create clusterrolebinding metrics \
  --clusterrole=<project-prefix>-metrics-reader \
  --serviceaccount=<namespace>:<service-account-name>
或使用清单:
apiVersion: rbac.authorization.k8s.io/v1
kind: ClusterRoleBinding
metadata:
  name: allow-metrics-access
roleRef:
  apiGroup: rbac.authorization.k8s.io
  kind: ClusterRole
  name: metrics-reader
subjects:
- kind: ServiceAccount
  name: controller-manager
  namespace: system # Replace 'system' with your controller-manager's namespace
测试指标端点(通过 Curl Pod)
如需手动测试访问 metrics 端点,可执行:
- 创建 RoleBinding
kubectl create clusterrolebinding <project-name>-metrics-binding \
  --clusterrole=<project-name>-metrics-reader \
  --serviceaccount=<project-name>-system:<project-name>-controller-manager
- 生成 Token
export TOKEN=$(kubectl create token <project-name>-controller-manager -n <project-name>-system)
echo $TOKEN
- Launch Curl Pod
kubectl run curl-metrics --rm -it --restart=Never \
  --image=curlimages/curl:7.87.0 -n <project-name>-system -- /bin/sh
- 调用 Metrics 端点
在 Pod 内使用:
curl -v -k -H "Authorization: Bearer $TOKEN" \
  https://<project-name>-controller-manager-metrics-service.<project-name>-system.svc.cluster.local:8443/metrics
指标保护与可选方案
未加保护的 metrics 端点可能向未授权用户暴露敏感数据(系统性能、应用行为、运维指标等),从而带来安全风险。
使用 authn/authz(默认启用)
为降低风险,Kubebuilder 项目通过认证(authn)与鉴权(authz)保护 metrics 端点,确保仅授权用户/服务账号可访问敏感指标。
过去常使用 kube-rbac-proxy 进行保护;新版本已不再使用。自 v4.1.0 起,项目默认通过 controller-runtime 的 WithAuthenticationAndAuthorization 启用并保护 metrics 端点。
因此,你会看到如下配置:
- In the
cmd/main.go:
if secureMetrics {
  ...
  metricsServerOptions.FilterProvider = filters.WithAuthenticationAndAuthorization
}
该配置通过 FilterProvider 对 metrics 端点实施认证与鉴权,确保仅具有相应权限的实体可访问。
- In the
config/rbac/kustomization.yaml:
# The following RBAC configurations are used to protect
# the metrics endpoint with authn/authz. These configurations
# ensure that only authorized users and service accounts
# can access the metrics endpoint.
- metrics_auth_role.yaml
- metrics_auth_role_binding.yaml
- metrics_reader_role.yaml
这样,只有使用相应 ServiceAccount token 的 Pod 才能读取 metrics。示例:
apiVersion: v1
kind: Pod
metadata:
  name: metrics-consumer
  namespace: system
spec:
  # Use the scaffolded service account name to allow authn/authz
  serviceAccountName: controller-manager
  containers:
  - name: metrics-consumer
    image: curlimages/curl:latest
    command: ["/bin/sh"]
    args:
      - "-c"
      - >
        while true;
        do
          # Note here that we are passing the token obtained from the ServiceAccount to curl the metrics endpoint
          curl -s -k -H "Authorization: Bearer $(cat /var/run/secrets/kubernetes.io/serviceaccount/token)"
          https://controller-manager-metrics-service.system.svc.cluster.local:8443/metrics;
          sleep 60;
        done
(推荐)在生产环境启用证书(默认关闭)
自 Kubebuilder 4.4.0 起,脚手架包含使用 CertManager 管理证书以保护 metrics server 的逻辑。按以下步骤可启用:
-
在
config/default/kustomization.yaml启用 Cert-Manager:-
取消注释 cert-manager 资源:
- ../certmanager
-
-
启用在
config/default/kustomization.yaml中用于挂载证书的 Patch:-
取消注释
cert_metrics_manager_patch.yaml,在 Manager 的 Deployment 中挂载serving-cert:# Uncomment the patches line if you enable Metrics and CertManager # [METRICS-WITH-CERTS] To enable metrics protected with certManager, uncomment the following line. # This patch will protect the metrics with certManager self-signed certs. - path: cert_metrics_manager_patch.yaml target: kind: Deployment
-
-
在
config/default/kustomization.yaml中启用为 Metrics Server 配置证书的 replacements:-
取消注释下方 replacements 块,为
config/certmanager下的证书正确设置 DNS 名称:# [CERTMANAGER] To enable cert-manager, uncomment all sections with 'CERTMANAGER' prefix. # Uncomment the following replacements to add the cert-manager CA injection annotations #replacements: # - source: # Uncomment the following block to enable certificates for metrics # kind: Service # version: v1 # name: controller-manager-metrics-service # fieldPath: metadata.name # targets: # - select: # kind: Certificate # group: cert-manager.io # version: v1 # name: metrics-certs # fieldPaths: # - spec.dnsNames.0 # - spec.dnsNames.1 # options: # delimiter: '.' # index: 0 # create: true # # - source: # kind: Service # version: v1 # name: controller-manager-metrics-service # fieldPath: metadata.namespace # targets: # - select: # kind: Certificate # group: cert-manager.io # version: v1 # name: metrics-certs # fieldPaths: # - spec.dnsNames.0 # - spec.dnsNames.1 # options: # delimiter: '.' # index: 1 # create: true #
-
-
在
config/prometheus/kustomization.yaml中启用ServiceMonitor的证书配置:-
添加或取消注释
ServiceMonitor的 patch,以使用 cert-manager 管理的 Secret 并启用证书校验:# [PROMETHEUS-WITH-CERTS] The following patch configures the ServiceMonitor in ../prometheus # to securely reference certificates created and managed by cert-manager. # Additionally, ensure that you uncomment the [METRICS WITH CERTMANAGER] patch under config/default/kustomization.yaml # to mount the "metrics-server-cert" secret in the Manager Deployment. patches: - path: monitor_tls_patch.yaml target: kind: ServiceMonitor
NOTE that the
ServiceMonitorpatch above will ensure that if you enable the Prometheus integration, it will securely reference the certificates created and managed by CertManager. But it will not enable the integration with Prometheus. To enable the integration with Prometheus, you need uncomment the#- ../certmanagerin theconfig/default/kustomization.yaml. For more information, see Exporting Metrics for Prometheus. -
(Optional) By using Network Policy (Disabled by default)
NetworkPolicy acts as a basic firewall for pods within a Kubernetes cluster, controlling traffic
flow at the IP address or port level. However, it doesn’t handle authn/authz.
Uncomment the following line in the config/default/kustomization.yaml:
# [NETWORK POLICY] Protect the /metrics endpoint and Webhook Server with NetworkPolicy.
# Only Pod(s) running a namespace labeled with 'metrics: enabled' will be able to gather the metrics.
# Only CR(s) which uses webhooks and applied on namespaces labeled 'webhooks: enabled' will be able to work properly.
#- ../network-policy
Exporting Metrics for Prometheus
使用 Prometheus Operator 导出指标的步骤:
-
安装 Prometheus 与 Prometheus Operator。 若无自建监控系统,生产环境建议使用 kube-prometheus。 若仅用于试验,可只安装 Prometheus 与 Prometheus Operator。
-
在
config/default/kustomization.yaml中取消注释- ../prometheus,以创建ServiceMonitor并启用指标导出:
# [PROMETHEUS] To enable prometheus monitor, uncomment all sections with 'PROMETHEUS'.
- ../prometheus
注意:当你将项目安装到集群时会创建 ServiceMonitor 用于导出指标。可通过 kubectl get ServiceMonitor -n <project>-system 检查,例如:
$ kubectl get ServiceMonitor -n monitor-system
NAME                                         AGE
monitor-controller-manager-metrics-monitor   2m8s
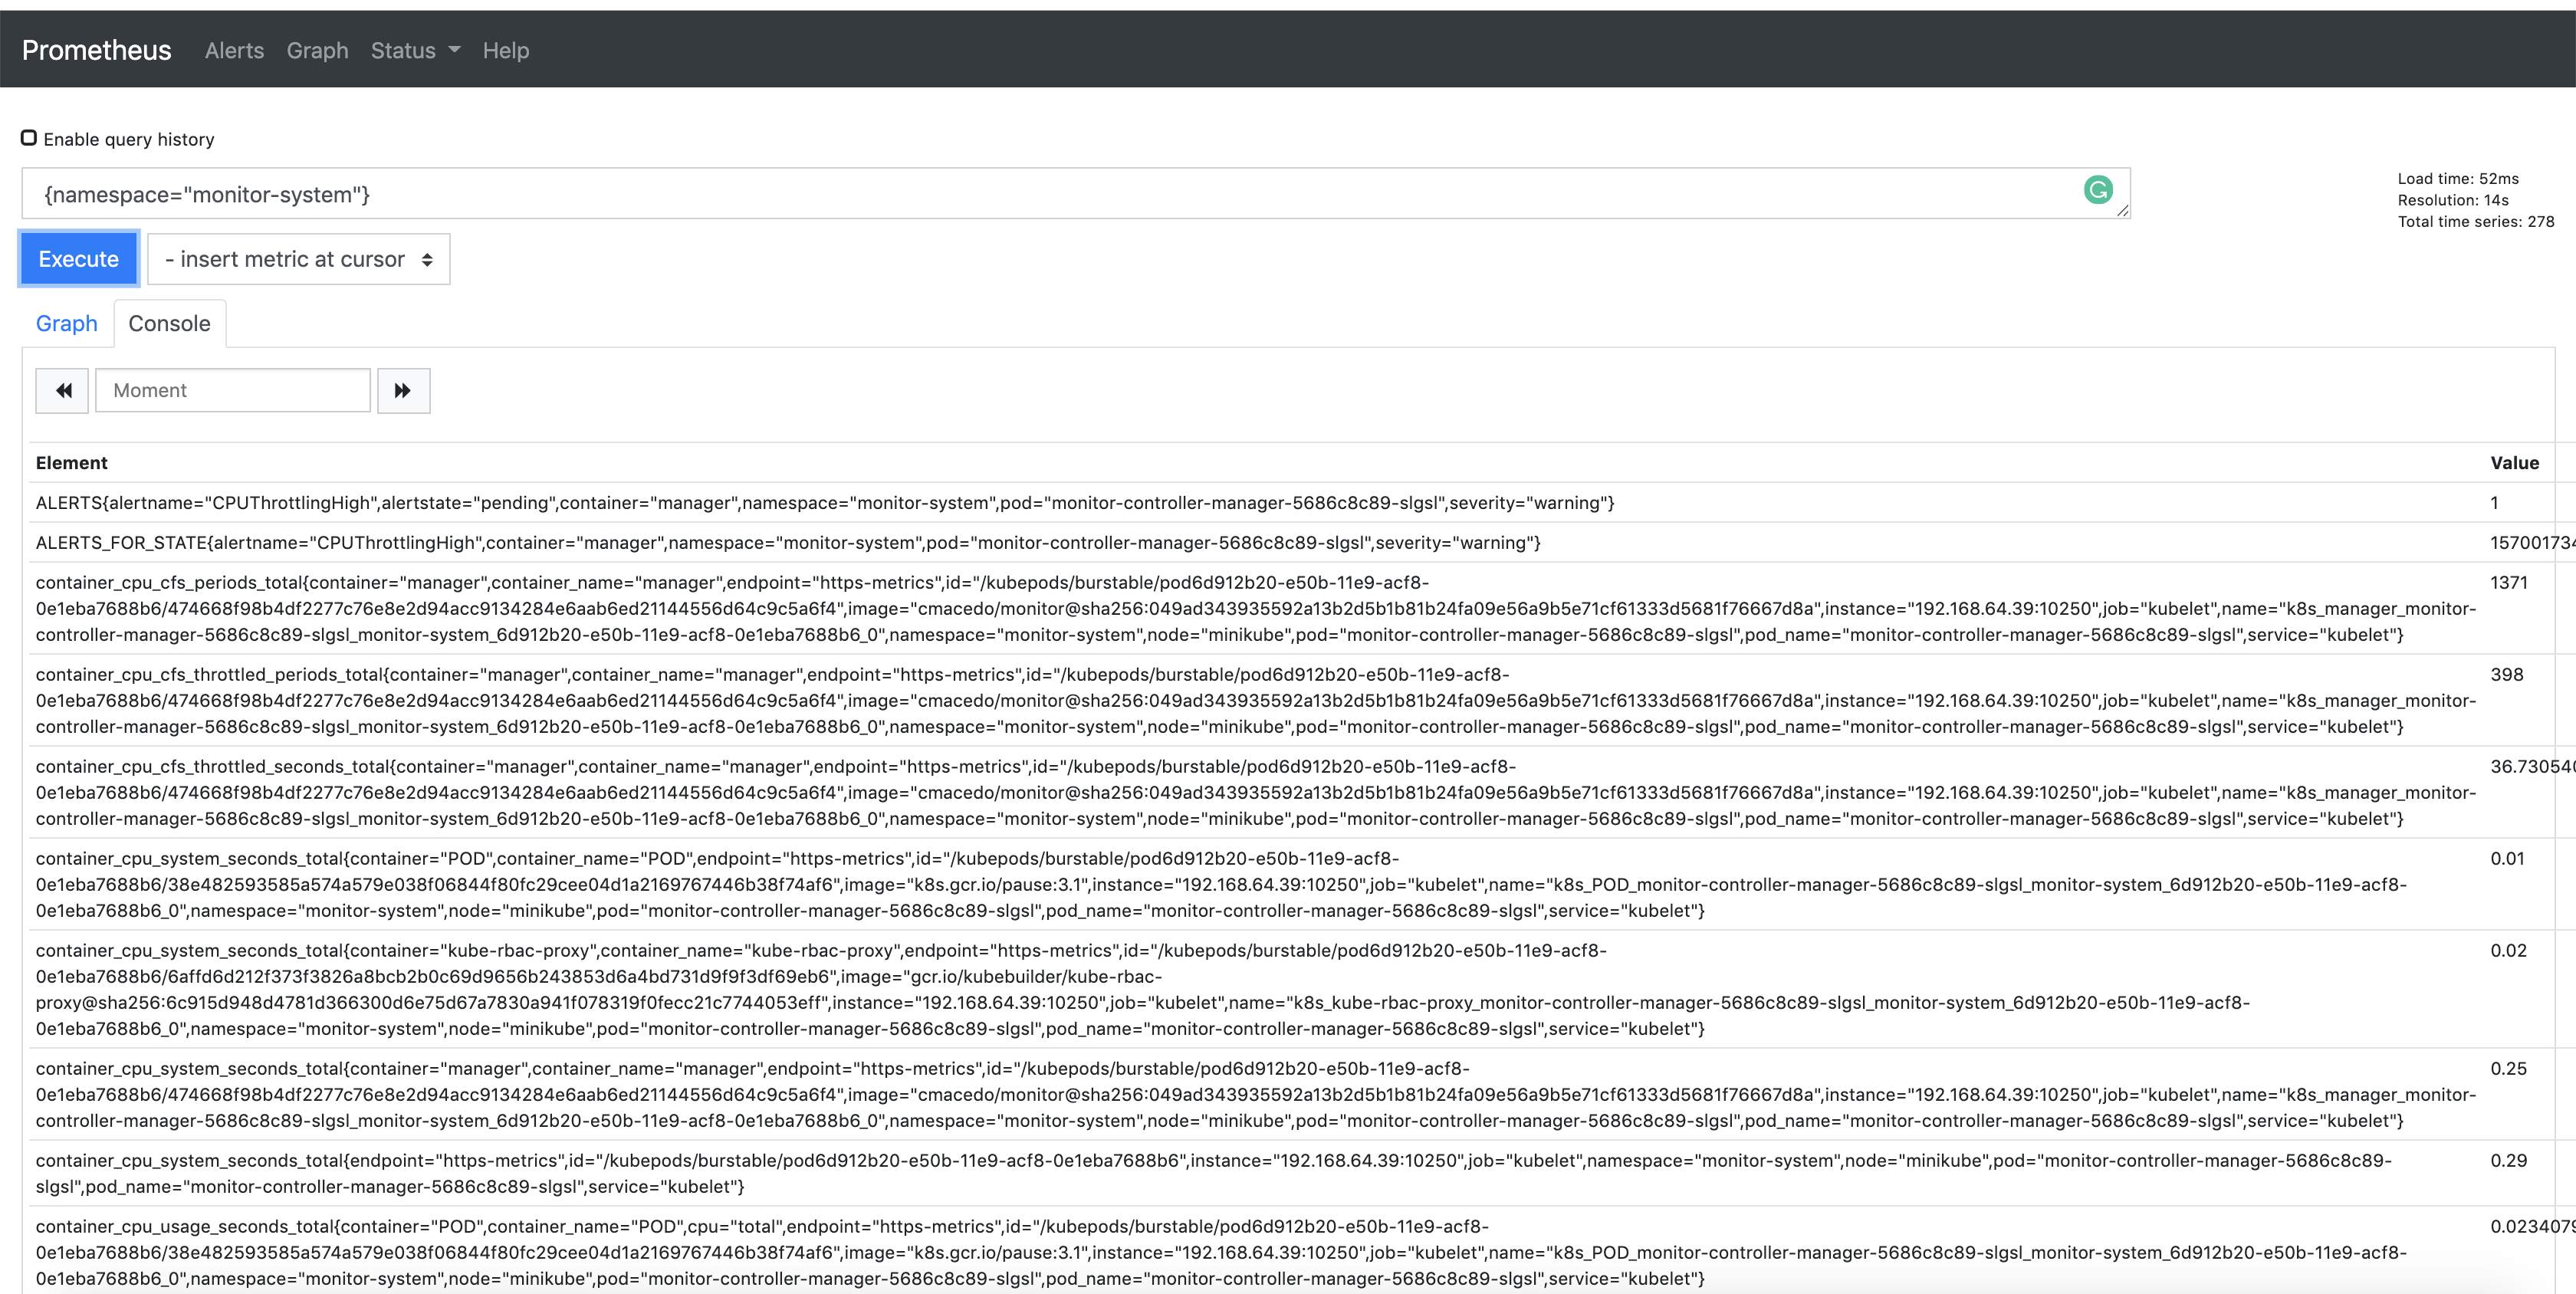
另外,指标默认通过 8443 端口导出。你可以在 Prometheus 控制台中通过 {namespace="<project>-system"} 查询该命名空间导出的指标:
发布自定义指标
如果希望从控制器发布更多指标,可使用 controller-runtime/pkg/metrics 的全局注册表。
一种常见方式是在控制器包中将采集器声明为全局变量,并在 init() 中注册:
For example:
import (
    "github.com/prometheus/client_golang/prometheus"
    "sigs.k8s.io/controller-runtime/pkg/metrics"
)

var (
    goobers = prometheus.NewCounter(
        prometheus.CounterOpts{
            Name: "goobers_total",
            Help: "Number of goobers processed",
        },
    )
    gooberFailures = prometheus.NewCounter(
        prometheus.CounterOpts{
            Name: "goober_failures_total",
            Help: "Number of failed goobers",
        },
    )
)

func init() {
    // Register custom metrics with the global prometheus registry
    metrics.Registry.MustRegister(goobers, gooberFailures)
}
随后可在调谐循环中任意位置对这些采集器写入数据;在 operator 代码中的任意位置均可读取与评估这些指标。
上述指标可被 Prometheus 或其他 OpenMetrics 系统抓取。
