注意: 性子急的读者可直接前往 快速开始。
正在使用 Kubebuilder 的 v1 或 v2 版本? 请查看旧版文档:v1、v2 或 v3
适用读者
Kubernetes 用户
Kubernetes 的用户将通过学习 API 设计与实现背后的基本概念,获得对 Kubernetes 更深入的理解。本书将教读者如何开发自己的 Kubernetes API,以及核心 Kubernetes API 的设计原则。
包括:
- Kubernetes API 与资源的结构
- API 版本化语义
- 自愈
- 垃圾回收与 Finalizer
- 声明式 vs 命令式 API
- 基于电平(Level-Based)vs 基于边沿(Edge-Base)API
- 资源 vs 子资源
Kubernetes API 扩展开发者
API 扩展开发者将学习实现典型 Kubernetes API 的原则与概念,以及用于快速落地的简洁工具与库。本书还涵盖扩展开发者常见的陷阱与误区。
包括:
- 如何将多个事件批量进一次调谐(reconciliation)调用
- 如何配置周期性调谐
- 即将推出
- 何时使用 lister 缓存 vs 实时查询
- 垃圾回收 vs Finalizer
- 如何使用声明式 vs Webhook 校验
- 如何实现 API 版本化
为什么选择 Kubernetes API
Kubernetes API 为遵循一致且丰富结构的对象提供了一致且定义良好的端点。
这种方式催生了用于处理 Kubernetes API 的丰富工具与库生态。
用户通过将对象声明为 YAML 或 JSON 配置,并使用通用工具来管理这些对象,从而与 API 交互。
将服务构建为 Kubernetes API 相较于传统 REST 具有诸多优势,包括:
- 托管的 API 端点、存储与校验。
- 丰富的工具与 CLI,例如
kubectl与kustomize。 - 支持认证(AuthN)与细粒度授权(AuthZ)。
- 通过 API 版本化与转换支持 API 演进。
- 便于构建自适应/自愈的 API,能够在无需用户干预的情况下持续响应系统状态变化。
- 以 Kubernetes 作为托管运行环境。
开发者可以构建并发布自己的 Kubernetes API,以安装到正在运行的 Kubernetes 集群中。
贡献
如果你希望为本书或代码做出贡献,请先阅读我们的贡献指南。
资源
-
Slack 频道:#kubebuilder
-
Google 讨论组: kubebuilder@googlegroups.com
架构概念图
下图将帮助你更好地理解 Kubebuilder 的概念与架构。
快速开始
本快速开始将涵盖:
前置条件
安装
安装 kubebuilder:
# download kubebuilder and install locally.
curl -L -o kubebuilder "https://go.kubebuilder.io/dl/latest/$(go env GOOS)/$(go env GOARCH)"
chmod +x kubebuilder && sudo mv kubebuilder /usr/local/bin/
创建项目
创建一个目录,并在其中运行 init 命令来初始化新项目。示例如下:
mkdir -p ~/projects/guestbook
cd ~/projects/guestbook
kubebuilder init --domain my.domain --repo my.domain/guestbook
创建 API
运行以下命令创建一个新的 API(group/version 为 webapp/v1)以及其上的新 Kind(CRD)Guestbook:
kubebuilder create api --group webapp --version v1 --kind Guestbook
(可选)编辑 API 定义与调谐业务逻辑。更多信息见 设计一个 API 与控制器包含什么。
如果编辑了 API 定义,请生成诸如自定义资源(CR)或自定义资源定义(CRD)等清单:
make manifests
点击查看示例。(api/v1/guestbook_types.go)
// GuestbookSpec defines the desired state of Guestbook
type GuestbookSpec struct {
	// INSERT ADDITIONAL SPEC FIELDS - desired state of cluster
	// Important: Run "make" to regenerate code after modifying this file

	// Quantity of instances
	// +kubebuilder:validation:Minimum=1
	// +kubebuilder:validation:Maximum=10
	Size int32 `json:"size"`

	// Name of the ConfigMap for GuestbookSpec's configuration
	// +kubebuilder:validation:MaxLength=15
	// +kubebuilder:validation:MinLength=1
	ConfigMapName string `json:"configMapName"`

	// +kubebuilder:validation:Enum=Phone;Address;Name
	Type string `json:"type,omitempty"`
}

// GuestbookStatus defines the observed state of Guestbook
type GuestbookStatus struct {
	// INSERT ADDITIONAL STATUS FIELD - define observed state of cluster
	// Important: Run "make" to regenerate code after modifying this file

	// PodName of the active Guestbook node.
	Active string `json:"active"`

	// PodNames of the standby Guestbook nodes.
	Standby []string `json:"standby"`
}

// +kubebuilder:object:root=true
// +kubebuilder:subresource:status
// +kubebuilder:resource:scope=Cluster

// Guestbook is the Schema for the guestbooks API
type Guestbook struct {
	metav1.TypeMeta   `json:",inline"`
	metav1.ObjectMeta `json:"metadata,omitempty"`

	Spec   GuestbookSpec   `json:"spec,omitempty"`
	Status GuestbookStatus `json:"status,omitempty"`
}
试运行
你需要一个 Kubernetes 集群来作为运行目标。可以使用 KinD 获取一个用于测试的本地集群,或者针对远程集群运行。
在集群中安装 CRD:
make install
为获得快速反馈与代码级调试,运行控制器(它会在前台运行;如需保持运行,请切换到新的终端):
make run
安装自定义资源的实例
如果你在 Create Resource [y/n] 处输入了 y,则在 samples 中已为该 CRD 创建了一个 CR(如果你更改过 API 定义,请先编辑样例):
kubectl apply -k config/samples/
在集群中运行
当控制器准备好进行打包并在其他集群中测试时:
构建并将镜像推送到 IMG 指定的位置:
make docker-build docker-push IMG=<some-registry>/<project-name>:tag
使用 IMG 指定的镜像将控制器部署到集群:
make deploy IMG=<some-registry>/<project-name>:tag
卸载 CRD
从集群删除你的 CRD:
make uninstall
取消部署控制器
从集群中取消部署控制器:
make undeploy
使用插件
Kubebuilder 的设计基于插件,你可以使用可用插件为项目添加可选特性。
生成用于管理镜像的 API 与控制器
例如,你可以使用 deploy-image 插件 生成一个用于管理容器镜像的 API 与控制器:
kubebuilder create api --group webapp --version v1alpha1 --kind Busybox --image=busybox:1.36.1 --plugins="deploy-image/v1-alpha"
该命令会生成:
api/v1alpha1/busybox_types.go中的 API 定义internal/controllers/busybox_controller.go中的控制器逻辑internal/controllers/busybox_controller_test.go中的测试脚手架(使用 EnvTest 进行集成式测试)
让你的项目与生态变化保持同步
Kubebuilder 提供了 AutoUpdate 插件,帮助你的项目与最新的生态变化保持一致。当有新版本发布时,该插件会打开一个包含 Pull Request 对比链接的 Issue。你可以审阅更新,并在需要时使用 GitHub AI models 来理解保持项目最新所需的变更。
kubebuilder edit --plugins="autoupdate/v1-alpha"
该命令会在 .github/workflows/autoupdate.yml 生成一个 GitHub workflow 文件。
下一步
- 继续阅读入门指南(不超过 30 分钟),以打下坚实基础。
- 随后深入CronJob 教程,通过开发示例项目加深理解。
- 在设计你自己的 API 与项目之前,确保你理解 Groups、Versions 与 Kinds,哇哦! 中关于 API 与 Group 的概念。
入门
我们将创建一个示例项目来展示其工作方式。该示例将:
- 调谐一个 Memcached CR——它代表一个在集群中部署/由集群管理的 Memcached 实例
- 使用 Memcached 镜像创建一个 Deployment
- 不允许实例数超过 CR 中定义的 size
- 更新 Memcached CR 的状态
创建项目
首先,为你的项目创建并进入一个目录。然后使用 kubebuilder 初始化:
mkdir $GOPATH/memcached-operator
cd $GOPATH/memcached-operator
kubebuilder init --domain=example.com
创建 Memcached API(CRD)
接下来,我们将创建负责在集群上部署并管理 Memcached 实例的 API。
kubebuilder create api --group cache --version v1alpha1 --kind Memcached
理解 API
该命令的主要目标是为 Memcached 这个 Kind 生成自定义资源(CR)与自定义资源定义(CRD)。它会创建 group 为 cache.example.com、version 为 v1alpha1 的 API,从而唯一标识 Memcached Kind 的新 CRD。借助 Kubebuilder,我们可以定义代表我们在平台上方案的 API 与对象。
虽然本示例中仅添加了一种资源的 Kind,但我们可以根据需要拥有任意数量的 Group 与 Kind。为便于理解,可以将 CRD 看作自定义对象的“定义”,而 CR 则是其“实例”。
定义我们的 API
定义规格(Spec)
现在,我们将定义集群中每个 Memcached 资源实例可以采用的值。在本示例中,我们允许通过以下方式配置实例数量:
type MemcachedSpec struct {
	...
	// +kubebuilder:validation:Minimum=0
	// +required
	Size *int32 `json:"size,omitempty"`
}
定义 Status
我们还希望跟踪为管理 Memcached CR 所进行操作的状态。这使我们能够像使用 Kubernetes API 中的任何资源那样,校验自定义资源对我们 API 的描述,并判断一切是否成功,或是否遇到错误。
// MemcachedStatus defines the observed state of Memcached
type MemcachedStatus struct {
	Conditions []metav1.Condition `json:"conditions,omitempty" patchStrategy:"merge" patchMergeKey:"type" protobuf:"bytes,1,rep,name=conditions"`
}
标记(Markers)与校验
此外,我们希望对自定义资源中的值进行校验以确保其有效。为此,我们将使用标记,例如 +kubebuilder:validation:Minimum=1。
现在,来看我们完整的示例。
Apache License
Copyright 2025 The Kubernetes authors.
Licensed under the Apache License, Version 2.0 (the “License”); you may not use this file except in compliance with the License. You may obtain a copy of the License at
http://www.apache.org/licenses/LICENSE-2.0
Unless required by applicable law or agreed to in writing, software distributed under the License is distributed on an “AS IS” BASIS, WITHOUT WARRANTIES OR CONDITIONS OF ANY KIND, either express or implied. See the License for the specific language governing permissions and limitations under the License.
Imports
package v1alpha1

import (
	metav1 "k8s.io/apimachinery/pkg/apis/meta/v1"
)

// EDIT THIS FILE!  THIS IS SCAFFOLDING FOR YOU TO OWN!
// NOTE: json tags are required.  Any new fields you add must have json tags for the fields to be serialized.
// MemcachedSpec defines the desired state of Memcached
type MemcachedSpec struct {
	// INSERT ADDITIONAL SPEC FIELDS - desired state of cluster
	// Important: Run "make" to regenerate code after modifying this file
	// The following markers will use OpenAPI v3 schema to validate the value
	// More info: https://book.kubebuilder.io/reference/markers/crd-validation.html

	// size defines the number of Memcached instances
	// The following markers will use OpenAPI v3 schema to validate the value
	// More info: https://book.kubebuilder.io/reference/markers/crd-validation.html
	// +kubebuilder:validation:Minimum=1
	// +kubebuilder:validation:Maximum=3
	// +kubebuilder:validation:ExclusiveMaximum=false
	// +optional
	Size *int32 `json:"size,omitempty"`
}

// MemcachedStatus defines the observed state of Memcached.
type MemcachedStatus struct {
	// INSERT ADDITIONAL STATUS FIELD - define observed state of cluster
	// Important: Run "make" to regenerate code after modifying this file

	// For Kubernetes API conventions, see:
	// https://github.com/kubernetes/community/blob/master/contributors/devel/sig-architecture/api-conventions.md#typical-status-properties

	// conditions represent the current state of the Memcached resource.
	// Each condition has a unique type and reflects the status of a specific aspect of the resource.
	//
	// Standard condition types include:
	// - "Available": the resource is fully functional
	// - "Progressing": the resource is being created or updated
	// - "Degraded": the resource failed to reach or maintain its desired state
	//
	// The status of each condition is one of True, False, or Unknown.
	// +listType=map
	// +listMapKey=type
	// +optional
	Conditions []metav1.Condition `json:"conditions,omitempty"`
}

// +kubebuilder:object:root=true
// +kubebuilder:subresource:status

// Memcached is the Schema for the memcacheds API
type Memcached struct {
	metav1.TypeMeta `json:",inline"`

	// metadata is a standard object metadata
	// +optional
	metav1.ObjectMeta `json:"metadata,omitempty,omitzero"`

	// spec defines the desired state of Memcached
	// +required
	Spec MemcachedSpec `json:"spec"`

	// status defines the observed state of Memcached
	// +optional
	Status MemcachedStatus `json:"status,omitempty,omitzero"`
}

// +kubebuilder:object:root=true

// MemcachedList contains a list of Memcached
type MemcachedList struct {
	metav1.TypeMeta `json:",inline"`
	metav1.ListMeta `json:"metadata,omitempty"`
	Items           []Memcached `json:"items"`
}

func init() {
	SchemeBuilder.Register(&Memcached{}, &MemcachedList{})
}
生成包含规格与校验的清单
生成所有必需文件:
-
运行
make generate在api/v1alpha1/zz_generated.deepcopy.go中生成 DeepCopy 实现。 -
然后运行
make manifests在config/crd/bases下生成 CRD 清单,并在config/samples下生成其示例。
这两个命令都会使用 controller-gen,但分别使用不同的参数来生成代码与清单。
config/crd/bases/cache.example.com_memcacheds.yaml: Our Memcached CRD
---
apiVersion: apiextensions.k8s.io/v1
kind: CustomResourceDefinition
metadata:
  annotations:
    controller-gen.kubebuilder.io/version: v0.19.0
  name: memcacheds.cache.example.com
spec:
  group: cache.example.com
  names:
    kind: Memcached
    listKind: MemcachedList
    plural: memcacheds
    singular: memcached
  scope: Namespaced
  versions:
  - name: v1alpha1
    schema:
      openAPIV3Schema:
        description: Memcached is the Schema for the memcacheds API
        properties:
          apiVersion:
            description: |-
              APIVersion defines the versioned schema of this representation of an object.
              Servers should convert recognized schemas to the latest internal value, and
              may reject unrecognized values.
              More info: https://git.k8s.io/community/contributors/devel/sig-architecture/api-conventions.md#resources
            type: string
          kind:
            description: |-
              Kind is a string value representing the REST resource this object represents.
              Servers may infer this from the endpoint the client submits requests to.
              Cannot be updated.
              In CamelCase.
              More info: https://git.k8s.io/community/contributors/devel/sig-architecture/api-conventions.md#types-kinds
            type: string
          metadata:
            type: object
          spec:
            description: spec defines the desired state of Memcached
            properties:
              size:
                description: |-
                  size defines the number of Memcached instances
                  The following markers will use OpenAPI v3 schema to validate the value
                  More info: https://book.kubebuilder.io/reference/markers/crd-validation.html
                format: int32
                maximum: 3
                minimum: 1
                type: integer
            type: object
          status:
            description: status defines the observed state of Memcached
            properties:
              conditions:
                description: |-
                  conditions represent the current state of the Memcached resource.
                  Each condition has a unique type and reflects the status of a specific aspect of the resource.

                  Standard condition types include:
                  - "Available": the resource is fully functional
                  - "Progressing": the resource is being created or updated
                  - "Degraded": the resource failed to reach or maintain its desired state

                  The status of each condition is one of True, False, or Unknown.
                items:
                  description: Condition contains details for one aspect of the current
                    state of this API Resource.
                  properties:
                    lastTransitionTime:
                      description: |-
                        lastTransitionTime is the last time the condition transitioned from one status to another.
                        This should be when the underlying condition changed.  If that is not known, then using the time when the API field changed is acceptable.
                      format: date-time
                      type: string
                    message:
                      description: |-
                        message is a human readable message indicating details about the transition.
                        This may be an empty string.
                      maxLength: 32768
                      type: string
                    observedGeneration:
                      description: |-
                        observedGeneration represents the .metadata.generation that the condition was set based upon.
                        For instance, if .metadata.generation is currently 12, but the .status.conditions[x].observedGeneration is 9, the condition is out of date
                        with respect to the current state of the instance.
                      format: int64
                      minimum: 0
                      type: integer
                    reason:
                      description: |-
                        reason contains a programmatic identifier indicating the reason for the condition's last transition.
                        Producers of specific condition types may define expected values and meanings for this field,
                        and whether the values are considered a guaranteed API.
                        The value should be a CamelCase string.
                        This field may not be empty.
                      maxLength: 1024
                      minLength: 1
                      pattern: ^[A-Za-z]([A-Za-z0-9_,:]*[A-Za-z0-9_])?$
                      type: string
                    status:
                      description: status of the condition, one of True, False, Unknown.
                      enum:
                      - "True"
                      - "False"
                      - Unknown
                      type: string
                    type:
                      description: type of condition in CamelCase or in foo.example.com/CamelCase.
                      maxLength: 316
                      pattern: ^([a-z0-9]([-a-z0-9]*[a-z0-9])?(\.[a-z0-9]([-a-z0-9]*[a-z0-9])?)*/)?(([A-Za-z0-9][-A-Za-z0-9_.]*)?[A-Za-z0-9])$
                      type: string
                  required:
                  - lastTransitionTime
                  - message
                  - reason
                  - status
                  - type
                  type: object
                type: array
                x-kubernetes-list-map-keys:
                - type
                x-kubernetes-list-type: map
            type: object
        required:
        - spec
        type: object
    served: true
    storage: true
    subresources:
      status: {}
自定义资源示例
config/samples 目录下的清单是可应用到集群的自定义资源示例。在本例中,将该资源应用到集群会生成一个副本数为 1 的 Deployment(见 size: 1)。
apiVersion: cache.example.com/v1alpha1
kind: Memcached
metadata:
  labels:
    app.kubernetes.io/name: project
    app.kubernetes.io/managed-by: kustomize
  name: memcached-sample
spec:
  # TODO(user): edit the following value to ensure the number
  # of Pods/Instances your Operand must have on cluster
  size: 1
调谐(Reconcile)流程
简单来说,Kubernetes 允许我们声明系统的期望状态,然后其控制器会持续观察集群并采取操作,以确保实际状态与期望状态一致。对于我们的自定义 API 与控制器,过程也是类似的。记住:我们是在扩展 Kubernetes 的行为与 API 以满足特定需求。
在控制器中,我们将实现一个调谐流程。
本质上,调谐流程以循环方式工作:持续检查条件并执行必要操作,直到达到期望状态。该流程会一直运行,直到系统中的所有条件与我们的实现所定义的期望状态一致。
下面是一个伪代码示例:
reconcile App {

  // Check if a Deployment for the app exists, if not, create one
  // If there's an error, then restart from the beginning of the reconcile
  if err != nil {
    return reconcile.Result{}, err
  }

  // Check if a Service for the app exists, if not, create one
  // If there's an error, then restart from the beginning of the reconcile
  if err != nil {
    return reconcile.Result{}, err
  }

  // Look for Database CR/CRD
  // Check the Database Deployment's replicas size
  // If deployment.replicas size doesn't match cr.size, then update it
  // Then, restart from the beginning of the reconcile. For example, by returning `reconcile.Result{Requeue: true}, nil`.
  if err != nil {
    return reconcile.Result{Requeue: true}, nil
  }
  ...

  // If at the end of the loop:
  // Everything was executed successfully, and the reconcile can stop
  return reconcile.Result{}, nil

}
放到本示例的上下文中
当我们将示例自定义资源(CR)应用到集群(例如 kubectl apply -f config/sample/cache_v1alpha1_memcached.yaml)时,我们希望确保会为 Memcached 镜像创建一个 Deployment,且其副本数与 CR 中定义的一致。
为实现这一点,我们首先需要实现一个操作:检查集群中是否已存在该 Memcached 实例对应的 Deployment;如果不存在,控制器将据此创建 Deployment。因此,调谐流程必须包含一项操作来确保该期望状态被持续维持。该操作大致包括:
	// Check if the deployment already exists, if not create a new one
	found := &appsv1.Deployment{}
	err = r.Get(ctx, types.NamespacedName{Name: memcached.Name, Namespace: memcached.Namespace}, found)
	if err != nil && apierrors.IsNotFound(err) {
		// Define a new deployment
		dep := r.deploymentForMemcached()
		// Create the Deployment on the cluster
		if err = r.Create(ctx, dep); err != nil {
            log.Error(err, "Failed to create new Deployment",
            "Deployment.Namespace", dep.Namespace, "Deployment.Name", dep.Name)
            return ctrl.Result{}, err
        }
		...
	}
接着需要注意,deploymentForMemcached() 函数需要定义并返回应在集群上创建的 Deployment。该函数应构造具备必要规格的 Deployment 对象,如下例所示:
    dep := &appsv1.Deployment{
		Spec: appsv1.DeploymentSpec{
			Replicas: &replicas,
			Template: corev1.PodTemplateSpec{
				Spec: corev1.PodSpec{
					Containers: []corev1.Container{{
						Image:           "memcached:1.6.26-alpine3.19",
						Name:            "memcached",
						ImagePullPolicy: corev1.PullIfNotPresent,
						Ports: []corev1.ContainerPort{{
							ContainerPort: 11211,
							Name:          "memcached",
						}},
						Command: []string{"memcached", "--memory-limit=64", "-o", "modern", "-v"},
					}},
				},
			},
		},
	}
此外,我们需要实现一个机制,以校验集群中的 Memcached 副本数是否与 CR 中指定的期望值一致。如果不一致,调谐过程必须更新集群以确保一致性。这意味着:无论何时在集群上创建或更新 Memcached Kind 的 CR,控制器都会持续调谐,直到实际副本数与期望值一致。如下例所示:
	...
	size := memcached.Spec.Size
	if *found.Spec.Replicas != size {
		found.Spec.Replicas = &size
		if err = r.Update(ctx, found); err != nil {
			log.Error(err, "Failed to update Deployment",
				"Deployment.Namespace", found.Namespace, "Deployment.Name", found.Name)
            return ctrl.Result{}, err
        }
    ...
现在,你可以查看负责管理 Memcached Kind 自定义资源的完整控制器。该控制器确保集群中的期望状态得以维持,从而保证 Memcached 实例始终以用户指定的副本数运行。
internal/controller/memcached_controller.go: Our Controller Implementation
/*
Copyright 2025 The Kubernetes authors.

Licensed under the Apache License, Version 2.0 (the "License");
you may not use this file except in compliance with the License.
You may obtain a copy of the License at

    http://www.apache.org/licenses/LICENSE-2.0

Unless required by applicable law or agreed to in writing, software
distributed under the License is distributed on an "AS IS" BASIS,
WITHOUT WARRANTIES OR CONDITIONS OF ANY KIND, either express or implied.
See the License for the specific language governing permissions and
limitations under the License.
*/

package controller

import (
	"context"
	"fmt"
	"time"

	appsv1 "k8s.io/api/apps/v1"
	corev1 "k8s.io/api/core/v1"
	apierrors "k8s.io/apimachinery/pkg/api/errors"
	"k8s.io/apimachinery/pkg/api/meta"
	metav1 "k8s.io/apimachinery/pkg/apis/meta/v1"
	"k8s.io/apimachinery/pkg/types"
	"k8s.io/utils/ptr"

	"k8s.io/apimachinery/pkg/runtime"
	ctrl "sigs.k8s.io/controller-runtime"
	"sigs.k8s.io/controller-runtime/pkg/client"
	logf "sigs.k8s.io/controller-runtime/pkg/log"

	cachev1alpha1 "example.com/memcached/api/v1alpha1"
)

// Definitions to manage status conditions
const (
	// typeAvailableMemcached represents the status of the Deployment reconciliation
	typeAvailableMemcached = "Available"
)

// MemcachedReconciler reconciles a Memcached object
type MemcachedReconciler struct {
	client.Client
	Scheme *runtime.Scheme
}

// +kubebuilder:rbac:groups=cache.example.com,resources=memcacheds,verbs=get;list;watch;create;update;patch;delete
// +kubebuilder:rbac:groups=cache.example.com,resources=memcacheds/status,verbs=get;update;patch
// +kubebuilder:rbac:groups=cache.example.com,resources=memcacheds/finalizers,verbs=update
// +kubebuilder:rbac:groups=core,resources=events,verbs=create;patch
// +kubebuilder:rbac:groups=apps,resources=deployments,verbs=get;list;watch;create;update;patch;delete
// +kubebuilder:rbac:groups=core,resources=pods,verbs=get;list;watch

// Reconcile is part of the main kubernetes reconciliation loop which aims to
// move the current state of the cluster closer to the desired state.
// It is essential for the controller's reconciliation loop to be idempotent. By following the Operator
// pattern you will create Controllers which provide a reconcile function
// responsible for synchronizing resources until the desired state is reached on the cluster.
// Breaking this recommendation goes against the design principles of controller-runtime.
// and may lead to unforeseen consequences such as resources becoming stuck and requiring manual intervention.
// For further info:
// - About Operator Pattern: https://kubernetes.io/docs/concepts/extend-kubernetes/operator/
// - About Controllers: https://kubernetes.io/docs/concepts/architecture/controller/
//
// For more details, check Reconcile and its Result here:
// - https://pkg.go.dev/sigs.k8s.io/controller-runtime@v0.22.1/pkg/reconcile
func (r *MemcachedReconciler) Reconcile(ctx context.Context, req ctrl.Request) (ctrl.Result, error) {
	log := logf.FromContext(ctx)

	// Fetch the Memcached instance
	// The purpose is check if the Custom Resource for the Kind Memcached
	// is applied on the cluster if not we return nil to stop the reconciliation
	memcached := &cachev1alpha1.Memcached{}
	err := r.Get(ctx, req.NamespacedName, memcached)
	if err != nil {
		if apierrors.IsNotFound(err) {
			// If the custom resource is not found then it usually means that it was deleted or not created
			// In this way, we will stop the reconciliation
			log.Info("memcached resource not found. Ignoring since object must be deleted")
			return ctrl.Result{}, nil
		}
		// Error reading the object - requeue the request.
		log.Error(err, "Failed to get memcached")
		return ctrl.Result{}, err
	}

	// Let's just set the status as Unknown when no status is available
	if len(memcached.Status.Conditions) == 0 {
		meta.SetStatusCondition(&memcached.Status.Conditions, metav1.Condition{Type: typeAvailableMemcached, Status: metav1.ConditionUnknown, Reason: "Reconciling", Message: "Starting reconciliation"})
		if err = r.Status().Update(ctx, memcached); err != nil {
			log.Error(err, "Failed to update Memcached status")
			return ctrl.Result{}, err
		}

		// Let's re-fetch the memcached Custom Resource after updating the status
		// so that we have the latest state of the resource on the cluster and we will avoid
		// raising the error "the object has been modified, please apply
		// your changes to the latest version and try again" which would re-trigger the reconciliation
		// if we try to update it again in the following operations
		if err := r.Get(ctx, req.NamespacedName, memcached); err != nil {
			log.Error(err, "Failed to re-fetch memcached")
			return ctrl.Result{}, err
		}
	}

	// Check if the deployment already exists, if not create a new one
	found := &appsv1.Deployment{}
	err = r.Get(ctx, types.NamespacedName{Name: memcached.Name, Namespace: memcached.Namespace}, found)
	if err != nil && apierrors.IsNotFound(err) {
		// Define a new deployment
		dep, err := r.deploymentForMemcached(memcached)
		if err != nil {
			log.Error(err, "Failed to define new Deployment resource for Memcached")

			// The following implementation will update the status
			meta.SetStatusCondition(&memcached.Status.Conditions, metav1.Condition{Type: typeAvailableMemcached,
				Status: metav1.ConditionFalse, Reason: "Reconciling",
				Message: fmt.Sprintf("Failed to create Deployment for the custom resource (%s): (%s)", memcached.Name, err)})

			if err := r.Status().Update(ctx, memcached); err != nil {
				log.Error(err, "Failed to update Memcached status")
				return ctrl.Result{}, err
			}

			return ctrl.Result{}, err
		}

		log.Info("Creating a new Deployment",
			"Deployment.Namespace", dep.Namespace, "Deployment.Name", dep.Name)
		if err = r.Create(ctx, dep); err != nil {
			log.Error(err, "Failed to create new Deployment",
				"Deployment.Namespace", dep.Namespace, "Deployment.Name", dep.Name)
			return ctrl.Result{}, err
		}

		// Deployment created successfully
		// We will requeue the reconciliation so that we can ensure the state
		// and move forward for the next operations
		return ctrl.Result{RequeueAfter: time.Minute}, nil
	} else if err != nil {
		log.Error(err, "Failed to get Deployment")
		// Let's return the error for the reconciliation be re-trigged again
		return ctrl.Result{}, err
	}

	// If the size is not defined in the Custom Resource then we will set the desired replicas to 0
	var desiredReplicas int32 = 0
	if memcached.Spec.Size != nil {
		desiredReplicas = *memcached.Spec.Size
	}

	// The CRD API defines that the Memcached type have a MemcachedSpec.Size field
	// to set the quantity of Deployment instances to the desired state on the cluster.
	// Therefore, the following code will ensure the Deployment size is the same as defined
	// via the Size spec of the Custom Resource which we are reconciling.
	if found.Spec.Replicas == nil || *found.Spec.Replicas != desiredReplicas {
		found.Spec.Replicas = ptr.To(desiredReplicas)
		if err = r.Update(ctx, found); err != nil {
			log.Error(err, "Failed to update Deployment",
				"Deployment.Namespace", found.Namespace, "Deployment.Name", found.Name)

			// Re-fetch the memcached Custom Resource before updating the status
			// so that we have the latest state of the resource on the cluster and we will avoid
			// raising the error "the object has been modified, please apply
			// your changes to the latest version and try again" which would re-trigger the reconciliation
			if err := r.Get(ctx, req.NamespacedName, memcached); err != nil {
				log.Error(err, "Failed to re-fetch memcached")
				return ctrl.Result{}, err
			}

			// The following implementation will update the status
			meta.SetStatusCondition(&memcached.Status.Conditions, metav1.Condition{Type: typeAvailableMemcached,
				Status: metav1.ConditionFalse, Reason: "Resizing",
				Message: fmt.Sprintf("Failed to update the size for the custom resource (%s): (%s)", memcached.Name, err)})

			if err := r.Status().Update(ctx, memcached); err != nil {
				log.Error(err, "Failed to update Memcached status")
				return ctrl.Result{}, err
			}

			return ctrl.Result{}, err
		}

		// Now, that we update the size we want to requeue the reconciliation
		// so that we can ensure that we have the latest state of the resource before
		// update. Also, it will help ensure the desired state on the cluster
		return ctrl.Result{Requeue: true}, nil
	}

	// The following implementation will update the status
	meta.SetStatusCondition(&memcached.Status.Conditions, metav1.Condition{Type: typeAvailableMemcached,
		Status: metav1.ConditionTrue, Reason: "Reconciling",
		Message: fmt.Sprintf("Deployment for custom resource (%s) with %d replicas created successfully", memcached.Name, desiredReplicas)})

	if err := r.Status().Update(ctx, memcached); err != nil {
		log.Error(err, "Failed to update Memcached status")
		return ctrl.Result{}, err
	}

	return ctrl.Result{}, nil
}

// SetupWithManager sets up the controller with the Manager.
func (r *MemcachedReconciler) SetupWithManager(mgr ctrl.Manager) error {
	return ctrl.NewControllerManagedBy(mgr).
		For(&cachev1alpha1.Memcached{}).
		Owns(&appsv1.Deployment{}).
		Named("memcached").
		Complete(r)
}

// deploymentForMemcached returns a Memcached Deployment object
func (r *MemcachedReconciler) deploymentForMemcached(
	memcached *cachev1alpha1.Memcached) (*appsv1.Deployment, error) {
	image := "memcached:1.6.26-alpine3.19"

	dep := &appsv1.Deployment{
		ObjectMeta: metav1.ObjectMeta{
			Name:      memcached.Name,
			Namespace: memcached.Namespace,
		},
		Spec: appsv1.DeploymentSpec{
			Replicas: memcached.Spec.Size,
			Selector: &metav1.LabelSelector{
				MatchLabels: map[string]string{"app.kubernetes.io/name": "project"},
			},
			Template: corev1.PodTemplateSpec{
				ObjectMeta: metav1.ObjectMeta{
					Labels: map[string]string{"app.kubernetes.io/name": "project"},
				},
				Spec: corev1.PodSpec{
					SecurityContext: &corev1.PodSecurityContext{
						RunAsNonRoot: ptr.To(true),
						SeccompProfile: &corev1.SeccompProfile{
							Type: corev1.SeccompProfileTypeRuntimeDefault,
						},
					},
					Containers: []corev1.Container{{
						Image:           image,
						Name:            "memcached",
						ImagePullPolicy: corev1.PullIfNotPresent,
						// Ensure restrictive context for the container
						// More info: https://kubernetes.io/docs/concepts/security/pod-security-standards/#restricted
						SecurityContext: &corev1.SecurityContext{
							RunAsNonRoot:             ptr.To(true),
							RunAsUser:                ptr.To(int64(1001)),
							AllowPrivilegeEscalation: ptr.To(false),
							Capabilities: &corev1.Capabilities{
								Drop: []corev1.Capability{
									"ALL",
								},
							},
						},
						Ports: []corev1.ContainerPort{{
							ContainerPort: 11211,
							Name:          "memcached",
						}},
						Command: []string{"memcached", "--memory-limit=64", "-o", "modern", "-v"},
					}},
				},
			},
		},
	}

	// Set the ownerRef for the Deployment
	// More info: https://kubernetes.io/docs/concepts/overview/working-with-objects/owners-dependents/
	if err := ctrl.SetControllerReference(memcached, dep, r.Scheme); err != nil {
		return nil, err
	}
	return dep, nil
}
深入控制器实现
配置 Manager 监听资源
核心思想是监听对控制器重要的资源。当控制器关注的资源发生变化时,Watch 会触发控制器的调谐循环,以确保资源的实际状态与控制器逻辑定义的期望状态相匹配。
注意我们如何配置 Manager 来监控 Memcached Kind 的自定义资源(CR)的创建、更新或删除等事件,以及控制器所管理并拥有的 Deployment 的任何变化:
// SetupWithManager sets up the controller with the Manager.
// The Deployment is also watched to ensure its
// desired state in the cluster.
func (r *MemcachedReconciler) SetupWithManager(mgr ctrl.Manager) error {
    return ctrl.NewControllerManagedBy(mgr).
		// Watch the Memcached Custom Resource and trigger reconciliation whenever it
		//is created, updated, or deleted
		For(&cachev1alpha1.Memcached{}).
		// Watch the Deployment managed by the Memcached controller. If any changes occur to the Deployment
        // owned and managed by this controller, it will trigger reconciliation, ensuring that the cluster
        // state aligns with the desired state.
		Owns(&appsv1.Deployment{}).
		Complete(r)
    }
但是,Manager 如何知道哪些资源归它所有?
我们并不希望控制器去监听集群中的所有 Deployment 并触发调谐循环;我们只希望在运行 Memcached 实例的那个特定 Deployment 发生变化时才触发。例如,如果有人误删了我们的 Deployment 或修改了其副本数,我们希望触发调谐以使其回到期望状态。
Manager 之所以知道应该观察哪个 Deployment,是因为我们设置了 ownerRef(Owner Reference):
if err := ctrl.SetControllerReference(memcached, dep, r.Scheme); err != nil {
    return nil, err
}
授予权限
确保控制器拥有管理其资源所需的权限(例如创建、获取、更新、列出)非常重要。
RBAC 权限 现在通过 RBAC 标记 配置,这些标记用于生成并更新 config/rbac/ 中的清单文件。它们可以(且应当)定义在每个控制器的 Reconcile() 方法上,如下示例所示:
// +kubebuilder:rbac:groups=cache.example.com,resources=memcacheds,verbs=get;list;watch;create;update;patch;delete
// +kubebuilder:rbac:groups=cache.example.com,resources=memcacheds/status,verbs=get;update;patch
// +kubebuilder:rbac:groups=cache.example.com,resources=memcacheds/finalizers,verbs=update
// +kubebuilder:rbac:groups=core,resources=events,verbs=create;patch
// +kubebuilder:rbac:groups=apps,resources=deployments,verbs=get;list;watch;create;update;patch;delete
// +kubebuilder:rbac:groups=core,resources=pods,verbs=get;list;watch
修改控制器后,运行 make manifests 命令。这将促使 controller-gen 刷新 config/rbac 下的文件。
config/rbac/role.yaml: Our RBAC Role generated
---
apiVersion: rbac.authorization.k8s.io/v1
kind: ClusterRole
metadata:
  name: manager-role
rules:
- apiGroups:
  - ""
  resources:
  - events
  verbs:
  - create
  - patch
- apiGroups:
  - ""
  resources:
  - pods
  verbs:
  - get
  - list
  - watch
- apiGroups:
  - apps
  resources:
  - deployments
  verbs:
  - create
  - delete
  - get
  - list
  - patch
  - update
  - watch
- apiGroups:
  - cache.example.com
  resources:
  - memcacheds
  verbs:
  - create
  - delete
  - get
  - list
  - patch
  - update
  - watch
- apiGroups:
  - cache.example.com
  resources:
  - memcacheds/finalizers
  verbs:
  - update
- apiGroups:
  - cache.example.com
  resources:
  - memcacheds/status
  verbs:
  - get
  - patch
  - update
Manager(main.go)
cmd/main.go 中的 Manager 负责管理应用中的各个控制器。
cmd/main.go: Our main.go
/*
Copyright 2025 The Kubernetes authors.

Licensed under the Apache License, Version 2.0 (the "License");
you may not use this file except in compliance with the License.
You may obtain a copy of the License at

    http://www.apache.org/licenses/LICENSE-2.0

Unless required by applicable law or agreed to in writing, software
distributed under the License is distributed on an "AS IS" BASIS,
WITHOUT WARRANTIES OR CONDITIONS OF ANY KIND, either express or implied.
See the License for the specific language governing permissions and
limitations under the License.
*/

package main

import (
	"crypto/tls"
	"flag"
	"os"

	// Import all Kubernetes client auth plugins (e.g. Azure, GCP, OIDC, etc.)
	// to ensure that exec-entrypoint and run can make use of them.
	_ "k8s.io/client-go/plugin/pkg/client/auth"

	"k8s.io/apimachinery/pkg/runtime"
	utilruntime "k8s.io/apimachinery/pkg/util/runtime"
	clientgoscheme "k8s.io/client-go/kubernetes/scheme"
	ctrl "sigs.k8s.io/controller-runtime"
	"sigs.k8s.io/controller-runtime/pkg/healthz"
	"sigs.k8s.io/controller-runtime/pkg/log/zap"
	"sigs.k8s.io/controller-runtime/pkg/metrics/filters"
	metricsserver "sigs.k8s.io/controller-runtime/pkg/metrics/server"
	"sigs.k8s.io/controller-runtime/pkg/webhook"

	cachev1alpha1 "example.com/memcached/api/v1alpha1"
	"example.com/memcached/internal/controller"
	// +kubebuilder:scaffold:imports
)

var (
	scheme   = runtime.NewScheme()
	setupLog = ctrl.Log.WithName("setup")
)

func init() {
	utilruntime.Must(clientgoscheme.AddToScheme(scheme))

	utilruntime.Must(cachev1alpha1.AddToScheme(scheme))
	// +kubebuilder:scaffold:scheme
}

// nolint:gocyclo
func main() {
	var metricsAddr string
	var metricsCertPath, metricsCertName, metricsCertKey string
	var webhookCertPath, webhookCertName, webhookCertKey string
	var enableLeaderElection bool
	var probeAddr string
	var secureMetrics bool
	var enableHTTP2 bool
	var tlsOpts []func(*tls.Config)
	flag.StringVar(&metricsAddr, "metrics-bind-address", "0", "The address the metrics endpoint binds to. "+
		"Use :8443 for HTTPS or :8080 for HTTP, or leave as 0 to disable the metrics service.")
	flag.StringVar(&probeAddr, "health-probe-bind-address", ":8081", "The address the probe endpoint binds to.")
	flag.BoolVar(&enableLeaderElection, "leader-elect", false,
		"Enable leader election for controller manager. "+
			"Enabling this will ensure there is only one active controller manager.")
	flag.BoolVar(&secureMetrics, "metrics-secure", true,
		"If set, the metrics endpoint is served securely via HTTPS. Use --metrics-secure=false to use HTTP instead.")
	flag.StringVar(&webhookCertPath, "webhook-cert-path", "", "The directory that contains the webhook certificate.")
	flag.StringVar(&webhookCertName, "webhook-cert-name", "tls.crt", "The name of the webhook certificate file.")
	flag.StringVar(&webhookCertKey, "webhook-cert-key", "tls.key", "The name of the webhook key file.")
	flag.StringVar(&metricsCertPath, "metrics-cert-path", "",
		"The directory that contains the metrics server certificate.")
	flag.StringVar(&metricsCertName, "metrics-cert-name", "tls.crt", "The name of the metrics server certificate file.")
	flag.StringVar(&metricsCertKey, "metrics-cert-key", "tls.key", "The name of the metrics server key file.")
	flag.BoolVar(&enableHTTP2, "enable-http2", false,
		"If set, HTTP/2 will be enabled for the metrics and webhook servers")
	opts := zap.Options{
		Development: true,
	}
	opts.BindFlags(flag.CommandLine)
	flag.Parse()

	ctrl.SetLogger(zap.New(zap.UseFlagOptions(&opts)))

	// if the enable-http2 flag is false (the default), http/2 should be disabled
	// due to its vulnerabilities. More specifically, disabling http/2 will
	// prevent from being vulnerable to the HTTP/2 Stream Cancellation and
	// Rapid Reset CVEs. For more information see:
	// - https://github.com/advisories/GHSA-qppj-fm5r-hxr3
	// - https://github.com/advisories/GHSA-4374-p667-p6c8
	disableHTTP2 := func(c *tls.Config) {
		setupLog.Info("disabling http/2")
		c.NextProtos = []string{"http/1.1"}
	}

	if !enableHTTP2 {
		tlsOpts = append(tlsOpts, disableHTTP2)
	}

	// Initial webhook TLS options
	webhookTLSOpts := tlsOpts
	webhookServerOptions := webhook.Options{
		TLSOpts: webhookTLSOpts,
	}

	if len(webhookCertPath) > 0 {
		setupLog.Info("Initializing webhook certificate watcher using provided certificates",
			"webhook-cert-path", webhookCertPath, "webhook-cert-name", webhookCertName, "webhook-cert-key", webhookCertKey)

		webhookServerOptions.CertDir = webhookCertPath
		webhookServerOptions.CertName = webhookCertName
		webhookServerOptions.KeyName = webhookCertKey
	}

	webhookServer := webhook.NewServer(webhookServerOptions)

	// Metrics endpoint is enabled in 'config/default/kustomization.yaml'. The Metrics options configure the server.
	// More info:
	// - https://pkg.go.dev/sigs.k8s.io/controller-runtime@v0.22.1/pkg/metrics/server
	// - https://book.kubebuilder.io/reference/metrics.html
	metricsServerOptions := metricsserver.Options{
		BindAddress:   metricsAddr,
		SecureServing: secureMetrics,
		TLSOpts:       tlsOpts,
	}

	if secureMetrics {
		// FilterProvider is used to protect the metrics endpoint with authn/authz.
		// These configurations ensure that only authorized users and service accounts
		// can access the metrics endpoint. The RBAC are configured in 'config/rbac/kustomization.yaml'. More info:
		// https://pkg.go.dev/sigs.k8s.io/controller-runtime@v0.22.1/pkg/metrics/filters#WithAuthenticationAndAuthorization
		metricsServerOptions.FilterProvider = filters.WithAuthenticationAndAuthorization
	}

	// If the certificate is not specified, controller-runtime will automatically
	// generate self-signed certificates for the metrics server. While convenient for development and testing,
	// this setup is not recommended for production.
	//
	// TODO(user): If you enable certManager, uncomment the following lines:
	// - [METRICS-WITH-CERTS] at config/default/kustomization.yaml to generate and use certificates
	// managed by cert-manager for the metrics server.
	// - [PROMETHEUS-WITH-CERTS] at config/prometheus/kustomization.yaml for TLS certification.
	if len(metricsCertPath) > 0 {
		setupLog.Info("Initializing metrics certificate watcher using provided certificates",
			"metrics-cert-path", metricsCertPath, "metrics-cert-name", metricsCertName, "metrics-cert-key", metricsCertKey)

		metricsServerOptions.CertDir = metricsCertPath
		metricsServerOptions.CertName = metricsCertName
		metricsServerOptions.KeyName = metricsCertKey
	}

	mgr, err := ctrl.NewManager(ctrl.GetConfigOrDie(), ctrl.Options{
		Scheme:                 scheme,
		Metrics:                metricsServerOptions,
		WebhookServer:          webhookServer,
		HealthProbeBindAddress: probeAddr,
		LeaderElection:         enableLeaderElection,
		LeaderElectionID:       "4b13cc52.example.com",
		// LeaderElectionReleaseOnCancel defines if the leader should step down voluntarily
		// when the Manager ends. This requires the binary to immediately end when the
		// Manager is stopped, otherwise, this setting is unsafe. Setting this significantly
		// speeds up voluntary leader transitions as the new leader don't have to wait
		// LeaseDuration time first.
		//
		// In the default scaffold provided, the program ends immediately after
		// the manager stops, so would be fine to enable this option. However,
		// if you are doing or is intended to do any operation such as perform cleanups
		// after the manager stops then its usage might be unsafe.
		// LeaderElectionReleaseOnCancel: true,
	})
	if err != nil {
		setupLog.Error(err, "unable to start manager")
		os.Exit(1)
	}

	if err := (&controller.MemcachedReconciler{
		Client: mgr.GetClient(),
		Scheme: mgr.GetScheme(),
	}).SetupWithManager(mgr); err != nil {
		setupLog.Error(err, "unable to create controller", "controller", "Memcached")
		os.Exit(1)
	}
	// +kubebuilder:scaffold:builder

	if err := mgr.AddHealthzCheck("healthz", healthz.Ping); err != nil {
		setupLog.Error(err, "unable to set up health check")
		os.Exit(1)
	}
	if err := mgr.AddReadyzCheck("readyz", healthz.Ping); err != nil {
		setupLog.Error(err, "unable to set up ready check")
		os.Exit(1)
	}

	setupLog.Info("starting manager")
	if err := mgr.Start(ctrl.SetupSignalHandler()); err != nil {
		setupLog.Error(err, "problem running manager")
		os.Exit(1)
	}
}
使用 Kubebuilder 插件生成额外选项
现在你已经更好地理解了如何创建自己的 API 与控制器,让我们在该项目中引入 autoupdate.kubebuilder.io/v1-alpha 插件,以便你的项目能跟随最新的 Kubebuilder 版本脚手架变化保持更新,并由此采纳生态中的改进。
kubebuilder edit --plugins="autoupdate/v1-alpha"
查看 .github/workflows/auto-update.yml 文件了解其工作方式。
在集群中验证项目
此时你可以参考快速开始中定义的步骤在集群中验证该项目,见:Run It On the Cluster
下一步
- 若想更深入地开发你的方案,考虑阅读 CronJob 教程
- 有关优化方法的思路,请参考最佳实践
版本兼容性与可支持性
Kubebuilder 创建的项目包含一个 Makefile,用于安装在项目创建时定义版本的工具。主要包含以下工具:
此外,这些项目还包含一个 go.mod 文件用于指定依赖版本。Kubebuilder 依赖于 controller-runtime 以及它的 Go 与 Kubernetes 依赖。因此,Makefile 与 go.mod 中定义的版本是已测试、受支持且被推荐的版本。
Kubebuilder 的每个次版本都会与特定的 client-go 次版本进行测试。尽管某个 Kubebuilder 次版本可能与其他 client-go 次版本或其他工具兼容,但这种兼容性并不保证、也不受支持或测试覆盖。
Kubebuilder 所需的最低 Go 版本由其依赖项中所需的最高最低 Go 版本决定。这通常与相应的 k8s.io/* 依赖所要求的最低 Go 版本保持一致。
兼容的 k8s.io/* 版本、client-go 版本和最低 Go 版本可在每个 标签版本 的项目脚手架 go.mod 文件中找到。
示例:对于 4.1.1 版本,最低 Go 版本兼容性为 1.22。你可以参考该标签版本 v4.1.1 的 testdata 目录中的示例,例如 project-v4 的 go.mod 文件。你也可以通过查看 Makefile 来检查该版本所支持并经过测试的工具版本。
支持的操作系统
当前,Kubebuilder 官方支持 macOS 与 Linux 平台。如果你使用的是 Windows 系统,可能会遇到问题。欢迎提交贡献以支持 Windows。
教程:构建 CronJob
太多教程一上来就是生硬的场景或玩具应用,只能讲清基础,然后在复杂内容面前戛然而止。本教程不同:我们会用 Kubebuilder 贯穿(几乎)全谱系的复杂度,从简单开始,逐步构建到一个功能相当完备的示例。
让我们假设(是的,这有点点“设定”)我们已经厌倦了 Kubernetes 中非 Kubebuilder 实现的 CronJob 控制器的维护负担,想用 Kubebuilder 重新实现它。
CronJob 控制器(双关非本意)的工作是在 Kubernetes 集群上以固定间隔运行一次性任务。它是构建在 Job 控制器之上的,而 Job 控制器的任务是将一次性任务运行一次并确保完成。
我们不会顺带重写 Job 控制器,而是把这当作一个学习机会,看看如何与外部类型进行交互。
为项目搭建脚手架
如在快速开始中所述,我们需要为新项目搭建脚手架。请先确认你已经安装了 Kubebuilder,然后为新项目创建脚手架:
# 创建项目目录,然后执行 init 命令
mkdir project
cd project
# 我们使用 tutorial.kubebuilder.io 作为域名,
# 因此所有 API 组都将是 <group>.tutorial.kubebuilder.io。
kubebuilder init --domain tutorial.kubebuilder.io --repo tutorial.kubebuilder.io/project
现在我们已经就位,让我们看看 Kubebuilder 到目前为止为我们搭了些什么……
基础项目包含什么?
当为一个新项目搭建脚手架时,Kubebuilder 会为我们提供一些基础样板代码。
构建基础设施
首先,是用于构建项目的基础设施:
go.mod:与项目匹配的新 Go 模块,包含基础依赖
module tutorial.kubebuilder.io/project

go 1.24.5

require (
	github.com/onsi/ginkgo/v2 v2.22.0
	github.com/onsi/gomega v1.36.1
	github.com/robfig/cron v1.2.0
	k8s.io/api v0.34.0
	k8s.io/apimachinery v0.34.0
	k8s.io/client-go v0.34.0
	k8s.io/utils v0.0.0-20250604170112-4c0f3b243397
	sigs.k8s.io/controller-runtime v0.22.1
)

require (
	cel.dev/expr v0.24.0 // indirect
	github.com/antlr4-go/antlr/v4 v4.13.0 // indirect
	github.com/beorn7/perks v1.0.1 // indirect
	github.com/blang/semver/v4 v4.0.0 // indirect
	github.com/cenkalti/backoff/v4 v4.3.0 // indirect
	github.com/cespare/xxhash/v2 v2.3.0 // indirect
	github.com/davecgh/go-spew v1.1.1 // indirect
	github.com/emicklei/go-restful/v3 v3.12.2 // indirect
	github.com/evanphx/json-patch/v5 v5.9.11 // indirect
	github.com/felixge/httpsnoop v1.0.4 // indirect
	github.com/fsnotify/fsnotify v1.9.0 // indirect
	github.com/fxamacker/cbor/v2 v2.9.0 // indirect
	github.com/go-logr/logr v1.4.2 // indirect
	github.com/go-logr/stdr v1.2.2 // indirect
	github.com/go-logr/zapr v1.3.0 // indirect
	github.com/go-openapi/jsonpointer v0.21.0 // indirect
	github.com/go-openapi/jsonreference v0.20.2 // indirect
	github.com/go-openapi/swag v0.23.0 // indirect
	github.com/go-task/slim-sprig/v3 v3.0.0 // indirect
	github.com/gogo/protobuf v1.3.2 // indirect
	github.com/google/btree v1.1.3 // indirect
	github.com/google/cel-go v0.26.0 // indirect
	github.com/google/gnostic-models v0.7.0 // indirect
	github.com/google/go-cmp v0.7.0 // indirect
	github.com/google/pprof v0.0.0-20241029153458-d1b30febd7db // indirect
	github.com/google/uuid v1.6.0 // indirect
	github.com/grpc-ecosystem/grpc-gateway/v2 v2.26.3 // indirect
	github.com/inconshreveable/mousetrap v1.1.0 // indirect
	github.com/josharian/intern v1.0.0 // indirect
	github.com/json-iterator/go v1.1.12 // indirect
	github.com/mailru/easyjson v0.7.7 // indirect
	github.com/modern-go/concurrent v0.0.0-20180306012644-bacd9c7ef1dd // indirect
	github.com/modern-go/reflect2 v1.0.3-0.20250322232337-35a7c28c31ee // indirect
	github.com/munnerz/goautoneg v0.0.0-20191010083416-a7dc8b61c822 // indirect
	github.com/pkg/errors v0.9.1 // indirect
	github.com/pmezard/go-difflib v1.0.0 // indirect
	github.com/prometheus/client_golang v1.22.0 // indirect
	github.com/prometheus/client_model v0.6.1 // indirect
	github.com/prometheus/common v0.62.0 // indirect
	github.com/prometheus/procfs v0.15.1 // indirect
	github.com/spf13/cobra v1.9.1 // indirect
	github.com/spf13/pflag v1.0.6 // indirect
	github.com/stoewer/go-strcase v1.3.0 // indirect
	github.com/x448/float16 v0.8.4 // indirect
	go.opentelemetry.io/auto/sdk v1.1.0 // indirect
	go.opentelemetry.io/contrib/instrumentation/net/http/otelhttp v0.58.0 // indirect
	go.opentelemetry.io/otel v1.35.0 // indirect
	go.opentelemetry.io/otel/exporters/otlp/otlptrace v1.34.0 // indirect
	go.opentelemetry.io/otel/exporters/otlp/otlptrace/otlptracegrpc v1.34.0 // indirect
	go.opentelemetry.io/otel/metric v1.35.0 // indirect
	go.opentelemetry.io/otel/sdk v1.34.0 // indirect
	go.opentelemetry.io/otel/trace v1.35.0 // indirect
	go.opentelemetry.io/proto/otlp v1.5.0 // indirect
	go.uber.org/multierr v1.11.0 // indirect
	go.uber.org/zap v1.27.0 // indirect
	go.yaml.in/yaml/v2 v2.4.2 // indirect
	go.yaml.in/yaml/v3 v3.0.4 // indirect
	golang.org/x/exp v0.0.0-20240719175910-8a7402abbf56 // indirect
	golang.org/x/net v0.38.0 // indirect
	golang.org/x/oauth2 v0.27.0 // indirect
	golang.org/x/sync v0.12.0 // indirect
	golang.org/x/sys v0.31.0 // indirect
	golang.org/x/term v0.30.0 // indirect
	golang.org/x/text v0.23.0 // indirect
	golang.org/x/time v0.9.0 // indirect
	golang.org/x/tools v0.26.0 // indirect
	gomodules.xyz/jsonpatch/v2 v2.4.0 // indirect
	google.golang.org/genproto/googleapis/api v0.0.0-20250303144028-a0af3efb3deb // indirect
	google.golang.org/genproto/googleapis/rpc v0.0.0-20250303144028-a0af3efb3deb // indirect
	google.golang.org/grpc v1.72.1 // indirect
	google.golang.org/protobuf v1.36.5 // indirect
	gopkg.in/evanphx/json-patch.v4 v4.12.0 // indirect
	gopkg.in/inf.v0 v0.9.1 // indirect
	gopkg.in/yaml.v3 v3.0.1 // indirect
	k8s.io/apiextensions-apiserver v0.34.0 // indirect
	k8s.io/apiserver v0.34.0 // indirect
	k8s.io/component-base v0.34.0 // indirect
	k8s.io/klog/v2 v2.130.1 // indirect
	k8s.io/kube-openapi v0.0.0-20250710124328-f3f2b991d03b // indirect
	sigs.k8s.io/apiserver-network-proxy/konnectivity-client v0.31.2 // indirect
	sigs.k8s.io/json v0.0.0-20241014173422-cfa47c3a1cc8 // indirect
	sigs.k8s.io/randfill v1.0.0 // indirect
	sigs.k8s.io/structured-merge-diff/v6 v6.3.0 // indirect
	sigs.k8s.io/yaml v1.6.0 // indirect
)
Makefile:用于构建与部署控制器的 Make 目标
# Image URL to use all building/pushing image targets
IMG ?= controller:latest

# Get the currently used golang install path (in GOPATH/bin, unless GOBIN is set)
ifeq (,$(shell go env GOBIN))
GOBIN=$(shell go env GOPATH)/bin
else
GOBIN=$(shell go env GOBIN)
endif

# CONTAINER_TOOL defines the container tool to be used for building images.
# Be aware that the target commands are only tested with Docker which is
# scaffolded by default. However, you might want to replace it to use other
# tools. (i.e. podman)
CONTAINER_TOOL ?= docker

# Setting SHELL to bash allows bash commands to be executed by recipes.
# Options are set to exit when a recipe line exits non-zero or a piped command fails.
SHELL = /usr/bin/env bash -o pipefail
.SHELLFLAGS = -ec

.PHONY: all
all: build

##@ General

# The help target prints out all targets with their descriptions organized
# beneath their categories. The categories are represented by '##@' and the
# target descriptions by '##'. The awk command is responsible for reading the
# entire set of makefiles included in this invocation, looking for lines of the
# file as xyz: ## something, and then pretty-format the target and help. Then,
# if there's a line with ##@ something, that gets pretty-printed as a category.
# More info on the usage of ANSI control characters for terminal formatting:
# https://en.wikipedia.org/wiki/ANSI_escape_code#SGR_parameters
# More info on the awk command:
# http://linuxcommand.org/lc3_adv_awk.php

.PHONY: help
help: ## Display this help.
	@awk 'BEGIN {FS = ":.*##"; printf "\nUsage:\n  make \033[36m<target>\033[0m\n"} /^[a-zA-Z_0-9-]+:.*?##/ { printf "  \033[36m%-15s\033[0m %s\n", $$1, $$2 } /^##@/ { printf "\n\033[1m%s\033[0m\n", substr($$0, 5) } ' $(MAKEFILE_LIST)

##@ Development

.PHONY: manifests
manifests: controller-gen ## Generate WebhookConfiguration, ClusterRole and CustomResourceDefinition objects.
	# Note that the option maxDescLen=0 was added in the default scaffold in order to sort out the issue
	# Too long: must have at most 262144 bytes. By using kubectl apply to create / update resources an annotation
	# is created by K8s API to store the latest version of the resource ( kubectl.kubernetes.io/last-applied-configuration).
	# However, it has a size limit and if the CRD is too big with so many long descriptions as this one it will cause the failure.
	$(CONTROLLER_GEN) rbac:roleName=manager-role crd:maxDescLen=0 webhook paths="./..." output:crd:artifacts:config=config/crd/bases

.PHONY: generate
generate: controller-gen ## Generate code containing DeepCopy, DeepCopyInto, and DeepCopyObject method implementations.
	$(CONTROLLER_GEN) object:headerFile="hack/boilerplate.go.txt" paths="./..."

.PHONY: fmt
fmt: ## Run go fmt against code.
	go fmt ./...

.PHONY: vet
vet: ## Run go vet against code.
	go vet ./...

.PHONY: test
test: manifests generate fmt vet setup-envtest ## Run tests.
	KUBEBUILDER_ASSETS="$(shell $(ENVTEST) use $(ENVTEST_K8S_VERSION) --bin-dir $(LOCALBIN) -p path)" go test $$(go list ./... | grep -v /e2e) -coverprofile cover.out

# TODO(user): To use a different vendor for e2e tests, modify the setup under 'tests/e2e'.
# The default setup assumes Kind is pre-installed and builds/loads the Manager Docker image locally.
# CertManager is installed by default; skip with:
# - CERT_MANAGER_INSTALL_SKIP=true
KIND_CLUSTER ?= project-test-e2e

.PHONY: setup-test-e2e
setup-test-e2e: ## Set up a Kind cluster for e2e tests if it does not exist
	@command -v $(KIND) >/dev/null 2>&1 || { \
		echo "Kind is not installed. Please install Kind manually."; \
		exit 1; \
	}
	@case "$$($(KIND) get clusters)" in \
		*"$(KIND_CLUSTER)"*) \
			echo "Kind cluster '$(KIND_CLUSTER)' already exists. Skipping creation." ;; \
		*) \
			echo "Creating Kind cluster '$(KIND_CLUSTER)'..."; \
			$(KIND) create cluster --name $(KIND_CLUSTER) ;; \
	esac

.PHONY: test-e2e
test-e2e: setup-test-e2e manifests generate fmt vet ## Run the e2e tests. Expected an isolated environment using Kind.
	KIND=$(KIND) KIND_CLUSTER=$(KIND_CLUSTER) go test -tags=e2e ./test/e2e/ -v -ginkgo.v
	$(MAKE) cleanup-test-e2e

.PHONY: cleanup-test-e2e
cleanup-test-e2e: ## Tear down the Kind cluster used for e2e tests
	@$(KIND) delete cluster --name $(KIND_CLUSTER)

.PHONY: lint
lint: golangci-lint ## Run golangci-lint linter
	$(GOLANGCI_LINT) run

.PHONY: lint-fix
lint-fix: golangci-lint ## Run golangci-lint linter and perform fixes
	$(GOLANGCI_LINT) run --fix

.PHONY: lint-config
lint-config: golangci-lint ## Verify golangci-lint linter configuration
	$(GOLANGCI_LINT) config verify

##@ Build

.PHONY: build
build: manifests generate fmt vet ## Build manager binary.
	go build -o bin/manager cmd/main.go

.PHONY: run
run: manifests generate fmt vet ## Run a controller from your host.
	go run ./cmd/main.go

# If you wish to build the manager image targeting other platforms you can use the --platform flag.
# (i.e. docker build --platform linux/arm64). However, you must enable docker buildKit for it.
# More info: https://docs.docker.com/develop/develop-images/build_enhancements/
.PHONY: docker-build
docker-build: ## Build docker image with the manager.
	$(CONTAINER_TOOL) build -t ${IMG} .

.PHONY: docker-push
docker-push: ## Push docker image with the manager.
	$(CONTAINER_TOOL) push ${IMG}

# PLATFORMS defines the target platforms for the manager image be built to provide support to multiple
# architectures. (i.e. make docker-buildx IMG=myregistry/mypoperator:0.0.1). To use this option you need to:
# - be able to use docker buildx. More info: https://docs.docker.com/build/buildx/
# - have enabled BuildKit. More info: https://docs.docker.com/develop/develop-images/build_enhancements/
# - be able to push the image to your registry (i.e. if you do not set a valid value via IMG=<myregistry/image:<tag>> then the export will fail)
# To adequately provide solutions that are compatible with multiple platforms, you should consider using this option.
PLATFORMS ?= linux/arm64,linux/amd64,linux/s390x,linux/ppc64le
.PHONY: docker-buildx
docker-buildx: ## Build and push docker image for the manager for cross-platform support
	# copy existing Dockerfile and insert --platform=${BUILDPLATFORM} into Dockerfile.cross, and preserve the original Dockerfile
	sed -e '1 s/\(^FROM\)/FROM --platform=\$$\{BUILDPLATFORM\}/; t' -e ' 1,// s//FROM --platform=\$$\{BUILDPLATFORM\}/' Dockerfile > Dockerfile.cross
	- $(CONTAINER_TOOL) buildx create --name project-builder
	$(CONTAINER_TOOL) buildx use project-builder
	- $(CONTAINER_TOOL) buildx build --push --platform=$(PLATFORMS) --tag ${IMG} -f Dockerfile.cross .
	- $(CONTAINER_TOOL) buildx rm project-builder
	rm Dockerfile.cross

.PHONY: build-installer
build-installer: manifests generate kustomize ## Generate a consolidated YAML with CRDs and deployment.
	mkdir -p dist
	cd config/manager && $(KUSTOMIZE) edit set image controller=${IMG}
	$(KUSTOMIZE) build config/default > dist/install.yaml

##@ Deployment

ifndef ignore-not-found
  ignore-not-found = false
endif

.PHONY: install
install: manifests kustomize ## Install CRDs into the K8s cluster specified in ~/.kube/config.
	@out="$$( $(KUSTOMIZE) build config/crd 2>/dev/null || true )"; \
	if [ -n "$$out" ]; then echo "$$out" | $(KUBECTL) apply -f -; else echo "No CRDs to install; skipping."; fi

.PHONY: uninstall
uninstall: manifests kustomize ## Uninstall CRDs from the K8s cluster specified in ~/.kube/config. Call with ignore-not-found=true to ignore resource not found errors during deletion.
	@out="$$( $(KUSTOMIZE) build config/crd 2>/dev/null || true )"; \
	if [ -n "$$out" ]; then echo "$$out" | $(KUBECTL) delete --ignore-not-found=$(ignore-not-found) -f -; else echo "No CRDs to delete; skipping."; fi

.PHONY: deploy
deploy: manifests kustomize ## Deploy controller to the K8s cluster specified in ~/.kube/config.
	cd config/manager && $(KUSTOMIZE) edit set image controller=${IMG}
	$(KUSTOMIZE) build config/default | $(KUBECTL) apply -f -

.PHONY: undeploy
undeploy: kustomize ## Undeploy controller from the K8s cluster specified in ~/.kube/config. Call with ignore-not-found=true to ignore resource not found errors during deletion.
	$(KUSTOMIZE) build config/default | $(KUBECTL) delete --ignore-not-found=$(ignore-not-found) -f -

##@ Dependencies

## Location to install dependencies to
LOCALBIN ?= $(shell pwd)/bin
$(LOCALBIN):
	mkdir -p $(LOCALBIN)

## Tool Binaries
KUBECTL ?= kubectl
KIND ?= kind
KUSTOMIZE ?= $(LOCALBIN)/kustomize
CONTROLLER_GEN ?= $(LOCALBIN)/controller-gen
ENVTEST ?= $(LOCALBIN)/setup-envtest
GOLANGCI_LINT = $(LOCALBIN)/golangci-lint

## Tool Versions
KUSTOMIZE_VERSION ?= v5.7.1
CONTROLLER_TOOLS_VERSION ?= v0.19.0
#ENVTEST_VERSION is the version of controller-runtime release branch to fetch the envtest setup script (i.e. release-0.20)
ENVTEST_VERSION ?= $(shell go list -m -f "{{ .Version }}" sigs.k8s.io/controller-runtime | awk -F'[v.]' '{printf "release-%d.%d", $$2, $$3}')
#ENVTEST_K8S_VERSION is the version of Kubernetes to use for setting up ENVTEST binaries (i.e. 1.31)
ENVTEST_K8S_VERSION ?= $(shell go list -m -f "{{ .Version }}" k8s.io/api | awk -F'[v.]' '{printf "1.%d", $$3}')
GOLANGCI_LINT_VERSION ?= v2.4.0

.PHONY: kustomize
kustomize: $(KUSTOMIZE) ## Download kustomize locally if necessary.
$(KUSTOMIZE): $(LOCALBIN)
	$(call go-install-tool,$(KUSTOMIZE),sigs.k8s.io/kustomize/kustomize/v5,$(KUSTOMIZE_VERSION))

.PHONY: controller-gen
controller-gen: $(CONTROLLER_GEN) ## Download controller-gen locally if necessary.
$(CONTROLLER_GEN): $(LOCALBIN)
	$(call go-install-tool,$(CONTROLLER_GEN),sigs.k8s.io/controller-tools/cmd/controller-gen,$(CONTROLLER_TOOLS_VERSION))

.PHONY: setup-envtest
setup-envtest: envtest ## Download the binaries required for ENVTEST in the local bin directory.
	@echo "Setting up envtest binaries for Kubernetes version $(ENVTEST_K8S_VERSION)..."
	@$(ENVTEST) use $(ENVTEST_K8S_VERSION) --bin-dir $(LOCALBIN) -p path || { \
		echo "Error: Failed to set up envtest binaries for version $(ENVTEST_K8S_VERSION)."; \
		exit 1; \
	}

.PHONY: envtest
envtest: $(ENVTEST) ## Download setup-envtest locally if necessary.
$(ENVTEST): $(LOCALBIN)
	$(call go-install-tool,$(ENVTEST),sigs.k8s.io/controller-runtime/tools/setup-envtest,$(ENVTEST_VERSION))

.PHONY: golangci-lint
golangci-lint: $(GOLANGCI_LINT) ## Download golangci-lint locally if necessary.
$(GOLANGCI_LINT): $(LOCALBIN)
	$(call go-install-tool,$(GOLANGCI_LINT),github.com/golangci/golangci-lint/v2/cmd/golangci-lint,$(GOLANGCI_LINT_VERSION))

# go-install-tool will 'go install' any package with custom target and name of binary, if it doesn't exist
# $1 - target path with name of binary
# $2 - package url which can be installed
# $3 - specific version of package
define go-install-tool
@[ -f "$(1)-$(3)" ] && [ "$$(readlink -- "$(1)" 2>/dev/null)" = "$(1)-$(3)" ] || { \
set -e; \
package=$(2)@$(3) ;\
echo "Downloading $${package}" ;\
rm -f $(1) ;\
GOBIN=$(LOCALBIN) go install $${package} ;\
mv $(1) $(1)-$(3) ;\
} ;\
ln -sf $$(realpath $(1)-$(3)) $(1)
endef
PROJECT:用于搭建新组件的 Kubebuilder 元数据
# Code generated by tool. DO NOT EDIT.
# This file is used to track the info used to scaffold your project
# and allow the plugins properly work.
# More info: https://book.kubebuilder.io/reference/project-config.html
cliVersion: (devel)
domain: tutorial.kubebuilder.io
layout:
- go.kubebuilder.io/v4
plugins:
  helm.kubebuilder.io/v1-alpha: {}
projectName: project
repo: tutorial.kubebuilder.io/project
resources:
- api:
    crdVersion: v1
    namespaced: true
  controller: true
  domain: tutorial.kubebuilder.io
  group: batch
  kind: CronJob
  path: tutorial.kubebuilder.io/project/api/v1
  version: v1
  webhooks:
    defaulting: true
    validation: true
    webhookVersion: v1
version: "3"
启动配置
我们还会在 config/ 目录下获得启动配置。当前它只包含将控制器在集群中启动所需的 Kustomize YAML 定义,但一旦开始编写控制器,它还会包含我们的 CustomResourceDefinition、RBAC 配置以及 WebhookConfiguration。
config/default 中包含一个用于以标准配置启动控制器的 Kustomize base。
其它每个目录都包含不同的配置内容,并被重构为各自的 base:
-
config/manager:将控制器作为 Pod 在集群中启动 -
config/rbac:在其专用 ServiceAccount 下运行控制器所需的权限
入口点
最后但同样重要的是,Kubebuilder 会为我们的项目搭建基本的入口点:main.go。接下来我们看看它……
每段旅程都有起点,每个程序都有 main
Apache License
Copyright 2022 The Kubernetes authors.
Licensed under the Apache License, Version 2.0 (the “License”); you may not use this file except in compliance with the License. You may obtain a copy of the License at
http://www.apache.org/licenses/LICENSE-2.0
Unless required by applicable law or agreed to in writing, software distributed under the License is distributed on an “AS IS” BASIS, WITHOUT WARRANTIES OR CONDITIONS OF ANY KIND, either express or implied. See the License for the specific language governing permissions and limitations under the License.
Our package starts out with some basic imports. Particularly:
- The core controller-runtime library
- The default controller-runtime logging, Zap (more on that a bit later)
package main

import (
	"flag"
	"os"

	// Import all Kubernetes client auth plugins (e.g. Azure, GCP, OIDC, etc.)
	// to ensure that exec-entrypoint and run can make use of them.
	_ "k8s.io/client-go/plugin/pkg/client/auth"

	"k8s.io/apimachinery/pkg/runtime"
	utilruntime "k8s.io/apimachinery/pkg/util/runtime"
	clientgoscheme "k8s.io/client-go/kubernetes/scheme"
	_ "k8s.io/client-go/plugin/pkg/client/auth/gcp"
	ctrl "sigs.k8s.io/controller-runtime"
	"sigs.k8s.io/controller-runtime/pkg/cache"
	"sigs.k8s.io/controller-runtime/pkg/healthz"
	"sigs.k8s.io/controller-runtime/pkg/log/zap"
	"sigs.k8s.io/controller-runtime/pkg/metrics/server"
	"sigs.k8s.io/controller-runtime/pkg/webhook"
	// +kubebuilder:scaffold:imports
)
Every set of controllers needs a Scheme, which provides mappings between Kinds and their corresponding Go types. We’ll talk a bit more about Kinds when we write our API definition, so just keep this in mind for later.
var (
	scheme   = runtime.NewScheme()
	setupLog = ctrl.Log.WithName("setup")
)

func init() {
	utilruntime.Must(clientgoscheme.AddToScheme(scheme))

	// +kubebuilder:scaffold:scheme
}
At this point, our main function is fairly simple:
-
We set up some basic flags for metrics.
-
We instantiate a manager, which keeps track of running all of our controllers, as well as setting up shared caches and clients to the API server (notice we tell the manager about our Scheme).
-
We run our manager, which in turn runs all of our controllers and webhooks. The manager is set up to run until it receives a graceful shutdown signal. This way, when we’re running on Kubernetes, we behave nicely with graceful pod termination.
While we don’t have anything to run just yet, remember where that
+kubebuilder:scaffold:builder comment is – things’ll get interesting there
soon.
func main() {
	var metricsAddr string
	var enableLeaderElection bool
	var probeAddr string
	flag.StringVar(&metricsAddr, "metrics-bind-address", ":8080", "The address the metric endpoint binds to.")
	flag.StringVar(&probeAddr, "health-probe-bind-address", ":8081", "The address the probe endpoint binds to.")
	flag.BoolVar(&enableLeaderElection, "leader-elect", false,
		"Enable leader election for controller manager. "+
			"Enabling this will ensure there is only one active controller manager.")
	opts := zap.Options{
		Development: true,
	}
	opts.BindFlags(flag.CommandLine)
	flag.Parse()

	ctrl.SetLogger(zap.New(zap.UseFlagOptions(&opts)))

	mgr, err := ctrl.NewManager(ctrl.GetConfigOrDie(), ctrl.Options{
		Scheme: scheme,
		Metrics: server.Options{
			BindAddress: metricsAddr,
		},
		WebhookServer:          webhook.NewServer(webhook.Options{Port: 9443}),
		HealthProbeBindAddress: probeAddr,
		LeaderElection:         enableLeaderElection,
		LeaderElectionID:       "80807133.tutorial.kubebuilder.io",
	})
	if err != nil {
		setupLog.Error(err, "unable to start manager")
		os.Exit(1)
	}
Note that the Manager can restrict the namespace that all controllers will watch for resources by:
	mgr, err := ctrl.NewManager(ctrl.GetConfigOrDie(), ctrl.Options{
		Scheme: scheme,
		Cache: cache.Options{
			DefaultNamespaces: map[string]cache.Config{
				namespace: {},
			},
		},
		Metrics: server.Options{
			BindAddress: metricsAddr,
		},
		WebhookServer:          webhook.NewServer(webhook.Options{Port: 9443}),
		HealthProbeBindAddress: probeAddr,
		LeaderElection:         enableLeaderElection,
		LeaderElectionID:       "80807133.tutorial.kubebuilder.io",
	})
The above example will change the scope of your project to a single Namespace. In this scenario,
it is also suggested to restrict the provided authorization to this namespace by replacing the default
ClusterRole and ClusterRoleBinding to Role and RoleBinding respectively.
For further information see the Kubernetes documentation about Using RBAC Authorization.
Also, it is possible to use the DefaultNamespaces
from cache.Options{} to cache objects in a specific set of namespaces:
	var namespaces []string // List of Namespaces
	defaultNamespaces := make(map[string]cache.Config)

	for _, ns := range namespaces {
		defaultNamespaces[ns] = cache.Config{}
	}

	mgr, err := ctrl.NewManager(ctrl.GetConfigOrDie(), ctrl.Options{
		Scheme: scheme,
		Cache: cache.Options{
			DefaultNamespaces: defaultNamespaces,
		},
		Metrics: server.Options{
			BindAddress: metricsAddr,
		},
		WebhookServer:          webhook.NewServer(webhook.Options{Port: 9443}),
		HealthProbeBindAddress: probeAddr,
		LeaderElection:         enableLeaderElection,
		LeaderElectionID:       "80807133.tutorial.kubebuilder.io",
	})
For further information see cache.Options{}
	// +kubebuilder:scaffold:builder

	if err := mgr.AddHealthzCheck("healthz", healthz.Ping); err != nil {
		setupLog.Error(err, "unable to set up health check")
		os.Exit(1)
	}
	if err := mgr.AddReadyzCheck("readyz", healthz.Ping); err != nil {
		setupLog.Error(err, "unable to set up ready check")
		os.Exit(1)
	}

	setupLog.Info("starting manager")
	if err := mgr.Start(ctrl.SetupSignalHandler()); err != nil {
		setupLog.Error(err, "problem running manager")
		os.Exit(1)
	}
}
说到这里,我们可以开始为 API 搭建脚手架了!
Groups、Versions 与 Kinds,哇哦!
在开始我们的 API 之前,先简单聊聊术语。
在 Kubernetes 中谈论 API 时,我们经常用到四个术语:groups、versions、kinds 和 resources。
Groups 与 Versions
Kubernetes 中的 API Group 只是相关功能的一个集合。每个 group 拥有一个或多个 version,顾名思义,它们允许我们随时间改变 API 的工作方式。
Kinds 与 Resources
每个 API group-version 包含一个或多个 API 类型,我们称之为 Kind。一个 Kind 可以在不同版本间改变其形式,但每种形式都必须能够以某种方式存储其他形式的全部数据(我们可以把数据放在字段里,或是放在注解中)。这意味着使用较旧的 API 版本不会导致较新的数据丢失或损坏。更多信息参见 Kubernetes API 指南。
你也会偶尔听到 resource 这个词。resource 只是某个 Kind 在 API 中的一种使用。通常,Kind 与 resource 是一一对应的。例如,pods 这个 resource 对应 Pod 这个 Kind。然而,有时相同的 Kind 可能由多个 resource 返回。例如,Scale 这个 Kind 由所有的 scale 子资源返回,如 deployments/scale 或 replicasets/scale。这正是 Kubernetes HorizontalPodAutoscaler 能与不同资源交互的原因。不过,对于 CRD,每个 Kind 只会对应单个 resource。
请注意,resource 总是小写,并且按照惯例是 Kind 的小写形式。
那这与 Go 如何对应?
当我们引用某个特定 group-version 下的 kind 时,我们称之为 GroupVersionKind,简称 GVK。资源的情况类似,简称 GVR。正如我们很快会看到的,每个 GVK 都对应包中的某个根 Go 类型。
现在术语已经讲清,我们终于可以创建 API 了!
那我们如何创建 API?
在下一节 Adding a new API 中,我们将看看 kubebuilder create api 这条命令是如何帮助我们创建自定义 API 的。
该命令的目标是为我们的 Kind 创建 Custom Resource(CR)与 Custom Resource Definition(CRD)。欲了解更多,请参见:使用 CustomResourceDefinition 扩展 Kubernetes API。
但为什么要创建 API 呢?
新的 API 是我们让 Kubernetes 理解自定义对象的方式。Go 结构体被用于生成 CRD,CRD 包含了我们数据的 schema,以及诸如新类型叫什么之类的跟踪信息。随后我们就可以创建自定义对象的实例,它们将由我们的控制器进行管理。
我们的 API 与 resource 代表了我们在集群中的解决方案。基本上,CRD 是对自定义对象的定义,而 CR 则是其一个实例。
有个例子吗?
想象一个经典场景:我们的目标是让一个应用及其数据库在 Kubernetes 平台上运行。那么,一个 CRD 可以表示 App,另一个 CRD 可以表示 DB。用一个 CRD 描述 App、另一个 CRD 描述 DB,不会破坏封装、单一职责和内聚性等概念。破坏这些概念可能会带来意想不到的副作用,比如难以扩展、复用或维护,等等。
这样,我们可以创建一个 App 的 CRD,对应的控制器负责创建包含该 App 的 Deployment、为其创建可访问的 Service 等。同理,我们可以创建一个表示 DB 的 CRD,并部署一个控制器来管理 DB 实例。
呃,那 Scheme 又是什么?
我们之前看到的 Scheme 只是用来跟踪某个 GVK 对应哪个 Go 类型的一种方式(不要被它的 godocs 吓到)。
例如,假设我们将 "tutorial.kubebuilder.io/api/v1".CronJob{} 标记为属于 batch.tutorial.kubebuilder.io/v1 API 组(这也就隐含了它的 Kind 是 CronJob)。
随后,当 API server 返回如下 JSON 时,我们就能据此构造一个新的 &CronJob{}:
{
    "kind": "CronJob",
    "apiVersion": "batch.tutorial.kubebuilder.io/v1",
    ...
}
或者在我们提交 &CronJob{} 更新时,正确地查找其 group-version。
添加一个新的 API
要为一个新的 Kind(你有在关注上一章吧?)及其对应的控制器搭建脚手架,我们可以使用 kubebuilder create api:
kubebuilder create api --group batch --version v1 --kind CronJob
在 “Create Resource” 和 “Create Controller” 处按下 y。
对于每个 group-version,第一次调用该命令时会为它创建一个目录。
在当前示例中,会创建 api/v1/ 目录,对应 batch.tutorial.kubebuilder.io/v1(还记得我们一开始的 --domain 设置 吗?)。
它还为我们的 CronJob Kind 添加了一个文件 api/v1/cronjob_types.go。每次用不同的 kind 调用该命令时,都会相应地添加一个新文件。
我们先看看“开箱即用”的内容,然后再继续补全。
Apache License
Copyright 2022.
Licensed under the Apache License, Version 2.0 (the “License”); you may not use this file except in compliance with the License. You may obtain a copy of the License at
http://www.apache.org/licenses/LICENSE-2.0
Unless required by applicable law or agreed to in writing, software distributed under the License is distributed on an “AS IS” BASIS, WITHOUT WARRANTIES OR CONDITIONS OF ANY KIND, either express or implied. See the License for the specific language governing permissions and limitations under the License.
We start out simply enough: we import the meta/v1 API group, which is not
normally exposed by itself, but instead contains metadata common to all
Kubernetes Kinds.
package v1

import (
	metav1 "k8s.io/apimachinery/pkg/apis/meta/v1"
)
Next, we define types for the Spec and Status of our Kind. Kubernetes functions
by reconciling desired state (Spec) with actual cluster state (other objects’
Status) and external state, and then recording what it observed (Status).
Thus, every functional object includes spec and status. A few types, like
ConfigMap don’t follow this pattern, since they don’t encode desired state,
but most types do.
// EDIT THIS FILE!  THIS IS SCAFFOLDING FOR YOU TO OWN!
// NOTE: json tags are required.  Any new fields you add must have json tags for the fields to be serialized.

// CronJobSpec defines the desired state of CronJob
type CronJobSpec struct {
	// INSERT ADDITIONAL SPEC FIELDS - desired state of cluster
	// Important: Run "make" to regenerate code after modifying this file
}

// CronJobStatus defines the observed state of CronJob
type CronJobStatus struct {
	// INSERT ADDITIONAL STATUS FIELD - define observed state of cluster
	// Important: Run "make" to regenerate code after modifying this file
}
Next, we define the types corresponding to actual Kinds, CronJob and CronJobList.
CronJob is our root type, and describes the CronJob kind. Like all Kubernetes objects, it contains
TypeMeta (which describes API version and Kind), and also contains ObjectMeta, which holds things
like name, namespace, and labels.
CronJobList is simply a container for multiple CronJobs. It’s the Kind used in bulk operations,
like LIST.
In general, we never modify either of these – all modifications go in either Spec or Status.
That little +kubebuilder:object:root comment is called a marker. We’ll see
more of them in a bit, but know that they act as extra metadata, telling
controller-tools (our code and YAML generator) extra information.
This particular one tells the object generator that this type represents
a Kind. Then, the object generator generates an implementation of the
runtime.Object interface for us, which is the standard
interface that all types representing Kinds must implement.
// +kubebuilder:object:root=true
// +kubebuilder:subresource:status

// CronJob is the Schema for the cronjobs API
type CronJob struct {
	metav1.TypeMeta   `json:",inline"`
	metav1.ObjectMeta `json:"metadata,omitempty"`

	Spec   CronJobSpec   `json:"spec,omitempty"`
	Status CronJobStatus `json:"status,omitempty"`
}

// +kubebuilder:object:root=true

// CronJobList contains a list of CronJob
type CronJobList struct {
	metav1.TypeMeta `json:",inline"`
	metav1.ListMeta `json:"metadata,omitempty"`
	Items           []CronJob `json:"items"`
}
Finally, we add the Go types to the API group. This allows us to add the types in this API group to any Scheme.
func init() {
	SchemeBuilder.Register(&CronJob{}, &CronJobList{})
}
了解了基本结构后,我们来把它填充完整!
设计一个 API
在 Kubernetes 中,我们在设计 API 时有一些规则。具体来说,所有序列化字段必须使用 camelCase,因此我们通过 JSON 结构体标签来指定这一点。我们也可以使用 omitempty 结构体标签在字段为空时省略序列化。
字段可以使用大多数原始类型。数字是个例外:出于 API 兼容性考虑,我们接受三种数字形式:用于整数的 int32 与 int64,以及用于小数的 resource.Quantity。
等等,什么是 Quantity?
Quantity 是一种用于小数的特殊表示法,具有明确固定的表示,使其在不同机器之间更具可移植性。你很可能在 Kubernetes 中为 Pod 指定资源请求与限制时见过它。
从概念上看,它类似于浮点数:包含有效数、基数和指数。其可序列化且便于阅读的人类可读格式使用整数与后缀来表示数值,就像我们描述计算机存储的方式一样。
例如,2m 在十进制表示中等于 0.002。2Ki 在十进制中表示 2048,而 2K 在十进制中表示 2000。如果我们需要表示小数部分,可以切换到允许使用整数的后缀:2.5 可写作 2500m。
支持两种基:10 和 2(分别称为十进制与二进制)。十进制基使用“常规”的 SI 后缀(例如 M 与 K),而二进制基使用 “mebi” 表示法(例如 Mi 与 Ki)。可参见 megabytes vs mebibytes。
还有一个我们会用到的特殊类型:metav1.Time。它与 time.Time 的功能相同,但具有固定且可移植的序列化格式。
介绍到这里,让我们看看 CronJob 对象长什么样!
Apache License
Copyright 2025 The Kubernetes authors.
Licensed under the Apache License, Version 2.0 (the “License”); you may not use this file except in compliance with the License. You may obtain a copy of the License at
http://www.apache.org/licenses/LICENSE-2.0
Unless required by applicable law or agreed to in writing, software distributed under the License is distributed on an “AS IS” BASIS, WITHOUT WARRANTIES OR CONDITIONS OF ANY KIND, either express or implied. See the License for the specific language governing permissions and limitations under the License.
package v1
Imports
import (
	batchv1 "k8s.io/api/batch/v1"
	corev1 "k8s.io/api/core/v1"
	metav1 "k8s.io/apimachinery/pkg/apis/meta/v1"
)

// EDIT THIS FILE!  THIS IS SCAFFOLDING FOR YOU TO OWN!
// NOTE: json tags are required.  Any new fields you add must have json tags for the fields to be serialized.
First, let’s take a look at our spec. As we discussed before, spec holds desired state, so any “inputs” to our controller go here.
Fundamentally a CronJob needs the following pieces:
- A schedule (the cron in CronJob)
- A template for the Job to run (the job in CronJob)
We’ll also want a few extras, which will make our users’ lives easier:
- A deadline for starting jobs (if we miss this deadline, we’ll just wait till the next scheduled time)
- What to do if multiple jobs would run at once (do we wait? stop the old one? run both?)
- A way to pause the running of a CronJob, in case something’s wrong with it
- Limits on old job history
Remember, since we never read our own status, we need to have some other way to keep track of whether a job has run. We can use at least one old job to do this.
We’ll use several markers (// +comment) to specify additional metadata. These
will be used by controller-tools when generating our CRD manifest.
As we’ll see in a bit, controller-tools will also use GoDoc to form descriptions for
the fields.
// CronJobSpec defines the desired state of CronJob
type CronJobSpec struct {
	// schedule in Cron format, see https://en.wikipedia.org/wiki/Cron.
	// +kubebuilder:validation:MinLength=0
	// +required
	Schedule string `json:"schedule"`

	// startingDeadlineSeconds defines in seconds for starting the job if it misses scheduled
	// time for any reason.  Missed jobs executions will be counted as failed ones.
	// +optional
	// +kubebuilder:validation:Minimum=0
	StartingDeadlineSeconds *int64 `json:"startingDeadlineSeconds,omitempty"`

	// concurrencyPolicy specifies how to treat concurrent executions of a Job.
	// Valid values are:
	// - "Allow" (default): allows CronJobs to run concurrently;
	// - "Forbid": forbids concurrent runs, skipping next run if previous run hasn't finished yet;
	// - "Replace": cancels currently running job and replaces it with a new one
	// +optional
	// +kubebuilder:default:=Allow
	ConcurrencyPolicy ConcurrencyPolicy `json:"concurrencyPolicy,omitempty"`

	// suspend tells the controller to suspend subsequent executions, it does
	// not apply to already started executions.  Defaults to false.
	// +optional
	Suspend *bool `json:"suspend,omitempty"`

	// jobTemplate defines the job that will be created when executing a CronJob.
	// +required
	JobTemplate batchv1.JobTemplateSpec `json:"jobTemplate"`

	// successfulJobsHistoryLimit defines the number of successful finished jobs to retain.
	// This is a pointer to distinguish between explicit zero and not specified.
	// +optional
	// +kubebuilder:validation:Minimum=0
	SuccessfulJobsHistoryLimit *int32 `json:"successfulJobsHistoryLimit,omitempty"`

	// failedJobsHistoryLimit defines the number of failed finished jobs to retain.
	// This is a pointer to distinguish between explicit zero and not specified.
	// +optional
	// +kubebuilder:validation:Minimum=0
	FailedJobsHistoryLimit *int32 `json:"failedJobsHistoryLimit,omitempty"`
}
We define a custom type to hold our concurrency policy. It’s actually just a string under the hood, but the type gives extra documentation, and allows us to attach validation on the type instead of the field, making the validation more easily reusable.
// ConcurrencyPolicy describes how the job will be handled.
// Only one of the following concurrent policies may be specified.
// If none of the following policies is specified, the default one
// is AllowConcurrent.
// +kubebuilder:validation:Enum=Allow;Forbid;Replace
type ConcurrencyPolicy string

const (
	// AllowConcurrent allows CronJobs to run concurrently.
	AllowConcurrent ConcurrencyPolicy = "Allow"

	// ForbidConcurrent forbids concurrent runs, skipping next run if previous
	// hasn't finished yet.
	ForbidConcurrent ConcurrencyPolicy = "Forbid"

	// ReplaceConcurrent cancels currently running job and replaces it with a new one.
	ReplaceConcurrent ConcurrencyPolicy = "Replace"
)
Next, let’s design our status, which holds observed state. It contains any information we want users or other controllers to be able to easily obtain.
We’ll keep a list of actively running jobs, as well as the last time that we successfully
ran our job. Notice that we use metav1.Time instead of time.Time to get the stable
serialization, as mentioned above.
// CronJobStatus defines the observed state of CronJob.
type CronJobStatus struct {
	// INSERT ADDITIONAL STATUS FIELD - define observed state of cluster
	// Important: Run "make" to regenerate code after modifying this file

	// active defines a list of pointers to currently running jobs.
	// +optional
	// +listType=atomic
	// +kubebuilder:validation:MinItems=1
	// +kubebuilder:validation:MaxItems=10
	Active []corev1.ObjectReference `json:"active,omitempty"`

	// lastScheduleTime defines when was the last time the job was successfully scheduled.
	// +optional
	LastScheduleTime *metav1.Time `json:"lastScheduleTime,omitempty"`

	// For Kubernetes API conventions, see:
	// https://github.com/kubernetes/community/blob/master/contributors/devel/sig-architecture/api-conventions.md#typical-status-properties

	// conditions represent the current state of the CronJob resource.
	// Each condition has a unique type and reflects the status of a specific aspect of the resource.
	//
	// Standard condition types include:
	// - "Available": the resource is fully functional
	// - "Progressing": the resource is being created or updated
	// - "Degraded": the resource failed to reach or maintain its desired state
	//
	// The status of each condition is one of True, False, or Unknown.
	// +listType=map
	// +listMapKey=type
	// +optional
	Conditions []metav1.Condition `json:"conditions,omitempty"`
}
Finally, we have the rest of the boilerplate that we’ve already discussed. As previously noted, we don’t need to change this, except to mark that we want a status subresource, so that we behave like built-in kubernetes types.
// +kubebuilder:object:root=true
// +kubebuilder:subresource:status

// CronJob is the Schema for the cronjobs API
type CronJob struct {
Root Object Definitions
	metav1.TypeMeta `json:",inline"`

	// metadata is a standard object metadata
	// +optional
	metav1.ObjectMeta `json:"metadata,omitempty,omitzero"`

	// spec defines the desired state of CronJob
	// +required
	Spec CronJobSpec `json:"spec"`

	// status defines the observed state of CronJob
	// +optional
	Status CronJobStatus `json:"status,omitempty,omitzero"`
}

// +kubebuilder:object:root=true

// CronJobList contains a list of CronJob
type CronJobList struct {
	metav1.TypeMeta `json:",inline"`
	metav1.ListMeta `json:"metadata,omitempty"`
	Items           []CronJob `json:"items"`
}

func init() {
	SchemeBuilder.Register(&CronJob{}, &CronJobList{})
}
现在我们已有 API,需要编写一个控制器来真正实现其功能。
简短插曲:其他这些东西是什么?
如果你瞥了一眼 api/v1/ 目录下的其他文件,可能会注意到除了 cronjob_types.go 之外还有两个文件:groupversion_info.go 与 zz_generated.deepcopy.go。
这两个文件都不需要手动编辑(前者保持不变,后者是自动生成的),但了解它们的内容是有帮助的。
groupversion_info.go
groupversion_info.go 包含了关于 group-version 的通用元数据:
Apache License
Copyright 2025 The Kubernetes authors.
Licensed under the Apache License, Version 2.0 (the “License”); you may not use this file except in compliance with the License. You may obtain a copy of the License at
http://www.apache.org/licenses/LICENSE-2.0
Unless required by applicable law or agreed to in writing, software distributed under the License is distributed on an “AS IS” BASIS, WITHOUT WARRANTIES OR CONDITIONS OF ANY KIND, either express or implied. See the License for the specific language governing permissions and limitations under the License.
First, we have some package-level markers that denote that there are
Kubernetes objects in this package, and that this package represents the group
batch.tutorial.kubebuilder.io. The object generator makes use of the
former, while the latter is used by the CRD generator to generate the right
metadata for the CRDs it creates from this package.
// Package v1 contains API Schema definitions for the batch v1 API group.
// +kubebuilder:object:generate=true
// +groupName=batch.tutorial.kubebuilder.io
package v1

import (
	"k8s.io/apimachinery/pkg/runtime/schema"
	"sigs.k8s.io/controller-runtime/pkg/scheme"
)
Then, we have the commonly useful variables that help us set up our Scheme.
Since we need to use all the types in this package in our controller, it’s
helpful (and the convention) to have a convenient method to add all the types to
some other Scheme. SchemeBuilder makes this easy for us.
var (
	// GroupVersion is group version used to register these objects.
	GroupVersion = schema.GroupVersion{Group: "batch.tutorial.kubebuilder.io", Version: "v1"}

	// SchemeBuilder is used to add go types to the GroupVersionKind scheme.
	SchemeBuilder = &scheme.Builder{GroupVersion: GroupVersion}

	// AddToScheme adds the types in this group-version to the given scheme.
	AddToScheme = SchemeBuilder.AddToScheme
)
zz_generated.deepcopy.go
zz_generated.deepcopy.go 包含了前面提到的 runtime.Object 接口的自动生成实现,它将我们所有的根类型标记为代表某个 Kind。
runtime.Object 接口的核心是一个深拷贝方法 DeepCopyObject。
controller-tools 中的 object 生成器还会为每个根类型及其所有子类型生成另外两个实用方法:DeepCopy 与 DeepCopyInto。
控制器包含什么?
控制器是 Kubernetes(以及任何 Operator)的核心。
控制器的职责是确保对任意给定对象而言,真实世界的状态(包括集群状态,以及潜在的外部状态,例如 Kubelet 的运行容器或云厂商的负载均衡器)与对象中声明的期望状态相匹配。每个控制器聚焦于一个“根”Kind,但可以与其他 Kind 交互。
我们称这一过程为“reconciling(调和)”。
在 controller-runtime 中,针对特定 Kind 实现调和逻辑的组件称为 Reconciler。一个 Reconciler 接收对象的名称,并返回是否需要重试(例如,出现错误的情况,或像 HorizontalPodAutoscaler 这样的周期性控制器)。
Apache License
Copyright 2022.
Licensed under the Apache License, Version 2.0 (the “License”); you may not use this file except in compliance with the License. You may obtain a copy of the License at
http://www.apache.org/licenses/LICENSE-2.0
Unless required by applicable law or agreed to in writing, software distributed under the License is distributed on an “AS IS” BASIS, WITHOUT WARRANTIES OR CONDITIONS OF ANY KIND, either express or implied. See the License for the specific language governing permissions and limitations under the License.
First, we start out with some standard imports. As before, we need the core controller-runtime library, as well as the client package, and the package for our API types.
package controllers

import (
	"context"

	"k8s.io/apimachinery/pkg/runtime"
	ctrl "sigs.k8s.io/controller-runtime"
	"sigs.k8s.io/controller-runtime/pkg/client"
	logf "sigs.k8s.io/controller-runtime/pkg/log"

	batchv1 "tutorial.kubebuilder.io/project/api/v1"
)
Next, kubebuilder has scaffolded a basic reconciler struct for us. Pretty much every reconciler needs to log, and needs to be able to fetch objects, so these are added out of the box.
// CronJobReconciler reconciles a CronJob object
type CronJobReconciler struct {
	client.Client
	Scheme *runtime.Scheme
}
Most controllers eventually end up running on the cluster, so they need RBAC permissions, which we specify using controller-tools RBAC markers. These are the bare minimum permissions needed to run. As we add more functionality, we’ll need to revisit these.
// +kubebuilder:rbac:groups=batch.tutorial.kubebuilder.io,resources=cronjobs,verbs=get;list;watch;create;update;patch;delete
// +kubebuilder:rbac:groups=batch.tutorial.kubebuilder.io,resources=cronjobs/status,verbs=get;update;patch
The ClusterRole manifest at config/rbac/role.yaml is generated from the above markers via controller-gen with the following command:
// make manifests
NOTE: If you receive an error, please run the specified command in the error and re-run make manifests.
Reconcile actually performs the reconciling for a single named object.
Our Request just has a name, but we can use the client to fetch
that object from the cache.
We return an empty result and no error, which indicates to controller-runtime that we’ve successfully reconciled this object and don’t need to try again until there’s some changes.
Most controllers need a logging handle and a context, so we set them up here.
The context is used to allow cancellation of
requests, and potentially things like tracing. It’s the first argument to all
client methods. The Background context is just a basic context without any
extra data or timing restrictions.
The logging handle lets us log. controller-runtime uses structured logging through a library called logr. As we’ll see shortly, logging works by attaching key-value pairs to a static message. We can pre-assign some pairs at the top of our reconcile method to have those attached to all log lines in this reconciler.
func (r *CronJobReconciler) Reconcile(ctx context.Context, req ctrl.Request) (ctrl.Result, error) {
	_ = logf.FromContext(ctx)

	// your logic here

	return ctrl.Result{}, nil
}
Finally, we add this reconciler to the manager, so that it gets started when the manager is started.
For now, we just note that this reconciler operates on CronJobs. Later,
we’ll use this to mark that we care about related objects as well.
func (r *CronJobReconciler) SetupWithManager(mgr ctrl.Manager) error {
	return ctrl.NewControllerManagedBy(mgr).
		For(&batchv1.CronJob{}).
		Complete(r)
}
了解了 Reconciler 的基本结构后,我们来完善 CronJob 的逻辑。
实现一个控制器
我们的 CronJob 控制器的基本逻辑如下:
-
加载指定名称的 CronJob
-
列出所有处于活动状态的 Job,并更新状态
-
根据历史保留上限清理旧的 Job
-
检查是否已被暂停(若已暂停则不再执行其他操作)
-
计算下一次计划运行时间
-
如果符合计划且未超出截止时间,并且没有被并发策略阻塞,则运行一个新的 Job
-
当我们发现有 Job 正在运行(自动完成)或到了下一次计划运行时间时,重新入队。
Apache License
Copyright 2025 The Kubernetes authors.
Licensed under the Apache License, Version 2.0 (the “License”); you may not use this file except in compliance with the License. You may obtain a copy of the License at
http://www.apache.org/licenses/LICENSE-2.0
Unless required by applicable law or agreed to in writing, software distributed under the License is distributed on an “AS IS” BASIS, WITHOUT WARRANTIES OR CONDITIONS OF ANY KIND, either express or implied. See the License for the specific language governing permissions and limitations under the License.
We’ll start out with some imports. You’ll see below that we’ll need a few more imports than those scaffolded for us. We’ll talk about each one when we use it.
package controller

import (
	"context"
	"fmt"
	"sort"
	"time"

	"github.com/robfig/cron"
	kbatch "k8s.io/api/batch/v1"
	corev1 "k8s.io/api/core/v1"
	metav1 "k8s.io/apimachinery/pkg/apis/meta/v1"
	"k8s.io/apimachinery/pkg/runtime"
	ref "k8s.io/client-go/tools/reference"
	ctrl "sigs.k8s.io/controller-runtime"
	"sigs.k8s.io/controller-runtime/pkg/client"
	logf "sigs.k8s.io/controller-runtime/pkg/log"

	batchv1 "tutorial.kubebuilder.io/project/api/v1"
)
Next, we’ll need a Clock, which will allow us to fake timing in our tests.
// CronJobReconciler reconciles a CronJob object
type CronJobReconciler struct {
	client.Client
	Scheme *runtime.Scheme
	Clock
}
Clock
We’ll mock out the clock to make it easier to jump around in time while testing,
the “real” clock just calls time.Now.
type realClock struct{}

func (_ realClock) Now() time.Time { return time.Now() } //nolint:staticcheck

// Clock knows how to get the current time.
// It can be used to fake out timing for testing.
type Clock interface {
	Now() time.Time
}
Notice that we need a few more RBAC permissions – since we’re creating and managing jobs now, we’ll need permissions for those, which means adding a couple more markers.
// +kubebuilder:rbac:groups=batch.tutorial.kubebuilder.io,resources=cronjobs,verbs=get;list;watch;create;update;patch;delete
// +kubebuilder:rbac:groups=batch.tutorial.kubebuilder.io,resources=cronjobs/status,verbs=get;update;patch
// +kubebuilder:rbac:groups=batch.tutorial.kubebuilder.io,resources=cronjobs/finalizers,verbs=update
// +kubebuilder:rbac:groups=batch,resources=jobs,verbs=get;list;watch;create;update;patch;delete
// +kubebuilder:rbac:groups=batch,resources=jobs/status,verbs=get
Now, we get to the heart of the controller – the reconciler logic.
var (
	scheduledTimeAnnotation = "batch.tutorial.kubebuilder.io/scheduled-at"
)

// Reconcile is part of the main kubernetes reconciliation loop which aims to
// move the current state of the cluster closer to the desired state.
// TODO(user): Modify the Reconcile function to compare the state specified by
// the CronJob object against the actual cluster state, and then
// perform operations to make the cluster state reflect the state specified by
// the user.
//
// For more details, check Reconcile and its Result here:
// - https://pkg.go.dev/sigs.k8s.io/controller-runtime@v0.22.1/pkg/reconcile
// nolint:gocyclo
func (r *CronJobReconciler) Reconcile(ctx context.Context, req ctrl.Request) (ctrl.Result, error) {
	log := logf.FromContext(ctx)
1: Load the CronJob by name
We’ll fetch the CronJob using our client. All client methods take a
context (to allow for cancellation) as their first argument, and the object
in question as their last. Get is a bit special, in that it takes a
NamespacedName
as the middle argument (most don’t have a middle argument, as we’ll see
below).
Many client methods also take variadic options at the end.
	var cronJob batchv1.CronJob
	if err := r.Get(ctx, req.NamespacedName, &cronJob); err != nil {
		log.Error(err, "unable to fetch CronJob")
		// we'll ignore not-found errors, since they can't be fixed by an immediate
		// requeue (we'll need to wait for a new notification), and we can get them
		// on deleted requests.
		return ctrl.Result{}, client.IgnoreNotFound(err)
	}
2: List all active jobs, and update the status
To fully update our status, we’ll need to list all child jobs in this namespace that belong to this CronJob. Similarly to Get, we can use the List method to list the child jobs. Notice that we use variadic options to set the namespace and field match (which is actually an index lookup that we set up below).
	var childJobs kbatch.JobList
	if err := r.List(ctx, &childJobs, client.InNamespace(req.Namespace), client.MatchingFields{jobOwnerKey: req.Name}); err != nil {
		log.Error(err, "unable to list child Jobs")
		return ctrl.Result{}, err
	}
Once we have all the jobs we own, we’ll split them into active, successful, and failed jobs, keeping track of the most recent run so that we can record it in status. Remember, status should be able to be reconstituted from the state of the world, so it’s generally not a good idea to read from the status of the root object. Instead, you should reconstruct it every run. That’s what we’ll do here.
We can check if a job is “finished” and whether it succeeded or failed using status conditions. We’ll put that logic in a helper to make our code cleaner.
	// find the active list of jobs
	var activeJobs []*kbatch.Job
	var successfulJobs []*kbatch.Job
	var failedJobs []*kbatch.Job
	var mostRecentTime *time.Time // find the last run so we can update the status
isJobFinished
We consider a job “finished” if it has a “Complete” or “Failed” condition marked as true. Status conditions allow us to add extensible status information to our objects that other humans and controllers can examine to check things like completion and health.
	isJobFinished := func(job *kbatch.Job) (bool, kbatch.JobConditionType) {
		for _, c := range job.Status.Conditions {
			if (c.Type == kbatch.JobComplete || c.Type == kbatch.JobFailed) && c.Status == corev1.ConditionTrue {
				return true, c.Type
			}
		}

		return false, ""
	}
getScheduledTimeForJob
We’ll use a helper to extract the scheduled time from the annotation that we added during job creation.
	getScheduledTimeForJob := func(job *kbatch.Job) (*time.Time, error) {
		timeRaw := job.Annotations[scheduledTimeAnnotation]
		if len(timeRaw) == 0 {
			return nil, nil
		}

		timeParsed, err := time.Parse(time.RFC3339, timeRaw)
		if err != nil {
			return nil, err
		}
		return &timeParsed, nil
	}
	for i, job := range childJobs.Items {
		_, finishedType := isJobFinished(&job)
		switch finishedType {
		case "": // ongoing
			activeJobs = append(activeJobs, &childJobs.Items[i])
		case kbatch.JobFailed:
			failedJobs = append(failedJobs, &childJobs.Items[i])
		case kbatch.JobComplete:
			successfulJobs = append(successfulJobs, &childJobs.Items[i])
		}

		// We'll store the launch time in an annotation, so we'll reconstitute that from
		// the active jobs themselves.
		scheduledTimeForJob, err := getScheduledTimeForJob(&job)
		if err != nil {
			log.Error(err, "unable to parse schedule time for child job", "job", &job)
			continue
		}
		if scheduledTimeForJob != nil {
			if mostRecentTime == nil || mostRecentTime.Before(*scheduledTimeForJob) {
				mostRecentTime = scheduledTimeForJob
			}
		}
	}

	if mostRecentTime != nil {
		cronJob.Status.LastScheduleTime = &metav1.Time{Time: *mostRecentTime}
	} else {
		cronJob.Status.LastScheduleTime = nil
	}
	cronJob.Status.Active = nil
	for _, activeJob := range activeJobs {
		jobRef, err := ref.GetReference(r.Scheme, activeJob)
		if err != nil {
			log.Error(err, "unable to make reference to active job", "job", activeJob)
			continue
		}
		cronJob.Status.Active = append(cronJob.Status.Active, *jobRef)
	}
Here, we’ll log how many jobs we observed at a slightly higher logging level, for debugging. Notice how instead of using a format string, we use a fixed message, and attach key-value pairs with the extra information. This makes it easier to filter and query log lines.
log.V(1).Info("job count", "active jobs", len(activeJobs), "successful jobs", len(successfulJobs), "failed jobs", len(failedJobs))
Using the data we’ve gathered, we’ll update the status of our CRD.
Just like before, we use our client. To specifically update the status
subresource, we’ll use the Status part of the client, with the Update
method.
The status subresource ignores changes to spec, so it’s less likely to conflict with any other updates, and can have separate permissions.
	if err := r.Status().Update(ctx, &cronJob); err != nil {
		log.Error(err, "unable to update CronJob status")
		return ctrl.Result{}, err
	}
Once we’ve updated our status, we can move on to ensuring that the status of the world matches what we want in our spec.
3: Clean up old jobs according to the history limit
First, we’ll try to clean up old jobs, so that we don’t leave too many lying around.
	// NB: deleting these are "best effort" -- if we fail on a particular one,
	// we won't requeue just to finish the deleting.
	if cronJob.Spec.FailedJobsHistoryLimit != nil {
		sort.Slice(failedJobs, func(i, j int) bool {
			if failedJobs[i].Status.StartTime == nil {
				return failedJobs[j].Status.StartTime != nil
			}
			return failedJobs[i].Status.StartTime.Before(failedJobs[j].Status.StartTime)
		})
		for i, job := range failedJobs {
			if int32(i) >= int32(len(failedJobs))-*cronJob.Spec.FailedJobsHistoryLimit {
				break
			}
			if err := r.Delete(ctx, job, client.PropagationPolicy(metav1.DeletePropagationBackground)); client.IgnoreNotFound(err) != nil {
				log.Error(err, "unable to delete old failed job", "job", job)
			} else {
				log.V(0).Info("deleted old failed job", "job", job)
			}
		}
	}

	if cronJob.Spec.SuccessfulJobsHistoryLimit != nil {
		sort.Slice(successfulJobs, func(i, j int) bool {
			if successfulJobs[i].Status.StartTime == nil {
				return successfulJobs[j].Status.StartTime != nil
			}
			return successfulJobs[i].Status.StartTime.Before(successfulJobs[j].Status.StartTime)
		})
		for i, job := range successfulJobs {
			if int32(i) >= int32(len(successfulJobs))-*cronJob.Spec.SuccessfulJobsHistoryLimit {
				break
			}
			if err := r.Delete(ctx, job, client.PropagationPolicy(metav1.DeletePropagationBackground)); err != nil {
				log.Error(err, "unable to delete old successful job", "job", job)
			} else {
				log.V(0).Info("deleted old successful job", "job", job)
			}
		}
	}
4: Check if we’re suspended
If this object is suspended, we don’t want to run any jobs, so we’ll stop now. This is useful if something’s broken with the job we’re running and we want to pause runs to investigate or putz with the cluster, without deleting the object.
	if cronJob.Spec.Suspend != nil && *cronJob.Spec.Suspend {
		log.V(1).Info("cronjob suspended, skipping")
		return ctrl.Result{}, nil
	}
5: Get the next scheduled run
If we’re not paused, we’ll need to calculate the next scheduled run, and whether or not we’ve got a run that we haven’t processed yet.
getNextSchedule
We’ll calculate the next scheduled time using our helpful cron library. We’ll start calculating appropriate times from our last run, or the creation of the CronJob if we can’t find a last run.
If there are too many missed runs and we don’t have any deadlines set, we’ll bail so that we don’t cause issues on controller restarts or wedges.
Otherwise, we’ll just return the missed runs (of which we’ll just use the latest), and the next run, so that we can know when it’s time to reconcile again.
	getNextSchedule := func(cronJob *batchv1.CronJob, now time.Time) (lastMissed time.Time, next time.Time, err error) {
		sched, err := cron.ParseStandard(cronJob.Spec.Schedule)
		if err != nil {
			return time.Time{}, time.Time{}, fmt.Errorf("unparseable schedule %q: %w", cronJob.Spec.Schedule, err)
		}

		// for optimization purposes, cheat a bit and start from our last observed run time
		// we could reconstitute this here, but there's not much point, since we've
		// just updated it.
		var earliestTime time.Time
		if cronJob.Status.LastScheduleTime != nil {
			earliestTime = cronJob.Status.LastScheduleTime.Time
		} else {
			earliestTime = cronJob.CreationTimestamp.Time
		}
		if cronJob.Spec.StartingDeadlineSeconds != nil {
			// controller is not going to schedule anything below this point
			schedulingDeadline := now.Add(-time.Second * time.Duration(*cronJob.Spec.StartingDeadlineSeconds))

			if schedulingDeadline.After(earliestTime) {
				earliestTime = schedulingDeadline
			}
		}
		if earliestTime.After(now) {
			return time.Time{}, sched.Next(now), nil
		}

		starts := 0
		for t := sched.Next(earliestTime); !t.After(now); t = sched.Next(t) {
			lastMissed = t
			// An object might miss several starts. For example, if
			// controller gets wedged on Friday at 5:01pm when everyone has
			// gone home, and someone comes in on Tuesday AM and discovers
			// the problem and restarts the controller, then all the hourly
			// jobs, more than 80 of them for one hourly scheduledJob, should
			// all start running with no further intervention (if the scheduledJob
			// allows concurrency and late starts).
			//
			// However, if there is a bug somewhere, or incorrect clock
			// on controller's server or apiservers (for setting creationTimestamp)
			// then there could be so many missed start times (it could be off
			// by decades or more), that it would eat up all the CPU and memory
			// of this controller. In that case, we want to not try to list
			// all the missed start times.
			starts++
			if starts > 100 {
				// We can't get the most recent times so just return an empty slice
				return time.Time{}, time.Time{}, fmt.Errorf("Too many missed start times (> 100). Set or decrease .spec.startingDeadlineSeconds or check clock skew.") //nolint:staticcheck
			}
		}
		return lastMissed, sched.Next(now), nil
	}
	// figure out the next times that we need to create
	// jobs at (or anything we missed).
	missedRun, nextRun, err := getNextSchedule(&cronJob, r.Now())
	if err != nil {
		log.Error(err, "unable to figure out CronJob schedule")
		// we don't really care about requeuing until we get an update that
		// fixes the schedule, so don't return an error
		return ctrl.Result{}, nil
	}
We’ll prep our eventual request to requeue until the next job, and then figure out if we actually need to run.
	scheduledResult := ctrl.Result{RequeueAfter: nextRun.Sub(r.Now())} // save this so we can re-use it elsewhere
	log = log.WithValues("now", r.Now(), "next run", nextRun)
6: Run a new job if it’s on schedule, not past the deadline, and not blocked by our concurrency policy
If we’ve missed a run, and we’re still within the deadline to start it, we’ll need to run a job.
	if missedRun.IsZero() {
		log.V(1).Info("no upcoming scheduled times, sleeping until next")
		return scheduledResult, nil
	}

	// make sure we're not too late to start the run
	log = log.WithValues("current run", missedRun)
	tooLate := false
	if cronJob.Spec.StartingDeadlineSeconds != nil {
		tooLate = missedRun.Add(time.Duration(*cronJob.Spec.StartingDeadlineSeconds) * time.Second).Before(r.Now())
	}
	if tooLate {
		log.V(1).Info("missed starting deadline for last run, sleeping till next")
		// TODO(directxman12): events
		return scheduledResult, nil
	}
If we actually have to run a job, we’ll need to either wait till existing ones finish, replace the existing ones, or just add new ones. If our information is out of date due to cache delay, we’ll get a requeue when we get up-to-date information.
	// figure out how to run this job -- concurrency policy might forbid us from running
	// multiple at the same time...
	if cronJob.Spec.ConcurrencyPolicy == batchv1.ForbidConcurrent && len(activeJobs) > 0 {
		log.V(1).Info("concurrency policy blocks concurrent runs, skipping", "num active", len(activeJobs))
		return scheduledResult, nil
	}

	// ...or instruct us to replace existing ones...
	if cronJob.Spec.ConcurrencyPolicy == batchv1.ReplaceConcurrent {
		for _, activeJob := range activeJobs {
			// we don't care if the job was already deleted
			if err := r.Delete(ctx, activeJob, client.PropagationPolicy(metav1.DeletePropagationBackground)); client.IgnoreNotFound(err) != nil {
				log.Error(err, "unable to delete active job", "job", activeJob)
				return ctrl.Result{}, err
			}
		}
	}
Once we’ve figured out what to do with existing jobs, we’ll actually create our desired job
constructJobForCronJob
We need to construct a job based on our CronJob’s template. We’ll copy over the spec from the template and copy some basic object meta.
Then, we’ll set the “scheduled time” annotation so that we can reconstitute our
LastScheduleTime field each reconcile.
Finally, we’ll need to set an owner reference. This allows the Kubernetes garbage collector to clean up jobs when we delete the CronJob, and allows controller-runtime to figure out which cronjob needs to be reconciled when a given job changes (is added, deleted, completes, etc).
	constructJobForCronJob := func(cronJob *batchv1.CronJob, scheduledTime time.Time) (*kbatch.Job, error) {
		// We want job names for a given nominal start time to have a deterministic name to avoid the same job being created twice
		name := fmt.Sprintf("%s-%d", cronJob.Name, scheduledTime.Unix())

		job := &kbatch.Job{
			ObjectMeta: metav1.ObjectMeta{
				Labels:      make(map[string]string),
				Annotations: make(map[string]string),
				Name:        name,
				Namespace:   cronJob.Namespace,
			},
			Spec: *cronJob.Spec.JobTemplate.Spec.DeepCopy(),
		}
		for k, v := range cronJob.Spec.JobTemplate.Annotations {
			job.Annotations[k] = v
		}
		job.Annotations[scheduledTimeAnnotation] = scheduledTime.Format(time.RFC3339)
		for k, v := range cronJob.Spec.JobTemplate.Labels {
			job.Labels[k] = v
		}
		if err := ctrl.SetControllerReference(cronJob, job, r.Scheme); err != nil {
			return nil, err
		}

		return job, nil
	}
	// actually make the job...
	job, err := constructJobForCronJob(&cronJob, missedRun)
	if err != nil {
		log.Error(err, "unable to construct job from template")
		// don't bother requeuing until we get a change to the spec
		return scheduledResult, nil
	}

	// ...and create it on the cluster
	if err := r.Create(ctx, job); err != nil {
		log.Error(err, "unable to create Job for CronJob", "job", job)
		return ctrl.Result{}, err
	}

	log.V(1).Info("created Job for CronJob run", "job", job)
7: Requeue when we either see a running job or it’s time for the next scheduled run
Finally, we’ll return the result that we prepped above, that says we want to requeue when our next run would need to occur. This is taken as a maximum deadline – if something else changes in between, like our job starts or finishes, we get modified, etc, we might reconcile again sooner.
	// we'll requeue once we see the running job, and update our status
	return scheduledResult, nil
}
Setup
Finally, we’ll update our setup. In order to allow our reconciler to quickly look up Jobs by their owner, we’ll need an index. We declare an index key that we can later use with the client as a pseudo-field name, and then describe how to extract the indexed value from the Job object. The indexer will automatically take care of namespaces for us, so we just have to extract the owner name if the Job has a CronJob owner.
Additionally, we’ll inform the manager that this controller owns some Jobs, so that it will automatically call Reconcile on the underlying CronJob when a Job changes, is deleted, etc.
var (
	jobOwnerKey = ".metadata.controller"
	apiGVStr    = batchv1.GroupVersion.String()
)

// SetupWithManager sets up the controller with the Manager.
func (r *CronJobReconciler) SetupWithManager(mgr ctrl.Manager) error {
	// set up a real clock, since we're not in a test
	if r.Clock == nil {
		r.Clock = realClock{}
	}

	if err := mgr.GetFieldIndexer().IndexField(context.Background(), &kbatch.Job{}, jobOwnerKey, func(rawObj client.Object) []string {
		// grab the job object, extract the owner...
		job := rawObj.(*kbatch.Job)
		owner := metav1.GetControllerOf(job)
		if owner == nil {
			return nil
		}
		// ...make sure it's a CronJob...
		if owner.APIVersion != apiGVStr || owner.Kind != "CronJob" {
			return nil
		}

		// ...and if so, return it
		return []string{owner.Name}
	}); err != nil {
		return err
	}

	return ctrl.NewControllerManagedBy(mgr).
		For(&batchv1.CronJob{}).
		Owns(&kbatch.Job{}).
		Named("cronjob").
		Complete(r)
}
这部分内容不少,但现在我们已经有一个可工作的控制器了。接下来在集群上进行测试,如果没有问题,再将其部署!
你刚才提到 main?
不过首先,还记得我们说过会回到 main.go 吗?我们来看看发生了哪些变化,以及需要添加什么。
Apache License
Copyright 2025 The Kubernetes authors.
Licensed under the Apache License, Version 2.0 (the “License”); you may not use this file except in compliance with the License. You may obtain a copy of the License at
http://www.apache.org/licenses/LICENSE-2.0
Unless required by applicable law or agreed to in writing, software distributed under the License is distributed on an “AS IS” BASIS, WITHOUT WARRANTIES OR CONDITIONS OF ANY KIND, either express or implied. See the License for the specific language governing permissions and limitations under the License.
Imports
package main

import (
	"crypto/tls"
	"flag"
	"os"

	// Import all Kubernetes client auth plugins (e.g. Azure, GCP, OIDC, etc.)
	// to ensure that exec-entrypoint and run can make use of them.
	_ "k8s.io/client-go/plugin/pkg/client/auth"

	"k8s.io/apimachinery/pkg/runtime"
	utilruntime "k8s.io/apimachinery/pkg/util/runtime"
	clientgoscheme "k8s.io/client-go/kubernetes/scheme"
	ctrl "sigs.k8s.io/controller-runtime"
	"sigs.k8s.io/controller-runtime/pkg/healthz"
	"sigs.k8s.io/controller-runtime/pkg/log/zap"
	"sigs.k8s.io/controller-runtime/pkg/metrics/filters"
	metricsserver "sigs.k8s.io/controller-runtime/pkg/metrics/server"
	"sigs.k8s.io/controller-runtime/pkg/webhook"

	batchv1 "tutorial.kubebuilder.io/project/api/v1"
	"tutorial.kubebuilder.io/project/internal/controller"
	webhookv1 "tutorial.kubebuilder.io/project/internal/webhook/v1"
	// +kubebuilder:scaffold:imports
)
The first difference to notice is that kubebuilder has added the new API
group’s package (batchv1) to our scheme. This means that we can use those
objects in our controller.
If we would be using any other CRD we would have to add their scheme the same way.
Builtin types such as Job have their scheme added by clientgoscheme.
var (
	scheme   = runtime.NewScheme()
	setupLog = ctrl.Log.WithName("setup")
)

func init() {
	utilruntime.Must(clientgoscheme.AddToScheme(scheme))

	utilruntime.Must(batchv1.AddToScheme(scheme))
	// +kubebuilder:scaffold:scheme
}
The other thing that’s changed is that kubebuilder has added a block calling our
CronJob controller’s SetupWithManager method.
// nolint:gocyclo
func main() {
old stuff
	var metricsAddr string
	var metricsCertPath, metricsCertName, metricsCertKey string
	var webhookCertPath, webhookCertName, webhookCertKey string
	var enableLeaderElection bool
	var probeAddr string
	var secureMetrics bool
	var enableHTTP2 bool
	var tlsOpts []func(*tls.Config)
	flag.StringVar(&metricsAddr, "metrics-bind-address", "0", "The address the metrics endpoint binds to. "+
		"Use :8443 for HTTPS or :8080 for HTTP, or leave as 0 to disable the metrics service.")
	flag.StringVar(&probeAddr, "health-probe-bind-address", ":8081", "The address the probe endpoint binds to.")
	flag.BoolVar(&enableLeaderElection, "leader-elect", false,
		"Enable leader election for controller manager. "+
			"Enabling this will ensure there is only one active controller manager.")
	flag.BoolVar(&secureMetrics, "metrics-secure", true,
		"If set, the metrics endpoint is served securely via HTTPS. Use --metrics-secure=false to use HTTP instead.")
	flag.StringVar(&webhookCertPath, "webhook-cert-path", "", "The directory that contains the webhook certificate.")
	flag.StringVar(&webhookCertName, "webhook-cert-name", "tls.crt", "The name of the webhook certificate file.")
	flag.StringVar(&webhookCertKey, "webhook-cert-key", "tls.key", "The name of the webhook key file.")
	flag.StringVar(&metricsCertPath, "metrics-cert-path", "",
		"The directory that contains the metrics server certificate.")
	flag.StringVar(&metricsCertName, "metrics-cert-name", "tls.crt", "The name of the metrics server certificate file.")
	flag.StringVar(&metricsCertKey, "metrics-cert-key", "tls.key", "The name of the metrics server key file.")
	flag.BoolVar(&enableHTTP2, "enable-http2", false,
		"If set, HTTP/2 will be enabled for the metrics and webhook servers")
	opts := zap.Options{
		Development: true,
	}
	opts.BindFlags(flag.CommandLine)
	flag.Parse()

	ctrl.SetLogger(zap.New(zap.UseFlagOptions(&opts)))

	// if the enable-http2 flag is false (the default), http/2 should be disabled
	// due to its vulnerabilities. More specifically, disabling http/2 will
	// prevent from being vulnerable to the HTTP/2 Stream Cancellation and
	// Rapid Reset CVEs. For more information see:
	// - https://github.com/advisories/GHSA-qppj-fm5r-hxr3
	// - https://github.com/advisories/GHSA-4374-p667-p6c8
	disableHTTP2 := func(c *tls.Config) {
		setupLog.Info("disabling http/2")
		c.NextProtos = []string{"http/1.1"}
	}

	if !enableHTTP2 {
		tlsOpts = append(tlsOpts, disableHTTP2)
	}

	// Initial webhook TLS options
	webhookTLSOpts := tlsOpts
	webhookServerOptions := webhook.Options{
		TLSOpts: webhookTLSOpts,
	}

	if len(webhookCertPath) > 0 {
		setupLog.Info("Initializing webhook certificate watcher using provided certificates",
			"webhook-cert-path", webhookCertPath, "webhook-cert-name", webhookCertName, "webhook-cert-key", webhookCertKey)

		webhookServerOptions.CertDir = webhookCertPath
		webhookServerOptions.CertName = webhookCertName
		webhookServerOptions.KeyName = webhookCertKey
	}

	webhookServer := webhook.NewServer(webhookServerOptions)

	// Metrics endpoint is enabled in 'config/default/kustomization.yaml'. The Metrics options configure the server.
	// More info:
	// - https://pkg.go.dev/sigs.k8s.io/controller-runtime@v0.22.1/pkg/metrics/server
	// - https://book.kubebuilder.io/reference/metrics.html
	metricsServerOptions := metricsserver.Options{
		BindAddress:   metricsAddr,
		SecureServing: secureMetrics,
		TLSOpts:       tlsOpts,
	}

	if secureMetrics {
		// FilterProvider is used to protect the metrics endpoint with authn/authz.
		// These configurations ensure that only authorized users and service accounts
		// can access the metrics endpoint. The RBAC are configured in 'config/rbac/kustomization.yaml'. More info:
		// https://pkg.go.dev/sigs.k8s.io/controller-runtime@v0.22.1/pkg/metrics/filters#WithAuthenticationAndAuthorization
		metricsServerOptions.FilterProvider = filters.WithAuthenticationAndAuthorization
	}

	// If the certificate is not specified, controller-runtime will automatically
	// generate self-signed certificates for the metrics server. While convenient for development and testing,
	// this setup is not recommended for production.
	//
	// TODO(user): If you enable certManager, uncomment the following lines:
	// - [METRICS-WITH-CERTS] at config/default/kustomization.yaml to generate and use certificates
	// managed by cert-manager for the metrics server.
	// - [PROMETHEUS-WITH-CERTS] at config/prometheus/kustomization.yaml for TLS certification.
	if len(metricsCertPath) > 0 {
		setupLog.Info("Initializing metrics certificate watcher using provided certificates",
			"metrics-cert-path", metricsCertPath, "metrics-cert-name", metricsCertName, "metrics-cert-key", metricsCertKey)

		metricsServerOptions.CertDir = metricsCertPath
		metricsServerOptions.CertName = metricsCertName
		metricsServerOptions.KeyName = metricsCertKey
	}

	mgr, err := ctrl.NewManager(ctrl.GetConfigOrDie(), ctrl.Options{
		Scheme:                 scheme,
		Metrics:                metricsServerOptions,
		WebhookServer:          webhookServer,
		HealthProbeBindAddress: probeAddr,
		LeaderElection:         enableLeaderElection,
		LeaderElectionID:       "80807133.tutorial.kubebuilder.io",
		// LeaderElectionReleaseOnCancel defines if the leader should step down voluntarily
		// when the Manager ends. This requires the binary to immediately end when the
		// Manager is stopped, otherwise, this setting is unsafe. Setting this significantly
		// speeds up voluntary leader transitions as the new leader don't have to wait
		// LeaseDuration time first.
		//
		// In the default scaffold provided, the program ends immediately after
		// the manager stops, so would be fine to enable this option. However,
		// if you are doing or is intended to do any operation such as perform cleanups
		// after the manager stops then its usage might be unsafe.
		// LeaderElectionReleaseOnCancel: true,
	})
	if err != nil {
		setupLog.Error(err, "unable to start manager")
		os.Exit(1)
	}
	if err := (&controller.CronJobReconciler{
		Client: mgr.GetClient(),
		Scheme: mgr.GetScheme(),
	}).SetupWithManager(mgr); err != nil {
		setupLog.Error(err, "unable to create controller", "controller", "CronJob")
		os.Exit(1)
	}
old stuff
We’ll also set up webhooks for our type, which we’ll talk about next. We just need to add them to the manager. Since we might want to run the webhooks separately, or not run them when testing our controller locally, we’ll put them behind an environment variable.
We’ll just make sure to set ENABLE_WEBHOOKS=false when we run locally.
	// nolint:goconst
	if os.Getenv("ENABLE_WEBHOOKS") != "false" {
		if err := webhookv1.SetupCronJobWebhookWithManager(mgr); err != nil {
			setupLog.Error(err, "unable to create webhook", "webhook", "CronJob")
			os.Exit(1)
		}
	}
	// +kubebuilder:scaffold:builder

	if err := mgr.AddHealthzCheck("healthz", healthz.Ping); err != nil {
		setupLog.Error(err, "unable to set up health check")
		os.Exit(1)
	}
	if err := mgr.AddReadyzCheck("readyz", healthz.Ping); err != nil {
		setupLog.Error(err, "unable to set up ready check")
		os.Exit(1)
	}

	setupLog.Info("starting manager")
	if err := mgr.Start(ctrl.SetupSignalHandler()); err != nil {
		setupLog.Error(err, "problem running manager")
		os.Exit(1)
	}
}
现在我们可以实现控制器了。
实现 defaulting/validating Webhook
如果你想为 CRD 实现准入 Webhook,你只需要实现 CustomDefaulter 和/或 CustomValidator 接口。
其余工作由 Kubebuilder 替你完成,例如:
- 创建 webhook 服务器
- 确保服务器已添加进 manager
- 为你的 webhooks 创建处理器
- 将每个处理器注册到服务器上的某条路径
首先,我们为 CRD(CronJob)搭建 webhook 脚手架。由于测试项目会使用 defaulting 与 validating webhooks,我们需要带上 --defaulting 与 --programmatic-validation 参数执行以下命令:
kubebuilder create webhook --group batch --version v1 --kind CronJob --defaulting --programmatic-validation
这会为你生成 webhook 函数,并在 main.go 中把你的 webhook 注册到 manager。
Apache License
Copyright 2025 The Kubernetes authors.
Licensed under the Apache License, Version 2.0 (the “License”); you may not use this file except in compliance with the License. You may obtain a copy of the License at
http://www.apache.org/licenses/LICENSE-2.0
Unless required by applicable law or agreed to in writing, software distributed under the License is distributed on an “AS IS” BASIS, WITHOUT WARRANTIES OR CONDITIONS OF ANY KIND, either express or implied. See the License for the specific language governing permissions and limitations under the License.
Go imports
package v1

import (
	"context"
	"fmt"

	"github.com/robfig/cron"
	apierrors "k8s.io/apimachinery/pkg/api/errors"
	"k8s.io/apimachinery/pkg/runtime/schema"
	validationutils "k8s.io/apimachinery/pkg/util/validation"
	"k8s.io/apimachinery/pkg/util/validation/field"

	"k8s.io/apimachinery/pkg/runtime"
	ctrl "sigs.k8s.io/controller-runtime"
	logf "sigs.k8s.io/controller-runtime/pkg/log"
	"sigs.k8s.io/controller-runtime/pkg/webhook"
	"sigs.k8s.io/controller-runtime/pkg/webhook/admission"

	batchv1 "tutorial.kubebuilder.io/project/api/v1"
)
Next, we’ll setup a logger for the webhooks.
var cronjoblog = logf.Log.WithName("cronjob-resource")
Then, we set up the webhook with the manager.
// SetupCronJobWebhookWithManager registers the webhook for CronJob in the manager.
func SetupCronJobWebhookWithManager(mgr ctrl.Manager) error {
	return ctrl.NewWebhookManagedBy(mgr).For(&batchv1.CronJob{}).
		WithValidator(&CronJobCustomValidator{}).
		WithDefaulter(&CronJobCustomDefaulter{
			DefaultConcurrencyPolicy:          batchv1.AllowConcurrent,
			DefaultSuspend:                    false,
			DefaultSuccessfulJobsHistoryLimit: 3,
			DefaultFailedJobsHistoryLimit:     1,
		}).
		Complete()
}
Notice that we use kubebuilder markers to generate webhook manifests. This marker is responsible for generating a mutating webhook manifest.
The meaning of each marker can be found here.
This marker is responsible for generating a mutation webhook manifest.
// +kubebuilder:webhook:path=/mutate-batch-tutorial-kubebuilder-io-v1-cronjob,mutating=true,failurePolicy=fail,sideEffects=None,groups=batch.tutorial.kubebuilder.io,resources=cronjobs,verbs=create;update,versions=v1,name=mcronjob-v1.kb.io,admissionReviewVersions=v1

// CronJobCustomDefaulter struct is responsible for setting default values on the custom resource of the
// Kind CronJob when those are created or updated.
//
// NOTE: The +kubebuilder:object:generate=false marker prevents controller-gen from generating DeepCopy methods,
// as it is used only for temporary operations and does not need to be deeply copied.
type CronJobCustomDefaulter struct {

	// Default values for various CronJob fields
	DefaultConcurrencyPolicy          batchv1.ConcurrencyPolicy
	DefaultSuspend                    bool
	DefaultSuccessfulJobsHistoryLimit int32
	DefaultFailedJobsHistoryLimit     int32
}

var _ webhook.CustomDefaulter = &CronJobCustomDefaulter{}
We use the webhook.CustomDefaulterinterface to set defaults to our CRD.
A webhook will automatically be served that calls this defaulting.
The Defaultmethod is expected to mutate the receiver, setting the defaults.
// Default implements webhook.CustomDefaulter so a webhook will be registered for the Kind CronJob.
func (d *CronJobCustomDefaulter) Default(_ context.Context, obj runtime.Object) error {
	cronjob, ok := obj.(*batchv1.CronJob)

	if !ok {
		return fmt.Errorf("expected an CronJob object but got %T", obj)
	}
	cronjoblog.Info("Defaulting for CronJob", "name", cronjob.GetName())

	// Set default values
	d.applyDefaults(cronjob)
	return nil
}

// applyDefaults applies default values to CronJob fields.
func (d *CronJobCustomDefaulter) applyDefaults(cronJob *batchv1.CronJob) {
	if cronJob.Spec.ConcurrencyPolicy == "" {
		cronJob.Spec.ConcurrencyPolicy = d.DefaultConcurrencyPolicy
	}
	if cronJob.Spec.Suspend == nil {
		cronJob.Spec.Suspend = new(bool)
		*cronJob.Spec.Suspend = d.DefaultSuspend
	}
	if cronJob.Spec.SuccessfulJobsHistoryLimit == nil {
		cronJob.Spec.SuccessfulJobsHistoryLimit = new(int32)
		*cronJob.Spec.SuccessfulJobsHistoryLimit = d.DefaultSuccessfulJobsHistoryLimit
	}
	if cronJob.Spec.FailedJobsHistoryLimit == nil {
		cronJob.Spec.FailedJobsHistoryLimit = new(int32)
		*cronJob.Spec.FailedJobsHistoryLimit = d.DefaultFailedJobsHistoryLimit
	}
}
We can validate our CRD beyond what’s possible with declarative validation. Generally, declarative validation should be sufficient, but sometimes more advanced use cases call for complex validation.
For instance, we’ll see below that we use this to validate a well-formed cron schedule without making up a long regular expression.
If webhook.CustomValidator interface is implemented, a webhook will automatically be
served that calls the validation.
The ValidateCreate, ValidateUpdate and ValidateDelete methods are expected
to validate its receiver upon creation, update and deletion respectively.
We separate out ValidateCreate from ValidateUpdate to allow behavior like making
certain fields immutable, so that they can only be set on creation.
ValidateDelete is also separated from ValidateUpdate to allow different
validation behavior on deletion.
Here, however, we just use the same shared validation for ValidateCreate and
ValidateUpdate. And we do nothing in ValidateDelete, since we don’t need to
validate anything on deletion.
This marker is responsible for generating a validation webhook manifest.
// +kubebuilder:webhook:path=/validate-batch-tutorial-kubebuilder-io-v1-cronjob,mutating=false,failurePolicy=fail,sideEffects=None,groups=batch.tutorial.kubebuilder.io,resources=cronjobs,verbs=create;update,versions=v1,name=vcronjob-v1.kb.io,admissionReviewVersions=v1

// CronJobCustomValidator struct is responsible for validating the CronJob resource
// when it is created, updated, or deleted.
//
// NOTE: The +kubebuilder:object:generate=false marker prevents controller-gen from generating DeepCopy methods,
// as this struct is used only for temporary operations and does not need to be deeply copied.
type CronJobCustomValidator struct {
	// TODO(user): Add more fields as needed for validation
}

var _ webhook.CustomValidator = &CronJobCustomValidator{}

// ValidateCreate implements webhook.CustomValidator so a webhook will be registered for the type CronJob.
func (v *CronJobCustomValidator) ValidateCreate(_ context.Context, obj runtime.Object) (admission.Warnings, error) {
	cronjob, ok := obj.(*batchv1.CronJob)
	if !ok {
		return nil, fmt.Errorf("expected a CronJob object but got %T", obj)
	}
	cronjoblog.Info("Validation for CronJob upon creation", "name", cronjob.GetName())

	return nil, validateCronJob(cronjob)
}

// ValidateUpdate implements webhook.CustomValidator so a webhook will be registered for the type CronJob.
func (v *CronJobCustomValidator) ValidateUpdate(_ context.Context, oldObj, newObj runtime.Object) (admission.Warnings, error) {
	cronjob, ok := newObj.(*batchv1.CronJob)
	if !ok {
		return nil, fmt.Errorf("expected a CronJob object for the newObj but got %T", newObj)
	}
	cronjoblog.Info("Validation for CronJob upon update", "name", cronjob.GetName())

	return nil, validateCronJob(cronjob)
}

// ValidateDelete implements webhook.CustomValidator so a webhook will be registered for the type CronJob.
func (v *CronJobCustomValidator) ValidateDelete(ctx context.Context, obj runtime.Object) (admission.Warnings, error) {
	cronjob, ok := obj.(*batchv1.CronJob)
	if !ok {
		return nil, fmt.Errorf("expected a CronJob object but got %T", obj)
	}
	cronjoblog.Info("Validation for CronJob upon deletion", "name", cronjob.GetName())

	// TODO(user): fill in your validation logic upon object deletion.

	return nil, nil
}
We validate the name and the spec of the CronJob.
// validateCronJob validates the fields of a CronJob object.
func validateCronJob(cronjob *batchv1.CronJob) error {
	var allErrs field.ErrorList
	if err := validateCronJobName(cronjob); err != nil {
		allErrs = append(allErrs, err)
	}
	if err := validateCronJobSpec(cronjob); err != nil {
		allErrs = append(allErrs, err)
	}
	if len(allErrs) == 0 {
		return nil
	}

	return apierrors.NewInvalid(
		schema.GroupKind{Group: "batch.tutorial.kubebuilder.io", Kind: "CronJob"},
		cronjob.Name, allErrs)
}
Some fields are declaratively validated by OpenAPI schema.
You can find kubebuilder validation markers (prefixed
with // +kubebuilder:validation) in the
Designing an API section.
You can find all of the kubebuilder supported markers for
declaring validation by running controller-gen crd -w,
or here.
func validateCronJobSpec(cronjob *batchv1.CronJob) *field.Error {
	// The field helpers from the kubernetes API machinery help us return nicely
	// structured validation errors.
	return validateScheduleFormat(
		cronjob.Spec.Schedule,
		field.NewPath("spec").Child("schedule"))
}
We’ll need to validate the cron schedule is well-formatted.
func validateScheduleFormat(schedule string, fldPath *field.Path) *field.Error {
	if _, err := cron.ParseStandard(schedule); err != nil {
		return field.Invalid(fldPath, schedule, err.Error())
	}
	return nil
}
Validate object name
Validating the length of a string field can be done declaratively by the validation schema.
But the ObjectMeta.Name field is defined in a shared package under
the apimachinery repo, so we can’t declaratively validate it using
the validation schema.
func validateCronJobName(cronjob *batchv1.CronJob) *field.Error {
	if len(cronjob.Name) > validationutils.DNS1035LabelMaxLength-11 {
		// The job name length is 63 characters like all Kubernetes objects
		// (which must fit in a DNS subdomain). The cronjob controller appends
		// a 11-character suffix to the cronjob (`-$TIMESTAMP`) when creating
		// a job. The job name length limit is 63 characters. Therefore cronjob
		// names must have length <= 63-11=52. If we don't validate this here,
		// then job creation will fail later.
		return field.Invalid(field.NewPath("metadata").Child("name"), cronjob.Name, "must be no more than 52 characters")
	}
	return nil
}
运行并部署控制器
可选
如果你选择修改了 API 定义,那么在继续之前,请生成 CR/CRD 等清单:
make manifests
为了测试控制器,我们可以在本地连接到集群运行它。但在此之前,需要按照快速开始安装我们的 CRD。必要时,这会使用 controller-tools 自动更新 YAML 清单:
make install
现在 CRD 已安装好,我们可以连接到集群运行控制器了。它会使用我们连接集群所用的凭证,因此暂时不需要担心 RBAC。
在另一个终端中运行:
export ENABLE_WEBHOOKS=false
make run
你应当能看到控制器的启动日志,但此时它还不会做任何事情。
接下来我们需要一个 CronJob 来测试。把示例写到 config/samples/batch_v1_cronjob.yaml,然后使用它:
apiVersion: batch.tutorial.kubebuilder.io/v1
kind: CronJob
metadata:
  labels:
    app.kubernetes.io/name: project
    app.kubernetes.io/managed-by: kustomize
  name: cronjob-sample
spec:
  schedule: "*/1 * * * *"
  startingDeadlineSeconds: 60
  concurrencyPolicy: Allow # explicitly specify, but Allow is also default.
  jobTemplate:
    spec:
      template:
        spec:
          containers:
          - name: hello
            image: busybox
            args:
            - /bin/sh
            - -c
            - date; echo Hello from the Kubernetes cluster
          restartPolicy: OnFailure
kubectl create -f config/samples/batch_v1_cronjob.yaml
此时你应该能看到一系列活动。如果观察这些变化,应能看到 cronjob 正在运行并更新状态:
kubectl get cronjob.batch.tutorial.kubebuilder.io -o yaml
kubectl get job
确认它已正常工作后,我们可以将其在集群中运行。停止 make run,然后执行:
make docker-build docker-push IMG=<some-registry>/<project-name>:tag
make deploy IMG=<some-registry>/<project-name>:tag
如果像之前那样再次列出 cronjobs,我们应该能看到控制器又在正常工作了!
部署 cert-manager
我们建议使用 cert-manager 为 Webhook 服务器签发证书。只要能把证书放到期望的位置,其他方案也同样可行。
你可以按照 cert-manager 文档 进行安装。
cert-manager 还有一个名为 CA Injector 的组件,负责将 CA bundle 注入到 MutatingWebhookConfiguration / ValidatingWebhookConfiguration 中。
为实现这一点,你需要在 MutatingWebhookConfiguration / ValidatingWebhookConfiguration 对象上添加键为 cert-manager.io/inject-ca-from 的注解。该注解的值应指向一个已存在的 certificate request 实例,格式为 <certificate-namespace>/<certificate-name>。
下面是我们用于给 MutatingWebhookConfiguration / ValidatingWebhookConfiguration 对象添加注解的 kustomize 补丁。
部署 Admission Webhook
cert-manager
你需要按照这里的说明安装 cert-manager 组件。
构建镜像
在本地运行以下命令构建镜像:
make docker-build docker-push IMG=<some-registry>/<project-name>:tag
部署 Webhook
你需要通过 kustomize 启用 webhook 与 cert-manager 的配置。
config/default/kustomization.yaml 现在应如下所示:
# Adds namespace to all resources.
namespace: project-system

# Value of this field is prepended to the
# names of all resources, e.g. a deployment named
# "wordpress" becomes "alices-wordpress".
# Note that it should also match with the prefix (text before '-') of the namespace
# field above.
namePrefix: project-

# Labels to add to all resources and selectors.
#labels:
#- includeSelectors: true
#  pairs:
#    someName: someValue

resources:
- ../crd
- ../rbac
- ../manager
# [WEBHOOK] To enable webhook, uncomment all the sections with [WEBHOOK] prefix including the one in
# crd/kustomization.yaml
- ../webhook
# [CERTMANAGER] To enable cert-manager, uncomment all sections with 'CERTMANAGER'. 'WEBHOOK' components are required.
- ../certmanager
# [PROMETHEUS] To enable prometheus monitor, uncomment all sections with 'PROMETHEUS'.
- ../prometheus
# [METRICS] Expose the controller manager metrics service.
- metrics_service.yaml
# [NETWORK POLICY] Protect the /metrics endpoint and Webhook Server with NetworkPolicy.
# Only Pod(s) running a namespace labeled with 'metrics: enabled' will be able to gather the metrics.
# Only CR(s) which requires webhooks and are applied on namespaces labeled with 'webhooks: enabled' will
# be able to communicate with the Webhook Server.
#- ../network-policy

# Uncomment the patches line if you enable Metrics
patches:
# [METRICS] The following patch will enable the metrics endpoint using HTTPS and the port :8443.
# More info: https://book.kubebuilder.io/reference/metrics
- path: manager_metrics_patch.yaml
  target:
    kind: Deployment

# Uncomment the patches line if you enable Metrics and CertManager
# [METRICS-WITH-CERTS] To enable metrics protected with certManager, uncomment the following line.
# This patch will protect the metrics with certManager self-signed certs.
- path: cert_metrics_manager_patch.yaml
  target:
    kind: Deployment

# [WEBHOOK] To enable webhook, uncomment all the sections with [WEBHOOK] prefix including the one in
# crd/kustomization.yaml
- path: manager_webhook_patch.yaml
  target:
    kind: Deployment

# [CERTMANAGER] To enable cert-manager, uncomment all sections with 'CERTMANAGER' prefix.
# Uncomment the following replacements to add the cert-manager CA injection annotations
replacements:
 - source: # Uncomment the following block to enable certificates for metrics
     kind: Service
     version: v1
     name: controller-manager-metrics-service
     fieldPath: metadata.name
   targets:
     - select:
         kind: Certificate
         group: cert-manager.io
         version: v1
         name: metrics-certs
       fieldPaths:
         - spec.dnsNames.0
         - spec.dnsNames.1
       options:
         delimiter: '.'
         index: 0
         create: true
     - select: # Uncomment the following to set the Service name for TLS config in Prometheus ServiceMonitor
         kind: ServiceMonitor
         group: monitoring.coreos.com
         version: v1
         name: controller-manager-metrics-monitor
       fieldPaths:
         - spec.endpoints.0.tlsConfig.serverName
       options:
         delimiter: '.'
         index: 0
         create: true

 - source:
     kind: Service
     version: v1
     name: controller-manager-metrics-service
     fieldPath: metadata.namespace
   targets:
     - select:
         kind: Certificate
         group: cert-manager.io
         version: v1
         name: metrics-certs
       fieldPaths:
         - spec.dnsNames.0
         - spec.dnsNames.1
       options:
         delimiter: '.'
         index: 1
         create: true
     - select: # Uncomment the following to set the Service namespace for TLS in Prometheus ServiceMonitor
         kind: ServiceMonitor
         group: monitoring.coreos.com
         version: v1
         name: controller-manager-metrics-monitor
       fieldPaths:
         - spec.endpoints.0.tlsConfig.serverName
       options:
         delimiter: '.'
         index: 1
         create: true

 - source: # Uncomment the following block if you have any webhook
     kind: Service
     version: v1
     name: webhook-service
     fieldPath: .metadata.name # Name of the service
   targets:
     - select:
         kind: Certificate
         group: cert-manager.io
         version: v1
         name: serving-cert
       fieldPaths:
         - .spec.dnsNames.0
         - .spec.dnsNames.1
       options:
         delimiter: '.'
         index: 0
         create: true
 - source:
     kind: Service
     version: v1
     name: webhook-service
     fieldPath: .metadata.namespace # Namespace of the service
   targets:
     - select:
         kind: Certificate
         group: cert-manager.io
         version: v1
         name: serving-cert
       fieldPaths:
         - .spec.dnsNames.0
         - .spec.dnsNames.1
       options:
         delimiter: '.'
         index: 1
         create: true

 - source: # Uncomment the following block if you have a ValidatingWebhook (--programmatic-validation)
     kind: Certificate
     group: cert-manager.io
     version: v1
     name: serving-cert # This name should match the one in certificate.yaml
     fieldPath: .metadata.namespace # Namespace of the certificate CR
   targets:
     - select:
         kind: ValidatingWebhookConfiguration
       fieldPaths:
         - .metadata.annotations.[cert-manager.io/inject-ca-from]
       options:
         delimiter: '/'
         index: 0
         create: true
 - source:
     kind: Certificate
     group: cert-manager.io
     version: v1
     name: serving-cert
     fieldPath: .metadata.name
   targets:
     - select:
         kind: ValidatingWebhookConfiguration
       fieldPaths:
         - .metadata.annotations.[cert-manager.io/inject-ca-from]
       options:
         delimiter: '/'
         index: 1
         create: true

 - source: # Uncomment the following block if you have a DefaultingWebhook (--defaulting )
     kind: Certificate
     group: cert-manager.io
     version: v1
     name: serving-cert
     fieldPath: .metadata.namespace # Namespace of the certificate CR
   targets:
     - select:
         kind: MutatingWebhookConfiguration
       fieldPaths:
         - .metadata.annotations.[cert-manager.io/inject-ca-from]
       options:
         delimiter: '/'
         index: 0
         create: true
 - source:
     kind: Certificate
     group: cert-manager.io
     version: v1
     name: serving-cert
     fieldPath: .metadata.name
   targets:
     - select:
         kind: MutatingWebhookConfiguration
       fieldPaths:
         - .metadata.annotations.[cert-manager.io/inject-ca-from]
       options:
         delimiter: '/'
         index: 1
         create: true

# - source: # Uncomment the following block if you have a ConversionWebhook (--conversion)
#     kind: Certificate
#     group: cert-manager.io
#     version: v1
#     name: serving-cert
#     fieldPath: .metadata.namespace # Namespace of the certificate CR
#   targets: # Do not remove or uncomment the following scaffold marker; required to generate code for target CRD.
# +kubebuilder:scaffold:crdkustomizecainjectionns
# - source:
#     kind: Certificate
#     group: cert-manager.io
#     version: v1
#     name: serving-cert
#     fieldPath: .metadata.name
#   targets: # Do not remove or uncomment the following scaffold marker; required to generate code for target CRD.
# +kubebuilder:scaffold:crdkustomizecainjectionname
而 config/crd/kustomization.yaml 现在应如下所示:
# This kustomization.yaml is not intended to be run by itself,
# since it depends on service name and namespace that are out of this kustomize package.
# It should be run by config/default
resources:
- bases/batch.tutorial.kubebuilder.io_cronjobs.yaml
# +kubebuilder:scaffold:crdkustomizeresource

patches:
# [WEBHOOK] To enable webhook, uncomment all the sections with [WEBHOOK] prefix.
# patches here are for enabling the conversion webhook for each CRD
# +kubebuilder:scaffold:crdkustomizewebhookpatch

# [WEBHOOK] To enable webhook, uncomment the following section
# the following config is for teaching kustomize how to do kustomization for CRDs.
#configurations:
#- kustomizeconfig.yaml
现在你可以将其部署到集群:
make deploy IMG=<some-registry>/<project-name>:tag
稍等片刻,直到 webhook Pod 启动并签发好证书。通常在 1 分钟内完成。
现在可以创建一个合法的 CronJob 来测试你的 webhooks;创建应当能够顺利完成。
kubectl create -f config/samples/batch_v1_cronjob.yaml
你也可以尝试创建一个非法的 CronJob(例如使用格式错误的 schedule 字段)。此时应看到创建失败并返回校验错误。
编写控制器测试
测试 Kubernetes 控制器是一个很大的主题,而 kubebuilder 为你生成的测试样板相对精简。
为了带你了解 Kubebuilder 生成的控制器的集成测试模式,我们将重温第一篇教程中构建的 CronJob,并为其编写一个简单测试。
基本方法是:在生成的 suite_test.go 文件中,使用 envtest 创建一个本地 Kubernetes API server,实例化并运行你的控制器;随后编写额外的 *_test.go 文件,使用 Ginkgo 对其进行测试。
如果你想调整 envtest 集群的配置,请参见为集成测试配置 envtest 章节以及 envtest 文档。
测试环境准备
Apache License
Copyright 2025 The Kubernetes authors.
Licensed under the Apache License, Version 2.0 (the “License”); you may not use this file except in compliance with the License. You may obtain a copy of the License at
http://www.apache.org/licenses/LICENSE-2.0
Unless required by applicable law or agreed to in writing, software distributed under the License is distributed on an “AS IS” BASIS, WITHOUT WARRANTIES OR CONDITIONS OF ANY KIND, either express or implied. See the License for the specific language governing permissions and limitations under the License.
Imports
When we created the CronJob API with kubebuilder create api in a previous chapter, Kubebuilder already did some test work for you.
Kubebuilder scaffolded a internal/controller/suite_test.go file that does the bare bones of setting up a test environment.
First, it will contain the necessary imports.
package controller

import (
	"context"
	"os"
	"path/filepath"
	"testing"

	ctrl "sigs.k8s.io/controller-runtime"

	. "github.com/onsi/ginkgo/v2"
	. "github.com/onsi/gomega"

	"k8s.io/client-go/kubernetes/scheme"
	"k8s.io/client-go/rest"
	"sigs.k8s.io/controller-runtime/pkg/client"
	"sigs.k8s.io/controller-runtime/pkg/envtest"
	logf "sigs.k8s.io/controller-runtime/pkg/log"
	"sigs.k8s.io/controller-runtime/pkg/log/zap"

	batchv1 "tutorial.kubebuilder.io/project/api/v1"
	// +kubebuilder:scaffold:imports
)

// These tests use Ginkgo (BDD-style Go testing framework). Refer to
// http://onsi.github.io/ginkgo/ to learn more about Ginkgo.
Now, let’s go through the code generated.
var (
	ctx       context.Context
	cancel    context.CancelFunc
	testEnv   *envtest.Environment
	cfg       *rest.Config
	k8sClient client.Client // You'll be using this client in your tests.
)

func TestControllers(t *testing.T) {
	RegisterFailHandler(Fail)

	RunSpecs(t, "Controller Suite")
}

var _ = BeforeSuite(func() {
	logf.SetLogger(zap.New(zap.WriteTo(GinkgoWriter), zap.UseDevMode(true)))

	ctx, cancel = context.WithCancel(context.TODO())

	var err error
The CronJob Kind is added to the runtime scheme used by the test environment. This ensures that the CronJob API is registered with the scheme, allowing the test controller to recognize and interact with CronJob resources.
	err = batchv1.AddToScheme(scheme.Scheme)
	Expect(err).NotTo(HaveOccurred())
After the schemas, you will see the following marker. This marker is what allows new schemas to be added here automatically when a new API is added to the project.
// +kubebuilder:scaffold:scheme
The envtest environment is configured to load Custom Resource Definitions (CRDs) from the specified directory. This setup enables the test environment to recognize and interact with the custom resources defined by these CRDs.
	By("bootstrapping test environment")
	testEnv = &envtest.Environment{
		CRDDirectoryPaths:     []string{filepath.Join("..", "..", "config", "crd", "bases")},
		ErrorIfCRDPathMissing: true,
	}

	// Retrieve the first found binary directory to allow running tests from IDEs
	if getFirstFoundEnvTestBinaryDir() != "" {
		testEnv.BinaryAssetsDirectory = getFirstFoundEnvTestBinaryDir()
	}
Then, we start the envtest cluster.
	// cfg is defined in this file globally.
	cfg, err = testEnv.Start()
	Expect(err).NotTo(HaveOccurred())
	Expect(cfg).NotTo(BeNil())
A client is created for our test CRUD operations.
	k8sClient, err = client.New(cfg, client.Options{Scheme: scheme.Scheme})
	Expect(err).NotTo(HaveOccurred())
	Expect(k8sClient).NotTo(BeNil())
One thing that this autogenerated file is missing, however, is a way to actually start your controller. The code above will set up a client for interacting with your custom Kind, but will not be able to test your controller behavior. If you want to test your custom controller logic, you’ll need to add some familiar-looking manager logic to your BeforeSuite() function, so you can register your custom controller to run on this test cluster.
You may notice that the code below runs your controller with nearly identical logic to your CronJob project’s main.go! The only difference is that the manager is started in a separate goroutine so it does not block the cleanup of envtest when you’re done running your tests.
Note that we set up both a “live” k8s client and a separate client from the manager. This is because when making
assertions in tests, you generally want to assert against the live state of the API server. If you use the client
from the manager (k8sManager.GetClient), you’d end up asserting against the contents of the cache instead, which is
slower and can introduce flakiness into your tests. We could use the manager’s APIReader to accomplish the same
thing, but that would leave us with two clients in our test assertions and setup (one for reading, one for writing),
and it’d be easy to make mistakes.
Note that we keep the reconciler running against the manager’s cache client, though – we want our controller to behave as it would in production, and we use features of the cache (like indices) in our controller which aren’t available when talking directly to the API server.
	k8sManager, err := ctrl.NewManager(cfg, ctrl.Options{
		Scheme: scheme.Scheme,
	})
	Expect(err).ToNot(HaveOccurred())

	err = (&CronJobReconciler{
		Client: k8sManager.GetClient(),
		Scheme: k8sManager.GetScheme(),
	}).SetupWithManager(k8sManager)
	Expect(err).ToNot(HaveOccurred())

	go func() {
		defer GinkgoRecover()
		err = k8sManager.Start(ctx)
		Expect(err).ToNot(HaveOccurred(), "failed to run manager")
	}()
})
Kubebuilder also generates boilerplate functions for cleaning up envtest and actually running your test files in your controllers/ directory. You won’t need to touch these.
var _ = AfterSuite(func() {
	By("tearing down the test environment")
	cancel()
	err := testEnv.Stop()
	Expect(err).NotTo(HaveOccurred())
})
Now that you have your controller running on a test cluster and a client ready to perform operations on your CronJob, we can start writing integration tests!
// getFirstFoundEnvTestBinaryDir locates the first binary in the specified path.
// ENVTEST-based tests depend on specific binaries, usually located in paths set by
// controller-runtime. When running tests directly (e.g., via an IDE) without using
// Makefile targets, the 'BinaryAssetsDirectory' must be explicitly configured.
//
// This function streamlines the process by finding the required binaries, similar to
// setting the 'KUBEBUILDER_ASSETS' environment variable. To ensure the binaries are
// properly set up, run 'make setup-envtest' beforehand.
func getFirstFoundEnvTestBinaryDir() string {
	basePath := filepath.Join("..", "..", "bin", "k8s")
	entries, err := os.ReadDir(basePath)
	if err != nil {
		logf.Log.Error(err, "Failed to read directory", "path", basePath)
		return ""
	}
	for _, entry := range entries {
		if entry.IsDir() {
			return filepath.Join(basePath, entry.Name())
		}
	}
	return ""
}
测试控制器行为
Apache License
Licensed under the Apache License, Version 2.0 (the “License”); you may not use this file except in compliance with the License. You may obtain a copy of the License at
http://www.apache.org/licenses/LICENSE-2.0
Unless required by applicable law or agreed to in writing, software distributed under the License is distributed on an “AS IS” BASIS, WITHOUT WARRANTIES OR CONDITIONS OF ANY KIND, either express or implied. See the License for the specific language governing permissions and limitations under the License.
Ideally, we should have one <kind>_controller_test.go for each controller scaffolded and called in the suite_test.go.
So, let’s write our example test for the CronJob controller (cronjob_controller_test.go.)
Imports
As usual, we start with the necessary imports. We also define some utility variables.
package controller

import (
	"context"
	"reflect"
	"time"

	. "github.com/onsi/ginkgo/v2"
	. "github.com/onsi/gomega"
	batchv1 "k8s.io/api/batch/v1"
	v1 "k8s.io/api/core/v1"
	metav1 "k8s.io/apimachinery/pkg/apis/meta/v1"
	"k8s.io/apimachinery/pkg/types"

	cronjobv1 "tutorial.kubebuilder.io/project/api/v1"
)
The first step to writing a simple integration test is to actually create an instance of CronJob you can run tests against. Note that to create a CronJob, you’ll need to create a stub CronJob struct that contains your CronJob’s specifications.
Note that when we create a stub CronJob, the CronJob also needs stubs of its required downstream objects. Without the stubbed Job template spec and the Pod template spec below, the Kubernetes API will not be able to create the CronJob.
var _ = Describe("CronJob controller", func() {

	// Define utility constants for object names and testing timeouts/durations and intervals.
	const (
		CronjobName      = "test-cronjob"
		CronjobNamespace = "default"
		JobName          = "test-job"

		timeout  = time.Second * 10
		duration = time.Second * 10
		interval = time.Millisecond * 250
	)

	Context("When updating CronJob Status", func() {
		It("Should increase CronJob Status.Active count when new Jobs are created", func() {
			By("By creating a new CronJob")
			ctx := context.Background()
			cronJob := &cronjobv1.CronJob{
				TypeMeta: metav1.TypeMeta{
					APIVersion: "batch.tutorial.kubebuilder.io/v1",
					Kind:       "CronJob",
				},
				ObjectMeta: metav1.ObjectMeta{
					Name:      CronjobName,
					Namespace: CronjobNamespace,
				},
				Spec: cronjobv1.CronJobSpec{
					Schedule: "1 * * * *",
					JobTemplate: batchv1.JobTemplateSpec{
						Spec: batchv1.JobSpec{
							// For simplicity, we only fill out the required fields.
							Template: v1.PodTemplateSpec{
								Spec: v1.PodSpec{
									// For simplicity, we only fill out the required fields.
									Containers: []v1.Container{
										{
											Name:  "test-container",
											Image: "test-image",
										},
									},
									RestartPolicy: v1.RestartPolicyOnFailure,
								},
							},
						},
					},
				},
			}
			Expect(k8sClient.Create(ctx, cronJob)).To(Succeed())
After creating this CronJob, let’s check that the CronJob’s Spec fields match what we passed in.
Note that, because the k8s apiserver may not have finished creating a CronJob after our Create() call from earlier, we will use Gomega’s Eventually() testing function instead of Expect() to give the apiserver an opportunity to finish creating our CronJob.
Eventually() will repeatedly run the function provided as an argument every interval seconds until
(a) the assertions done by the passed-in Gomega succeed, or
(b) the number of attempts * interval period exceed the provided timeout value.
In the examples below, timeout and interval are Go Duration values of our choosing.
			cronjobLookupKey := types.NamespacedName{Name: CronjobName, Namespace: CronjobNamespace}
			createdCronjob := &cronjobv1.CronJob{}

			// We'll need to retry getting this newly created CronJob, given that creation may not immediately happen.
			Eventually(func(g Gomega) {
				g.Expect(k8sClient.Get(ctx, cronjobLookupKey, createdCronjob)).To(Succeed())
			}, timeout, interval).Should(Succeed())
			// Let's make sure our Schedule string value was properly converted/handled.
			Expect(createdCronjob.Spec.Schedule).To(Equal("1 * * * *"))
Now that we’ve created a CronJob in our test cluster, the next step is to write a test that actually tests our CronJob controller’s behavior. Let’s test the CronJob controller’s logic responsible for updating CronJob.Status.Active with actively running jobs. We’ll verify that when a CronJob has a single active downstream Job, its CronJob.Status.Active field contains a reference to this Job.
First, we should get the test CronJob we created earlier, and verify that it currently does not have any active jobs.
We use Gomega’s Consistently() check here to ensure that the active job count remains 0 over a duration of time.
			By("By checking the CronJob has zero active Jobs")
			Consistently(func(g Gomega) {
				g.Expect(k8sClient.Get(ctx, cronjobLookupKey, createdCronjob)).To(Succeed())
				g.Expect(createdCronjob.Status.Active).To(BeEmpty())
			}, duration, interval).Should(Succeed())
Next, we actually create a stubbed Job that will belong to our CronJob, as well as its downstream template specs. We set the Job’s status’s “Active” count to 2 to simulate the Job running two pods, which means the Job is actively running.
We then take the stubbed Job and set its owner reference to point to our test CronJob. This ensures that the test Job belongs to, and is tracked by, our test CronJob. Once that’s done, we create our new Job instance.
			By("By creating a new Job")
			testJob := &batchv1.Job{
				ObjectMeta: metav1.ObjectMeta{
					Name:      JobName,
					Namespace: CronjobNamespace,
				},
				Spec: batchv1.JobSpec{
					Template: v1.PodTemplateSpec{
						Spec: v1.PodSpec{
							// For simplicity, we only fill out the required fields.
							Containers: []v1.Container{
								{
									Name:  "test-container",
									Image: "test-image",
								},
							},
							RestartPolicy: v1.RestartPolicyOnFailure,
						},
					},
				},
			}

			// Note that your CronJob’s GroupVersionKind is required to set up this owner reference.
			kind := reflect.TypeOf(cronjobv1.CronJob{}).Name()
			gvk := cronjobv1.GroupVersion.WithKind(kind)

			controllerRef := metav1.NewControllerRef(createdCronjob, gvk)
			testJob.SetOwnerReferences([]metav1.OwnerReference{*controllerRef})
			Expect(k8sClient.Create(ctx, testJob)).To(Succeed())
			// Note that you can not manage the status values while creating the resource.
			// The status field is managed separately to reflect the current state of the resource.
			// Therefore, it should be updated using a PATCH or PUT operation after the resource has been created.
			// Additionally, it is recommended to use StatusConditions to manage the status. For further information see:
			// https://github.com/kubernetes/community/blob/master/contributors/devel/sig-architecture/api-conventions.md#spec-and-status
			testJob.Status.Active = 2
			Expect(k8sClient.Status().Update(ctx, testJob)).To(Succeed())
Adding this Job to our test CronJob should trigger our controller’s reconciler logic. After that, we can write a test that evaluates whether our controller eventually updates our CronJob’s Status field as expected!
			By("By checking that the CronJob has one active Job")
			Eventually(func(g Gomega) {
				g.Expect(k8sClient.Get(ctx, cronjobLookupKey, createdCronjob)).To(Succeed(), "should GET the CronJob")
				g.Expect(createdCronjob.Status.Active).To(HaveLen(1), "should have exactly one active job")
				g.Expect(createdCronjob.Status.Active[0].Name).To(Equal(JobName), "the wrong job is active")
			}, timeout, interval).Should(Succeed(), "should list our active job %s in the active jobs list in status", JobName)
		})
	})

})
After writing all this code, you can run go test ./... in your controllers/ directory again to run your new test!
上面的 Status 更新示例展示了一个针对带下游对象的自定义 Kind 的通用测试策略。到这里,你应该已经掌握了以下用于测试控制器行为的方法:
- 在 envtest 集群上运行你的控制器
- 为创建测试对象编写桩代码(stubs)
- 只改变对象的某些部分,以测试特定的控制器行为
尾声
到这里,我们已经完成了一个功能相当完备的 CronJob 控制器实现,使用了 Kubebuilder 的大多数特性,并借助 envtest 为控制器编写了测试。
如果你还想继续深入,前往多版本教程 学习如何为项目添加新的 API 版本。
此外,你也可以自行尝试以下步骤 —— 我们很快会为它们补充教程:
- 在
kubectl get中添加额外的打印列
教程:多版本 API
大多数项目最初都会从一个会随版本变化的 alpha API 开始。然而,最终大多数项目都需要迁移到更稳定的 API。一旦 API 稳定,就不能再引入破坏性变更。这正是 API 版本化发挥作用的地方。
让我们对 CronJob 的 API 规格做一些变更,并确保我们的 CronJob 项目能支持不同的版本。
如果你还没有,请先阅读基础的 CronJob 教程。
接下来,让我们明确要做哪些变更……
做些改动
Kubernetes API 中一个相当常见的变更是:把原先非结构化或以特殊字符串格式存储的数据,改为结构化数据。我们的 schedule 字段就非常符合这一点——当前在 v1 中,它长这样:
schedule: "*/1 * * * *"
这是一个教科书式的“特殊字符串格式”的例子(除非你是 Unix 管理员,否则可读性不佳)。
让我们把它变得更结构化一些。依据我们的 CronJob 代码,我们支持“标准”的 Cron 格式。
在 Kubernetes 中,所有版本之间必须能够安全地往返转换。这意味着,如果我们从版本 1 转换到版本 2,再转换回版本 1,就不能丢失信息。因此,我们对 API 做的任何变更都必须与 v1 所支持的内容兼容,同时还需要确保在 v2 中新增的任何内容在 v1 中也能得到支持。在某些情况下,这意味着需要向 v1 添加新字段,但在我们的场景中,由于没有新增功能,因此无需这么做。
牢记上述要求,我们把上面的例子转换为略微更结构化的形式:
schedule:
  minute: */1
现在,至少每个字段都有了标签,同时仍然可以轻松支持每个字段的不同语法。
为完成此变更,我们需要一个新的 API 版本,就叫它 v2:
kubebuilder create api --group batch --version v2 --kind CronJob
在 “Create Resource” 处选择 y,在 “Create Controller” 处选择 n。
现在,复制现有类型,然后做相应修改:
Apache License
Copyright 2025 The Kubernetes authors.
Licensed under the Apache License, Version 2.0 (the “License”); you may not use this file except in compliance with the License. You may obtain a copy of the License at
http://www.apache.org/licenses/LICENSE-2.0
Unless required by applicable law or agreed to in writing, software distributed under the License is distributed on an “AS IS” BASIS, WITHOUT WARRANTIES OR CONDITIONS OF ANY KIND, either express or implied. See the License for the specific language governing permissions and limitations under the License.
Since we’re in a v2 package, controller-gen will assume this is for the v2
version automatically. We could override that with the +versionName
marker.
package v2
Imports
import (
	batchv1 "k8s.io/api/batch/v1"
	corev1 "k8s.io/api/core/v1"
	metav1 "k8s.io/apimachinery/pkg/apis/meta/v1"
)

// EDIT THIS FILE!  THIS IS SCAFFOLDING FOR YOU TO OWN!
// NOTE: json tags are required.  Any new fields you add must have json tags for the fields to be serialized.
We’ll leave our spec largely unchanged, except to change the schedule field to a new type.
// CronJobSpec defines the desired state of CronJob
type CronJobSpec struct {
	// schedule in Cron format, see https://en.wikipedia.org/wiki/Cron.
	// +required
	Schedule CronSchedule `json:"schedule"`
The rest of Spec
	// startingDeadlineSeconds defines in seconds for starting the job if it misses scheduled
	// time for any reason.  Missed jobs executions will be counted as failed ones.
	// +optional
	// +kubebuilder:validation:Minimum=0
	StartingDeadlineSeconds *int64 `json:"startingDeadlineSeconds,omitempty"`

	// concurrencyPolicy defines how to treat concurrent executions of a Job.
	// Valid values are:
	// - "Allow" (default): allows CronJobs to run concurrently;
	// - "Forbid": forbids concurrent runs, skipping next run if previous run hasn't finished yet;
	// - "Replace": cancels currently running job and replaces it with a new one
	// +optional
	// +kubebuilder:default:=Allow
	ConcurrencyPolicy ConcurrencyPolicy `json:"concurrencyPolicy,omitempty"`

	// suspend tells the controller to suspend subsequent executions, it does
	// not apply to already started executions.  Defaults to false.
	// +optional
	Suspend *bool `json:"suspend,omitempty"`

	// jobTemplate defines the job that will be created when executing a CronJob.
	// +required
	JobTemplate batchv1.JobTemplateSpec `json:"jobTemplate"`

	// successfulJobsHistoryLimit defines the number of successful finished jobs to retain.
	// This is a pointer to distinguish between explicit zero and not specified.
	// +optional
	// +kubebuilder:validation:Minimum=0
	SuccessfulJobsHistoryLimit *int32 `json:"successfulJobsHistoryLimit,omitempty"`

	// failedJobsHistoryLimit defines the number of failed finished jobs to retain.
	// This is a pointer to distinguish between explicit zero and not specified.
	// +optional
	// +kubebuilder:validation:Minimum=0
	FailedJobsHistoryLimit *int32 `json:"failedJobsHistoryLimit,omitempty"`
}
Next, we’ll need to define a type to hold our schedule. Based on our proposed YAML above, it’ll have a field for each corresponding Cron “field”.
// describes a Cron schedule.
type CronSchedule struct {
	// minute specifies the minutes during which the job executes.
	// +optional
	Minute *CronField `json:"minute,omitempty"`
	// hour specifies the hour during which the job executes.
	// +optional
	Hour *CronField `json:"hour,omitempty"`
	// dayOfMonth specifies the day of the month during which the job executes.
	// +optional
	DayOfMonth *CronField `json:"dayOfMonth,omitempty"`
	// month specifies the month during which the job executes.
	// +optional
	Month *CronField `json:"month,omitempty"`
	// dayOfWeek specifies the day of the week during which the job executes.
	// +optional
	DayOfWeek *CronField `json:"dayOfWeek,omitempty"`
}
Finally, we’ll define a wrapper type to represent a field. We could attach additional validation to this field, but for now we’ll just use it for documentation purposes.
// represents a Cron field specifier.
type CronField string
Other Types
All the other types will stay the same as before.
// ConcurrencyPolicy describes how the job will be handled.
// Only one of the following concurrent policies may be specified.
// If none of the following policies is specified, the default one
// is AllowConcurrent.
// +kubebuilder:validation:Enum=Allow;Forbid;Replace
type ConcurrencyPolicy string

const (
	// AllowConcurrent allows CronJobs to run concurrently.
	AllowConcurrent ConcurrencyPolicy = "Allow"

	// ForbidConcurrent forbids concurrent runs, skipping next run if previous
	// hasn't finished yet.
	ForbidConcurrent ConcurrencyPolicy = "Forbid"

	// ReplaceConcurrent cancels currently running job and replaces it with a new one.
	ReplaceConcurrent ConcurrencyPolicy = "Replace"
)

// CronJobStatus defines the observed state of CronJob.
type CronJobStatus struct {
	// INSERT ADDITIONAL STATUS FIELD - define observed state of cluster
	// Important: Run "make" to regenerate code after modifying this file
	// active defines a list of pointers to currently running jobs.
	// +optional
	// +listType=atomic
	// +kubebuilder:validation:MinItems=1
	// +kubebuilder:validation:MaxItems=10
	Active []corev1.ObjectReference `json:"active,omitempty"`

	// lastScheduleTime defines the information when was the last time the job was successfully scheduled.
	// +optional
	LastScheduleTime *metav1.Time `json:"lastScheduleTime,omitempty"`

	// For Kubernetes API conventions, see:
	// https://github.com/kubernetes/community/blob/master/contributors/devel/sig-architecture/api-conventions.md#typical-status-properties

	// conditions represent the current state of the CronJob resource.
	// Each condition has a unique type and reflects the status of a specific aspect of the resource.
	//
	// Standard condition types include:
	// - "Available": the resource is fully functional
	// - "Progressing": the resource is being created or updated
	// - "Degraded": the resource failed to reach or maintain its desired state
	//
	// The status of each condition is one of True, False, or Unknown.
	// +listType=map
	// +listMapKey=type
	// +optional
	Conditions []metav1.Condition `json:"conditions,omitempty"`
}

// +kubebuilder:object:root=true
// +kubebuilder:subresource:status
// +versionName=v2
// CronJob is the Schema for the cronjobs API
type CronJob struct {
	metav1.TypeMeta `json:",inline"`

	// metadata is a standard object metadata
	// +optional
	metav1.ObjectMeta `json:"metadata,omitempty,omitzero"`

	// spec defines the desired state of CronJob
	// +required
	Spec CronJobSpec `json:"spec"`

	// status defines the observed state of CronJob
	// +optional
	Status CronJobStatus `json:"status,omitempty,omitzero"`
}

// +kubebuilder:object:root=true

// CronJobList contains a list of CronJob
type CronJobList struct {
	metav1.TypeMeta `json:",inline"`
	metav1.ListMeta `json:"metadata,omitempty"`
	Items           []CronJob `json:"items"`
}

func init() {
	SchemeBuilder.Register(&CronJob{}, &CronJobList{})
}
存储版本(Storage Versions)
Apache License
Copyright 2025 The Kubernetes authors.
Licensed under the Apache License, Version 2.0 (the “License”); you may not use this file except in compliance with the License. You may obtain a copy of the License at
http://www.apache.org/licenses/LICENSE-2.0
Unless required by applicable law or agreed to in writing, software distributed under the License is distributed on an “AS IS” BASIS, WITHOUT WARRANTIES OR CONDITIONS OF ANY KIND, either express or implied. See the License for the specific language governing permissions and limitations under the License.
package v1
Imports
import (
	batchv1 "k8s.io/api/batch/v1"
	corev1 "k8s.io/api/core/v1"
	metav1 "k8s.io/apimachinery/pkg/apis/meta/v1"
)

// EDIT THIS FILE!  THIS IS SCAFFOLDING FOR YOU TO OWN!
// NOTE: json tags are required.  Any new fields you add must have json tags for the fields to be serialized.
old stuff
// CronJobSpec defines the desired state of CronJob
type CronJobSpec struct {
	// schedule in Cron format, see https://en.wikipedia.org/wiki/Cron.
	// +kubebuilder:validation:MinLength=0
	// +required
	Schedule string `json:"schedule"`

	// startingDeadlineSeconds defines in seconds for starting the job if it misses scheduled
	// time for any reason.  Missed jobs executions will be counted as failed ones.
	// +optional
	// +kubebuilder:validation:Minimum=0
	StartingDeadlineSeconds *int64 `json:"startingDeadlineSeconds,omitempty"`

	// concurrencyPolicy specifies how to treat concurrent executions of a Job.
	// Valid values are:
	// - "Allow" (default): allows CronJobs to run concurrently;
	// - "Forbid": forbids concurrent runs, skipping next run if previous run hasn't finished yet;
	// - "Replace": cancels currently running job and replaces it with a new one
	// +optional
	// +kubebuilder:default:=Allow
	ConcurrencyPolicy ConcurrencyPolicy `json:"concurrencyPolicy,omitempty"`

	// suspend tells the controller to suspend subsequent executions, it does
	// not apply to already started executions.  Defaults to false.
	// +optional
	Suspend *bool `json:"suspend,omitempty"`

	// jobTemplate defines the job that will be created when executing a CronJob.
	// +required
	JobTemplate batchv1.JobTemplateSpec `json:"jobTemplate"`

	// successfulJobsHistoryLimit defines the number of successful finished jobs to retain.
	// This is a pointer to distinguish between explicit zero and not specified.
	// +optional
	// +kubebuilder:validation:Minimum=0
	SuccessfulJobsHistoryLimit *int32 `json:"successfulJobsHistoryLimit,omitempty"`

	// failedJobsHistoryLimit defines the number of failed finished jobs to retain.
	// This is a pointer to distinguish between explicit zero and not specified.
	// +optional
	// +kubebuilder:validation:Minimum=0
	FailedJobsHistoryLimit *int32 `json:"failedJobsHistoryLimit,omitempty"`
}

// ConcurrencyPolicy describes how the job will be handled.
// Only one of the following concurrent policies may be specified.
// If none of the following policies is specified, the default one
// is AllowConcurrent.
// +kubebuilder:validation:Enum=Allow;Forbid;Replace
type ConcurrencyPolicy string

const (
	// AllowConcurrent allows CronJobs to run concurrently.
	AllowConcurrent ConcurrencyPolicy = "Allow"

	// ForbidConcurrent forbids concurrent runs, skipping next run if previous
	// hasn't finished yet.
	ForbidConcurrent ConcurrencyPolicy = "Forbid"

	// ReplaceConcurrent cancels currently running job and replaces it with a new one.
	ReplaceConcurrent ConcurrencyPolicy = "Replace"
)

// CronJobStatus defines the observed state of CronJob.
type CronJobStatus struct {
	// INSERT ADDITIONAL STATUS FIELD - define observed state of cluster
	// Important: Run "make" to regenerate code after modifying this file

	// active defines a list of pointers to currently running jobs.
	// +optional
	// +listType=atomic
	// +kubebuilder:validation:MinItems=1
	// +kubebuilder:validation:MaxItems=10
	Active []corev1.ObjectReference `json:"active,omitempty"`

	// lastScheduleTime defines when was the last time the job was successfully scheduled.
	// +optional
	LastScheduleTime *metav1.Time `json:"lastScheduleTime,omitempty"`

	// For Kubernetes API conventions, see:
	// https://github.com/kubernetes/community/blob/master/contributors/devel/sig-architecture/api-conventions.md#typical-status-properties

	// conditions represent the current state of the CronJob resource.
	// Each condition has a unique type and reflects the status of a specific aspect of the resource.
	//
	// Standard condition types include:
	// - "Available": the resource is fully functional
	// - "Progressing": the resource is being created or updated
	// - "Degraded": the resource failed to reach or maintain its desired state
	//
	// The status of each condition is one of True, False, or Unknown.
	// +listType=map
	// +listMapKey=type
	// +optional
	Conditions []metav1.Condition `json:"conditions,omitempty"`
}
Since we’ll have more than one version, we’ll need to mark a storage version. This is the version that the Kubernetes API server uses to store our data. We’ll chose the v1 version for our project.
We’ll use the +kubebuilder:storageversion to do this.
Note that multiple versions may exist in storage if they were written before the storage version changes – changing the storage version only affects how objects are created/updated after the change.
// +kubebuilder:object:root=true
// +kubebuilder:storageversion
// +kubebuilder:subresource:status
// +versionName=v1
// +kubebuilder:storageversion
// CronJob is the Schema for the cronjobs API
type CronJob struct {
	metav1.TypeMeta `json:",inline"`

	// metadata is a standard object metadata
	// +optional
	metav1.ObjectMeta `json:"metadata,omitempty,omitzero"`

	// spec defines the desired state of CronJob
	// +required
	Spec CronJobSpec `json:"spec"`

	// status defines the observed state of CronJob
	// +optional
	Status CronJobStatus `json:"status,omitempty,omitzero"`
}
old stuff
// +kubebuilder:object:root=true

// CronJobList contains a list of CronJob
type CronJobList struct {
	metav1.TypeMeta `json:",inline"`
	metav1.ListMeta `json:"metadata,omitempty"`
	Items           []CronJob `json:"items"`
}

func init() {
	SchemeBuilder.Register(&CronJob{}, &CronJobList{})
}
既然类型已经就位,接下来我们需要设置转换……
“轮毂与辐条”以及其他轮子隐喻
现在我们有两个不同的版本,用户可以请求任意一个版本,因此我们必须定义一种在版本之间进行转换的方式。对于 CRD,这通过 webhook 来完成,类似于我们在基础教程中定义的 defaulting 与 validating webhooks。与之前一样,controller-runtime 会帮助我们把细节串起来,我们只需要实现实际的转换逻辑。
不过在这之前,我们需要先理解 controller-runtime 如何看待版本,具体来说:
完全图可不够“航海”
一种简单的定义转换的方法是:为每一对版本之间都定义转换函数。然后,每当需要转换时,我们查找相应函数并调用它来完成转换。
当只有两个版本时这么做没问题,但如果有 4 种类型呢?8 种类型呢?那将会有很多很多转换函数。
因此,controller-runtime 用“轮毂-辐条(hub-and-spoke)”模型来表示转换:我们将某一个版本标记为“hub”,其他所有版本只需定义到该 hub 的转换以及从该 hub 的转换:
随后,如果需要在两个非 hub 版本之间进行转换,我们先转换到 hub 版本,再转换到目标版本:
这减少了我们需要定义的转换函数数量,并且该模型参考了 Kubernetes 内部的做法。
这和 Webhook 有什么关系?
当 API 客户端(如 kubectl 或你的控制器)请求你的资源的某个特定版本时,Kubernetes API server 需要返回该版本的结果。然而,该版本可能与 API server 存储的版本不一致。
这种情况下,API server 需要知道如何在期望版本与存储版本之间进行转换。由于 CRD 的转换不是内建的,Kubernetes API server 会调用一个 webhook 来完成转换。对于 Kubebuilder,这个 webhook 由 controller-runtime 实现,它执行我们上面讨论的 hub-and-spoke 转换。
现在转换模型已经明晰,我们就可以实际实现转换了。
实现转换
转换模型确定后,就该实际实现转换函数了。我们将为 CronJob API 的 v1(Hub)到 v2(Spoke)创建一个转换 webhook,见:
kubebuilder create webhook --group batch --version v1 --kind CronJob --conversion --spoke v2
上述命令会在 cronjob_types.go 旁边生成 cronjob_conversion.go 文件,以避免在主类型文件中堆积额外函数。
Hub…
首先实现 hub。我们选择 v1 作为 hub:
Apache License
Copyright 2025 The Kubernetes authors.
Licensed under the Apache License, Version 2.0 (the “License”); you may not use this file except in compliance with the License. You may obtain a copy of the License at
http://www.apache.org/licenses/LICENSE-2.0
Unless required by applicable law or agreed to in writing, software distributed under the License is distributed on an “AS IS” BASIS, WITHOUT WARRANTIES OR CONDITIONS OF ANY KIND, either express or implied. See the License for the specific language governing permissions and limitations under the License.
package v1
Implementing the hub method is pretty easy – we just have to add an empty
method called Hub()to serve as a
marker.
We could also just put this inline in our cronjob_types.go file.
// Hub marks this type as a conversion hub.
func (*CronJob) Hub() {}
…以及 Spokes
然后实现 spoke,即 v2 版本:
Apache License
Copyright 2025 The Kubernetes authors.
Licensed under the Apache License, Version 2.0 (the “License”); you may not use this file except in compliance with the License. You may obtain a copy of the License at
http://www.apache.org/licenses/LICENSE-2.0
Unless required by applicable law or agreed to in writing, software distributed under the License is distributed on an “AS IS” BASIS, WITHOUT WARRANTIES OR CONDITIONS OF ANY KIND, either express or implied. See the License for the specific language governing permissions and limitations under the License.
package v2
Imports
For imports, we’ll need the controller-runtime
conversion
package, plus the API version for our hub type (v1), and finally some of the
standard packages.
import (
	"fmt"
	"strings"

	"log"

	"sigs.k8s.io/controller-runtime/pkg/conversion"

	batchv1 "tutorial.kubebuilder.io/project/api/v1"
)
Our “spoke” versions need to implement the
Convertible
interface. Namely, they’ll need ConvertTo() and ConvertFrom()
methods to convert to/from the hub version.
ConvertTo is expected to modify its argument to contain the converted object. Most of the conversion is straightforward copying, except for converting our changed field.
// ConvertTo converts this CronJob (v2) to the Hub version (v1).
func (src *CronJob) ConvertTo(dstRaw conversion.Hub) error {
	dst := dstRaw.(*batchv1.CronJob)
	log.Printf("ConvertTo: Converting CronJob from Spoke version v2 to Hub version v1;"+
		"source: %s/%s, target: %s/%s", src.Namespace, src.Name, dst.Namespace, dst.Name)

	sched := src.Spec.Schedule
	scheduleParts := []string{"*", "*", "*", "*", "*"}
	if sched.Minute != nil {
		scheduleParts[0] = string(*sched.Minute)
	}
	if sched.Hour != nil {
		scheduleParts[1] = string(*sched.Hour)
	}
	if sched.DayOfMonth != nil {
		scheduleParts[2] = string(*sched.DayOfMonth)
	}
	if sched.Month != nil {
		scheduleParts[3] = string(*sched.Month)
	}
	if sched.DayOfWeek != nil {
		scheduleParts[4] = string(*sched.DayOfWeek)
	}
	dst.Spec.Schedule = strings.Join(scheduleParts, " ")
rote conversion
The rest of the conversion is pretty rote.
	// ObjectMeta
	dst.ObjectMeta = src.ObjectMeta

	// Spec
	dst.Spec.StartingDeadlineSeconds = src.Spec.StartingDeadlineSeconds
	dst.Spec.ConcurrencyPolicy = batchv1.ConcurrencyPolicy(src.Spec.ConcurrencyPolicy)
	dst.Spec.Suspend = src.Spec.Suspend
	dst.Spec.JobTemplate = src.Spec.JobTemplate
	dst.Spec.SuccessfulJobsHistoryLimit = src.Spec.SuccessfulJobsHistoryLimit
	dst.Spec.FailedJobsHistoryLimit = src.Spec.FailedJobsHistoryLimit

	// Status
	dst.Status.Active = src.Status.Active
	dst.Status.LastScheduleTime = src.Status.LastScheduleTime
	return nil
}
ConvertFrom is expected to modify its receiver to contain the converted object. Most of the conversion is straightforward copying, except for converting our changed field.
// ConvertFrom converts the Hub version (v1) to this CronJob (v2).
func (dst *CronJob) ConvertFrom(srcRaw conversion.Hub) error {
	src := srcRaw.(*batchv1.CronJob)
	log.Printf("ConvertFrom: Converting CronJob from Hub version v1 to Spoke version v2;"+
		"source: %s/%s, target: %s/%s", src.Namespace, src.Name, dst.Namespace, dst.Name)

	schedParts := strings.Split(src.Spec.Schedule, " ")
	if len(schedParts) != 5 {
		return fmt.Errorf("invalid schedule: not a standard 5-field schedule")
	}
	partIfNeeded := func(raw string) *CronField {
		if raw == "*" {
			return nil
		}
		part := CronField(raw)
		return &part
	}
	dst.Spec.Schedule.Minute = partIfNeeded(schedParts[0])
	dst.Spec.Schedule.Hour = partIfNeeded(schedParts[1])
	dst.Spec.Schedule.DayOfMonth = partIfNeeded(schedParts[2])
	dst.Spec.Schedule.Month = partIfNeeded(schedParts[3])
	dst.Spec.Schedule.DayOfWeek = partIfNeeded(schedParts[4])
rote conversion
The rest of the conversion is pretty rote.
	// ObjectMeta
	dst.ObjectMeta = src.ObjectMeta

	// Spec
	dst.Spec.StartingDeadlineSeconds = src.Spec.StartingDeadlineSeconds
	dst.Spec.ConcurrencyPolicy = ConcurrencyPolicy(src.Spec.ConcurrencyPolicy)
	dst.Spec.Suspend = src.Spec.Suspend
	dst.Spec.JobTemplate = src.Spec.JobTemplate
	dst.Spec.SuccessfulJobsHistoryLimit = src.Spec.SuccessfulJobsHistoryLimit
	dst.Spec.FailedJobsHistoryLimit = src.Spec.FailedJobsHistoryLimit

	// Status
	dst.Status.Active = src.Status.Active
	dst.Status.LastScheduleTime = src.Status.LastScheduleTime
	return nil
}
现在转换已经就位,我们只需要把 main 连起来以提供该 webhook!
设置 webhooks
转换逻辑已就绪,剩下的就是让 controller-runtime 知道我们的转换。
Webhook 设置……
Apache License
Copyright 2025 The Kubernetes authors.
Licensed under the Apache License, Version 2.0 (the “License”); you may not use this file except in compliance with the License. You may obtain a copy of the License at
http://www.apache.org/licenses/LICENSE-2.0
Unless required by applicable law or agreed to in writing, software distributed under the License is distributed on an “AS IS” BASIS, WITHOUT WARRANTIES OR CONDITIONS OF ANY KIND, either express or implied. See the License for the specific language governing permissions and limitations under the License.
Go imports
package v1

import (
	"context"
	"fmt"

	"github.com/robfig/cron"
	apierrors "k8s.io/apimachinery/pkg/api/errors"
	"k8s.io/apimachinery/pkg/runtime/schema"
	validationutils "k8s.io/apimachinery/pkg/util/validation"
	"k8s.io/apimachinery/pkg/util/validation/field"

	"k8s.io/apimachinery/pkg/runtime"
	ctrl "sigs.k8s.io/controller-runtime"
	logf "sigs.k8s.io/controller-runtime/pkg/log"
	"sigs.k8s.io/controller-runtime/pkg/webhook"
	"sigs.k8s.io/controller-runtime/pkg/webhook/admission"

	batchv1 "tutorial.kubebuilder.io/project/api/v1"
)
Next, we’ll setup a logger for the webhooks.
var cronjoblog = logf.Log.WithName("cronjob-resource")
This setup doubles as setup for our conversion webhooks: as long as our types implement the Hub and Convertible interfaces, a conversion webhook will be registered.
// SetupCronJobWebhookWithManager registers the webhook for CronJob in the manager.
func SetupCronJobWebhookWithManager(mgr ctrl.Manager) error {
	return ctrl.NewWebhookManagedBy(mgr).For(&batchv1.CronJob{}).
		WithValidator(&CronJobCustomValidator{}).
		WithDefaulter(&CronJobCustomDefaulter{
			DefaultConcurrencyPolicy:          batchv1.AllowConcurrent,
			DefaultSuspend:                    false,
			DefaultSuccessfulJobsHistoryLimit: 3,
			DefaultFailedJobsHistoryLimit:     1,
		}).
		Complete()
}
Notice that we use kubebuilder markers to generate webhook manifests. This marker is responsible for generating a mutating webhook manifest.
The meaning of each marker can be found here.
This marker is responsible for generating a mutation webhook manifest.
// +kubebuilder:webhook:path=/mutate-batch-tutorial-kubebuilder-io-v1-cronjob,mutating=true,failurePolicy=fail,sideEffects=None,groups=batch.tutorial.kubebuilder.io,resources=cronjobs,verbs=create;update,versions=v1,name=mcronjob-v1.kb.io,admissionReviewVersions=v1

// CronJobCustomDefaulter struct is responsible for setting default values on the custom resource of the
// Kind CronJob when those are created or updated.
//
// NOTE: The +kubebuilder:object:generate=false marker prevents controller-gen from generating DeepCopy methods,
// as it is used only for temporary operations and does not need to be deeply copied.
type CronJobCustomDefaulter struct {

	// Default values for various CronJob fields
	DefaultConcurrencyPolicy          batchv1.ConcurrencyPolicy
	DefaultSuspend                    bool
	DefaultSuccessfulJobsHistoryLimit int32
	DefaultFailedJobsHistoryLimit     int32
}

var _ webhook.CustomDefaulter = &CronJobCustomDefaulter{}
We use the webhook.CustomDefaulterinterface to set defaults to our CRD.
A webhook will automatically be served that calls this defaulting.
The Defaultmethod is expected to mutate the receiver, setting the defaults.
// Default implements webhook.CustomDefaulter so a webhook will be registered for the Kind CronJob.
func (d *CronJobCustomDefaulter) Default(_ context.Context, obj runtime.Object) error {
	cronjob, ok := obj.(*batchv1.CronJob)

	if !ok {
		return fmt.Errorf("expected an CronJob object but got %T", obj)
	}
	cronjoblog.Info("Defaulting for CronJob", "name", cronjob.GetName())

	// Set default values
	d.applyDefaults(cronjob)
	return nil
}

// applyDefaults applies default values to CronJob fields.
func (d *CronJobCustomDefaulter) applyDefaults(cronJob *batchv1.CronJob) {
	if cronJob.Spec.ConcurrencyPolicy == "" {
		cronJob.Spec.ConcurrencyPolicy = d.DefaultConcurrencyPolicy
	}
	if cronJob.Spec.Suspend == nil {
		cronJob.Spec.Suspend = new(bool)
		*cronJob.Spec.Suspend = d.DefaultSuspend
	}
	if cronJob.Spec.SuccessfulJobsHistoryLimit == nil {
		cronJob.Spec.SuccessfulJobsHistoryLimit = new(int32)
		*cronJob.Spec.SuccessfulJobsHistoryLimit = d.DefaultSuccessfulJobsHistoryLimit
	}
	if cronJob.Spec.FailedJobsHistoryLimit == nil {
		cronJob.Spec.FailedJobsHistoryLimit = new(int32)
		*cronJob.Spec.FailedJobsHistoryLimit = d.DefaultFailedJobsHistoryLimit
	}
}
We can validate our CRD beyond what’s possible with declarative validation. Generally, declarative validation should be sufficient, but sometimes more advanced use cases call for complex validation.
For instance, we’ll see below that we use this to validate a well-formed cron schedule without making up a long regular expression.
If webhook.CustomValidator interface is implemented, a webhook will automatically be
served that calls the validation.
The ValidateCreate, ValidateUpdate and ValidateDelete methods are expected
to validate its receiver upon creation, update and deletion respectively.
We separate out ValidateCreate from ValidateUpdate to allow behavior like making
certain fields immutable, so that they can only be set on creation.
ValidateDelete is also separated from ValidateUpdate to allow different
validation behavior on deletion.
Here, however, we just use the same shared validation for ValidateCreate and
ValidateUpdate. And we do nothing in ValidateDelete, since we don’t need to
validate anything on deletion.
This marker is responsible for generating a validation webhook manifest.
// +kubebuilder:webhook:path=/validate-batch-tutorial-kubebuilder-io-v1-cronjob,mutating=false,failurePolicy=fail,sideEffects=None,groups=batch.tutorial.kubebuilder.io,resources=cronjobs,verbs=create;update,versions=v1,name=vcronjob-v1.kb.io,admissionReviewVersions=v1

// CronJobCustomValidator struct is responsible for validating the CronJob resource
// when it is created, updated, or deleted.
//
// NOTE: The +kubebuilder:object:generate=false marker prevents controller-gen from generating DeepCopy methods,
// as this struct is used only for temporary operations and does not need to be deeply copied.
type CronJobCustomValidator struct {
	// TODO(user): Add more fields as needed for validation
}

var _ webhook.CustomValidator = &CronJobCustomValidator{}

// ValidateCreate implements webhook.CustomValidator so a webhook will be registered for the type CronJob.
func (v *CronJobCustomValidator) ValidateCreate(_ context.Context, obj runtime.Object) (admission.Warnings, error) {
	cronjob, ok := obj.(*batchv1.CronJob)
	if !ok {
		return nil, fmt.Errorf("expected a CronJob object but got %T", obj)
	}
	cronjoblog.Info("Validation for CronJob upon creation", "name", cronjob.GetName())

	return nil, validateCronJob(cronjob)
}

// ValidateUpdate implements webhook.CustomValidator so a webhook will be registered for the type CronJob.
func (v *CronJobCustomValidator) ValidateUpdate(_ context.Context, oldObj, newObj runtime.Object) (admission.Warnings, error) {
	cronjob, ok := newObj.(*batchv1.CronJob)
	if !ok {
		return nil, fmt.Errorf("expected a CronJob object for the newObj but got %T", newObj)
	}
	cronjoblog.Info("Validation for CronJob upon update", "name", cronjob.GetName())

	return nil, validateCronJob(cronjob)
}

// ValidateDelete implements webhook.CustomValidator so a webhook will be registered for the type CronJob.
func (v *CronJobCustomValidator) ValidateDelete(ctx context.Context, obj runtime.Object) (admission.Warnings, error) {
	cronjob, ok := obj.(*batchv1.CronJob)
	if !ok {
		return nil, fmt.Errorf("expected a CronJob object but got %T", obj)
	}
	cronjoblog.Info("Validation for CronJob upon deletion", "name", cronjob.GetName())

	// TODO(user): fill in your validation logic upon object deletion.

	return nil, nil
}
We validate the name and the spec of the CronJob.
// validateCronJob validates the fields of a CronJob object.
func validateCronJob(cronjob *batchv1.CronJob) error {
	var allErrs field.ErrorList
	if err := validateCronJobName(cronjob); err != nil {
		allErrs = append(allErrs, err)
	}
	if err := validateCronJobSpec(cronjob); err != nil {
		allErrs = append(allErrs, err)
	}
	if len(allErrs) == 0 {
		return nil
	}

	return apierrors.NewInvalid(
		schema.GroupKind{Group: "batch.tutorial.kubebuilder.io", Kind: "CronJob"},
		cronjob.Name, allErrs)
}
Some fields are declaratively validated by OpenAPI schema.
You can find kubebuilder validation markers (prefixed
with // +kubebuilder:validation) in the
Designing an API section.
You can find all of the kubebuilder supported markers for
declaring validation by running controller-gen crd -w,
or here.
func validateCronJobSpec(cronjob *batchv1.CronJob) *field.Error {
	// The field helpers from the kubernetes API machinery help us return nicely
	// structured validation errors.
	return validateScheduleFormat(
		cronjob.Spec.Schedule,
		field.NewPath("spec").Child("schedule"))
}
We’ll need to validate the cron schedule is well-formatted.
func validateScheduleFormat(schedule string, fldPath *field.Path) *field.Error {
	if _, err := cron.ParseStandard(schedule); err != nil {
		return field.Invalid(fldPath, schedule, err.Error())
	}
	return nil
}
Validate object name
Validating the length of a string field can be done declaratively by the validation schema.
But the ObjectMeta.Name field is defined in a shared package under
the apimachinery repo, so we can’t declaratively validate it using
the validation schema.
func validateCronJobName(cronjob *batchv1.CronJob) *field.Error {
	if len(cronjob.Name) > validationutils.DNS1035LabelMaxLength-11 {
		// The job name length is 63 characters like all Kubernetes objects
		// (which must fit in a DNS subdomain). The cronjob controller appends
		// a 11-character suffix to the cronjob (`-$TIMESTAMP`) when creating
		// a job. The job name length limit is 63 characters. Therefore cronjob
		// names must have length <= 63-11=52. If we don't validate this here,
		// then job creation will fail later.
		return field.Invalid(field.NewPath("metadata").Child("name"), cronjob.Name, "must be no more than 52 characters")
	}
	return nil
}
……以及 main.go
同样,我们现有的 main 文件也足够了:
Apache License
Copyright 2025 The Kubernetes authors.
Licensed under the Apache License, Version 2.0 (the “License”); you may not use this file except in compliance with the License. You may obtain a copy of the License at
http://www.apache.org/licenses/LICENSE-2.0
Unless required by applicable law or agreed to in writing, software distributed under the License is distributed on an “AS IS” BASIS, WITHOUT WARRANTIES OR CONDITIONS OF ANY KIND, either express or implied. See the License for the specific language governing permissions and limitations under the License.
Imports
package main

import (
	"crypto/tls"
	"flag"
	"os"

	// Import all Kubernetes client auth plugins (e.g. Azure, GCP, OIDC, etc.)
	// to ensure that exec-entrypoint and run can make use of them.
	_ "k8s.io/client-go/plugin/pkg/client/auth"

	kbatchv1 "k8s.io/api/batch/v1"
	"k8s.io/apimachinery/pkg/runtime"
	utilruntime "k8s.io/apimachinery/pkg/util/runtime"
	clientgoscheme "k8s.io/client-go/kubernetes/scheme"
	ctrl "sigs.k8s.io/controller-runtime"
	"sigs.k8s.io/controller-runtime/pkg/healthz"
	"sigs.k8s.io/controller-runtime/pkg/log/zap"
	"sigs.k8s.io/controller-runtime/pkg/metrics/filters"
	metricsserver "sigs.k8s.io/controller-runtime/pkg/metrics/server"
	"sigs.k8s.io/controller-runtime/pkg/webhook"

	batchv1 "tutorial.kubebuilder.io/project/api/v1"
	batchv2 "tutorial.kubebuilder.io/project/api/v2"
	"tutorial.kubebuilder.io/project/internal/controller"
	webhookv1 "tutorial.kubebuilder.io/project/internal/webhook/v1"
	webhookv2 "tutorial.kubebuilder.io/project/internal/webhook/v2"
	// +kubebuilder:scaffold:imports
)
existing setup
var (
	scheme   = runtime.NewScheme()
	setupLog = ctrl.Log.WithName("setup")
)

func init() {
	utilruntime.Must(clientgoscheme.AddToScheme(scheme))

	utilruntime.Must(kbatchv1.AddToScheme(scheme)) // we've added this ourselves
	utilruntime.Must(batchv1.AddToScheme(scheme))
	utilruntime.Must(batchv2.AddToScheme(scheme))
	// +kubebuilder:scaffold:scheme
}
// nolint:gocyclo
func main() {
existing setup
	var metricsAddr string
	var metricsCertPath, metricsCertName, metricsCertKey string
	var webhookCertPath, webhookCertName, webhookCertKey string
	var enableLeaderElection bool
	var probeAddr string
	var secureMetrics bool
	var enableHTTP2 bool
	var tlsOpts []func(*tls.Config)
	flag.StringVar(&metricsAddr, "metrics-bind-address", "0", "The address the metrics endpoint binds to. "+
		"Use :8443 for HTTPS or :8080 for HTTP, or leave as 0 to disable the metrics service.")
	flag.StringVar(&probeAddr, "health-probe-bind-address", ":8081", "The address the probe endpoint binds to.")
	flag.BoolVar(&enableLeaderElection, "leader-elect", false,
		"Enable leader election for controller manager. "+
			"Enabling this will ensure there is only one active controller manager.")
	flag.BoolVar(&secureMetrics, "metrics-secure", true,
		"If set, the metrics endpoint is served securely via HTTPS. Use --metrics-secure=false to use HTTP instead.")
	flag.StringVar(&webhookCertPath, "webhook-cert-path", "", "The directory that contains the webhook certificate.")
	flag.StringVar(&webhookCertName, "webhook-cert-name", "tls.crt", "The name of the webhook certificate file.")
	flag.StringVar(&webhookCertKey, "webhook-cert-key", "tls.key", "The name of the webhook key file.")
	flag.StringVar(&metricsCertPath, "metrics-cert-path", "",
		"The directory that contains the metrics server certificate.")
	flag.StringVar(&metricsCertName, "metrics-cert-name", "tls.crt", "The name of the metrics server certificate file.")
	flag.StringVar(&metricsCertKey, "metrics-cert-key", "tls.key", "The name of the metrics server key file.")
	flag.BoolVar(&enableHTTP2, "enable-http2", false,
		"If set, HTTP/2 will be enabled for the metrics and webhook servers")
	opts := zap.Options{
		Development: true,
	}
	opts.BindFlags(flag.CommandLine)
	flag.Parse()

	ctrl.SetLogger(zap.New(zap.UseFlagOptions(&opts)))

	// if the enable-http2 flag is false (the default), http/2 should be disabled
	// due to its vulnerabilities. More specifically, disabling http/2 will
	// prevent from being vulnerable to the HTTP/2 Stream Cancellation and
	// Rapid Reset CVEs. For more information see:
	// - https://github.com/advisories/GHSA-qppj-fm5r-hxr3
	// - https://github.com/advisories/GHSA-4374-p667-p6c8
	disableHTTP2 := func(c *tls.Config) {
		setupLog.Info("disabling http/2")
		c.NextProtos = []string{"http/1.1"}
	}

	if !enableHTTP2 {
		tlsOpts = append(tlsOpts, disableHTTP2)
	}

	// Initial webhook TLS options
	webhookTLSOpts := tlsOpts
	webhookServerOptions := webhook.Options{
		TLSOpts: webhookTLSOpts,
	}

	if len(webhookCertPath) > 0 {
		setupLog.Info("Initializing webhook certificate watcher using provided certificates",
			"webhook-cert-path", webhookCertPath, "webhook-cert-name", webhookCertName, "webhook-cert-key", webhookCertKey)

		webhookServerOptions.CertDir = webhookCertPath
		webhookServerOptions.CertName = webhookCertName
		webhookServerOptions.KeyName = webhookCertKey
	}

	webhookServer := webhook.NewServer(webhookServerOptions)

	// Metrics endpoint is enabled in 'config/default/kustomization.yaml'. The Metrics options configure the server.
	// More info:
	// - https://pkg.go.dev/sigs.k8s.io/controller-runtime@v0.22.1/pkg/metrics/server
	// - https://book.kubebuilder.io/reference/metrics.html
	metricsServerOptions := metricsserver.Options{
		BindAddress:   metricsAddr,
		SecureServing: secureMetrics,
		TLSOpts:       tlsOpts,
	}

	if secureMetrics {
		// FilterProvider is used to protect the metrics endpoint with authn/authz.
		// These configurations ensure that only authorized users and service accounts
		// can access the metrics endpoint. The RBAC are configured in 'config/rbac/kustomization.yaml'. More info:
		// https://pkg.go.dev/sigs.k8s.io/controller-runtime@v0.22.1/pkg/metrics/filters#WithAuthenticationAndAuthorization
		metricsServerOptions.FilterProvider = filters.WithAuthenticationAndAuthorization
	}

	// If the certificate is not specified, controller-runtime will automatically
	// generate self-signed certificates for the metrics server. While convenient for development and testing,
	// this setup is not recommended for production.
	//
	// TODO(user): If you enable certManager, uncomment the following lines:
	// - [METRICS-WITH-CERTS] at config/default/kustomization.yaml to generate and use certificates
	// managed by cert-manager for the metrics server.
	// - [PROMETHEUS-WITH-CERTS] at config/prometheus/kustomization.yaml for TLS certification.
	if len(metricsCertPath) > 0 {
		setupLog.Info("Initializing metrics certificate watcher using provided certificates",
			"metrics-cert-path", metricsCertPath, "metrics-cert-name", metricsCertName, "metrics-cert-key", metricsCertKey)

		metricsServerOptions.CertDir = metricsCertPath
		metricsServerOptions.CertName = metricsCertName
		metricsServerOptions.KeyName = metricsCertKey
	}

	mgr, err := ctrl.NewManager(ctrl.GetConfigOrDie(), ctrl.Options{
		Scheme:                 scheme,
		Metrics:                metricsServerOptions,
		WebhookServer:          webhookServer,
		HealthProbeBindAddress: probeAddr,
		LeaderElection:         enableLeaderElection,
		LeaderElectionID:       "80807133.tutorial.kubebuilder.io",
		// LeaderElectionReleaseOnCancel defines if the leader should step down voluntarily
		// when the Manager ends. This requires the binary to immediately end when the
		// Manager is stopped, otherwise, this setting is unsafe. Setting this significantly
		// speeds up voluntary leader transitions as the new leader don't have to wait
		// LeaseDuration time first.
		//
		// In the default scaffold provided, the program ends immediately after
		// the manager stops, so would be fine to enable this option. However,
		// if you are doing or is intended to do any operation such as perform cleanups
		// after the manager stops then its usage might be unsafe.
		// LeaderElectionReleaseOnCancel: true,
	})
	if err != nil {
		setupLog.Error(err, "unable to start manager")
		os.Exit(1)
	}

	if err := (&controller.CronJobReconciler{
		Client: mgr.GetClient(),
		Scheme: mgr.GetScheme(),
	}).SetupWithManager(mgr); err != nil {
		setupLog.Error(err, "unable to create controller", "controller", "CronJob")
		os.Exit(1)
	}
Our existing call to SetupWebhookWithManager registers our conversion webhooks with the manager, too.
	// nolint:goconst
	if os.Getenv("ENABLE_WEBHOOKS") != "false" {
		if err := webhookv1.SetupCronJobWebhookWithManager(mgr); err != nil {
			setupLog.Error(err, "unable to create webhook", "webhook", "CronJob")
			os.Exit(1)
		}
	}
	// nolint:goconst
	if os.Getenv("ENABLE_WEBHOOKS") != "false" {
		if err := webhookv2.SetupCronJobWebhookWithManager(mgr); err != nil {
			setupLog.Error(err, "unable to create webhook", "webhook", "CronJob")
			os.Exit(1)
		}
	}
	// +kubebuilder:scaffold:builder
existing setup
	if err := mgr.AddHealthzCheck("healthz", healthz.Ping); err != nil {
		setupLog.Error(err, "unable to set up health check")
		os.Exit(1)
	}
	if err := mgr.AddReadyzCheck("readyz", healthz.Ping); err != nil {
		setupLog.Error(err, "unable to set up ready check")
		os.Exit(1)
	}

	setupLog.Info("starting manager")
	if err := mgr.Start(ctrl.SetupSignalHandler()); err != nil {
		setupLog.Error(err, "problem running manager")
		os.Exit(1)
	}
}
一切就绪!接下来就是测试我们的 webhooks。
部署与测试
在测试转换之前,我们需要在 CRD 中启用它:
Kubebuilder 会在 config 目录下生成 Kubernetes 清单,默认禁用 webhook 相关内容。要启用它们,我们需要:
-
在
config/crd/kustomization.yaml文件中启用patches/webhook_in_<kind>.yaml与patches/cainjection_in_<kind>.yaml -
在
config/default/kustomization.yaml的bases段落下启用../certmanager与../webhook目录 -
在
config/default/kustomization.yaml文件中启用CERTMANAGER段落下的全部变量
此外,如果 Makefile 中存在 CRD_OPTIONS 变量,我们需要将其设置为仅 "crd",去掉 trivialVersions 选项(这确保我们确实为每个版本生成校验,而不是告诉 Kubernetes 它们相同):
CRD_OPTIONS ?= "crd"
现在代码修改与清单都已就位,让我们把它部署到集群并进行测试。
除非你有其他证书管理方案,否则你需要安装 cert-manager(版本 0.9.0+)。Kubebuilder 团队已经用版本 0.9.0-alpha.0 验证过本教程中的步骤。
当证书相关内容准备就绪后,我们可以像平常一样运行 make install deploy,将所有组件(CRD、controller-manager 部署)部署到集群。
测试
当所有组件在集群上运行且已启用转换后,我们可以通过请求不同版本来测试转换。
我们基于 v1 版本创建一个 v2 版本(放在 config/samples 下)
apiVersion: batch.tutorial.kubebuilder.io/v2
kind: CronJob
metadata:
  labels:
    app.kubernetes.io/name: project
    app.kubernetes.io/managed-by: kustomize
  name: cronjob-sample
spec:
  schedule:
    minute: "*/1"
  startingDeadlineSeconds: 60
  concurrencyPolicy: Allow # explicitly specify, but Allow is also default.
  jobTemplate:
    spec:
      template:
        spec:
          containers:
          - name: hello
            image: busybox
            args:
            - /bin/sh
            - -c
            - date; echo Hello from the Kubernetes cluster
          restartPolicy: OnFailure
然后在集群中创建它:
kubectl apply -f config/samples/batch_v2_cronjob.yaml
如果一切正确,应能创建成功,并且我们应当能使用 v2 资源来获取它:
kubectl get cronjobs.v2.batch.tutorial.kubebuilder.io -o yaml
apiVersion: batch.tutorial.kubebuilder.io/v2
kind: CronJob
metadata:
  labels:
    app.kubernetes.io/name: project
    app.kubernetes.io/managed-by: kustomize
  name: cronjob-sample
spec:
  schedule:
    minute: "*/1"
  startingDeadlineSeconds: 60
  concurrencyPolicy: Allow # explicitly specify, but Allow is also default.
  jobTemplate:
    spec:
      template:
        spec:
          containers:
          - name: hello
            image: busybox
            args:
            - /bin/sh
            - -c
            - date; echo Hello from the Kubernetes cluster
          restartPolicy: OnFailure
以及 v1 资源:
kubectl get cronjobs.v1.batch.tutorial.kubebuilder.io -o yaml
apiVersion: batch.tutorial.kubebuilder.io/v1
kind: CronJob
metadata:
  labels:
    app.kubernetes.io/name: project
    app.kubernetes.io/managed-by: kustomize
  name: cronjob-sample
spec:
  schedule: "*/1 * * * *"
  startingDeadlineSeconds: 60
  concurrencyPolicy: Allow # explicitly specify, but Allow is also default.
  jobTemplate:
    spec:
      template:
        spec:
          containers:
          - name: hello
            image: busybox
            args:
            - /bin/sh
            - -c
            - date; echo Hello from the Kubernetes cluster
          restartPolicy: OnFailure
两者都应被正确填充,并分别与我们的 v2 与 v1 示例等价。注意它们的 API 版本不同。
最后,稍等片刻,你会注意到即便我们的控制器是基于 v1 API 版本编写的,CronJob 依然会持续进行调谐。
故障排查
迁移
将你的项目脚手架升级以采用 Kubebuilder 的最新变更,可能涉及迁移到新的插件版本(例如 go.kubebuilder.io/v3 → go.kubebuilder.io/v4)或更新的 CLI 工具链。该过程通常包括重新生成脚手架并手动合并你的自定义代码。
本节详细说明了在不同版本的 Kubebuilder 脚手架之间,以及迁移到更复杂的项目布局结构时所需的步骤。
手动方式容易出错,因此 Kubebuilder 引入了新的 alpha 命令来帮助简化迁移过程。
手动迁移
传统流程包括:
-
使用最新的 Kubebuilder 版本或插件重新生成项目脚手架
-
手动重新添加自定义逻辑
-
运行项目生成器:
make generate
make manifests
了解 PROJECT 文件(自 v3.0.0 引入)
Kubebuilder 使用的所有输入都记录在 PROJECT 文件中。如果你使用 CLI 生成脚手架,该文件会记录项目的配置与元数据。
Alpha 迁移命令
Kubebuilder 提供了 alpha 命令来辅助项目升级。
kubebuilder alpha generate
使用已安装的 CLI 版本重新生成项目脚手架。
kubebuilder alpha generate
kubebuilder alpha update(自 v4.7.0 起可用)
通过执行三方合并来自动化迁移:
- 原始脚手架
- 你当前的自定义版本
- 最新或指定目标脚手架
kubebuilder alpha update
更多详情请参阅Alpha 命令文档。
来自 3.0.0 之前 Legacy 版本的迁移指南
请根据你的需求,按照迁移指南将旧版 Kubebuilder 项目升级到所需的 v3.x 版本。 自 v3 起,Kubebuilder 引入了插件生态,以提升可维护性、复用性与使用体验。
更多背景与设计细节参见:
此外,你也可以查阅插件章节。
Kubebuilder v1 与 v2 对比(Legacy:从 v1.0.0+ 到 v2.0.0)
本文覆盖从 v1 迁移到 v2 的所有破坏性变更。
更多(含非破坏性)变更详情可参考 controller-runtime、 controller-tools 与 kubebuilder 的发布说明。
共同变化(Common changes)
v2 项目改用 Go Modules;在 Go 1.13 发布前,kubebuilder 仍兼容 dep。
controller-runtime
-
Client.List采用函数式可选项(List(ctx, list, ...option))替代List(ctx, ListOptions, list)。 -
Client.DeleteAllOf新增至Client接口。 -
指标(metrics)默认开启。
-
pkg/runtime下部分包位置已调整,旧位置标记为弃用,并会在 controller-runtime v1.0.0 前移除。详见 godocs。
与 Webhook 相关
-
移除 Webhook 的自动证书生成与自注册。请使用 controller-tools 生成 Webhook 配置;若需证书生成,推荐使用 cert-manager。Kubebuilder v2 会为你脚手架出 cert-manager 的配置,详见 Webhook 教程。
-
builder包现在为控制器与 Webhook 分别提供构造器,便于选择运行内容。
controller-tools
v2 重写了生成器框架。大多数场景下用法不变,但也存在破坏性变更。详见标记文档。
Kubebuilder
-
v2 引入更简化的项目布局。设计文档见 https://github.com/kubernetes-sigs/kubebuilder/blob/master/designs/simplified-scaffolding.md
-
v1 中 manager 以
StatefulSet部署;v2 中改为Deployment。 -
新增
kubebuilder create webhook命令用于脚手架 变更/校验/转换 Webhook,替代kubebuilder alpha webhook。 -
v2 使用
distroless/static作为基础镜像(替代 Ubuntu),以降低镜像体积与攻击面。 -
v2 需要 kustomize v3.1.0+。
从 v1 迁移到 v2
在继续之前,请先了解 Kubebuilder v1 与 v2 的差异。
请确保已按安装指南安装所需组件。
推荐的迁移方式是:新建一个 v2 项目,然后将 API 与调谐(reconciliation)代码拷贝过去。这样最终得到的项目就是原生的 v2 布局。 在某些情况下,也可以“就地升级”(复用 v1 的项目布局,升级 controller-runtime 与 controller-tools)。
下面以一个 v1 项目为例迁移到 Kubebuilder v2。最终效果应与示例 v2 项目一致。
准备工作
首先确认 Group、Version、Kind 与 Domain。
先看一个 v1 项目的目录结构:
pkg/
├── apis
│   ├── addtoscheme_batch_v1.go
│   ├── apis.go
│   └── batch
│       ├── group.go
│       └── v1
│           ├── cronjob_types.go
│           ├── cronjob_types_test.go
│           ├── doc.go
│           ├── register.go
│           ├── v1_suite_test.go
│           └── zz_generated.deepcopy.go
├── controller
└── webhook
所有 API 信息都在 pkg/apis/batch 下,可以在那里找到所需信息。
In cronjob_types.go, we can find
type CronJob struct {...}
In register.go, we can find
SchemeGroupVersion = schema.GroupVersion{Group: "batch.tutorial.kubebuilder.io", Version: "v1"}
据此可知 Kind 为 CronJob,Group/Version 为 batch.tutorial.kubebuilder.io/v1。
初始化 v2 项目
现在初始化 v2 项目。在此之前,若不在 GOPATH 下,先初始化一个新的 Go 模块:
go mod init tutorial.kubebuilder.io/project
随后用 kubebuilder 完成项目初始化:
kubebuilder init --domain tutorial.kubebuilder.io
迁移 API 与 Controller
接下来重新脚手架 API 类型与控制器。因为两者都需要,交互提示时分别选择生成 API 与 Controller:
kubebuilder create api --group batch --version v1 --kind CronJob
如果你使用多 Group,需要做一些手工迁移,详见/migration/multi-group.md。
迁移 API
将 pkg/apis/batch/v1/cronjob_types.go 中的类型拷贝到 api/v1/cronjob_types.go。仅需要复制 Spec 与 Status 字段的实现。
可以把 +k8s:deepcopy-gen:interfaces=... 标记(在 Kubebuilder 中已弃用)替换为 +kubebuilder:object:root=true。
以下标记已无需保留(它们来自非常老的 Kubebuilder 版本):
// +genclient
// +k8s:openapi-gen=true
API 类型应类似:
// +kubebuilder:object:root=true
// +kubebuilder:subresource:status
// CronJob is the Schema for the cronjobs API
type CronJob struct {...}

// +kubebuilder:object:root=true

// CronJobList contains a list of CronJob
type CronJobList struct {...}
迁移 Controller
将 pkg/controller/cronjob/cronjob_controller.go 中的调谐器代码迁移到 controllers/cronjob_controller.go:
We’ll need to copy
- the fields from the
ReconcileCronJobstruct toCronJobReconciler - the contents of the
Reconcilefunction - the rbac related markers to the new file.
- the code under
func add(mgr manager.Manager, r reconcile.Reconciler) errortofunc SetupWithManager
迁移 Webhook
如果项目未使用 Webhook,可跳过本节。
核心类型与外部 CRD 的 Webhook
若需要为 Kubernetes 核心类型(例如 Pod)或你不拥有的外部 CRD 配置 Webhook,可参考 controller-runtime 的内置类型示例。Kubebuilder 对此类场景不会脚手架太多内容,但可直接使用 controller-runtime 的能力。
为自有 CRD 脚手架 Webhook
为 CronJob 脚手架 Webhook。示例项目使用了默认化与校验 Webhook,因此需要带上 --defaulting 与 --programmatic-validation:
kubebuilder create webhook --group batch --version v1 --kind CronJob --defaulting --programmatic-validation
根据需要配置 Webhook 的 CRD 数量,可能需要用不同的 GVK 重复执行以上命令。
随后为每个 Webhook 复制逻辑。对于验证型 Webhook,可将
pkg/default_server/cronjob/validating/cronjob_create_handler.go 中 func validatingCronJobFn
的内容复制到 api/v1/cronjob_webhook.go 的 func ValidateCreate(更新时对应 ValidateUpdate)。
同样地,把 func mutatingCronJobFn 的逻辑复制到 func Default。
Webhook 标记(Markers)
在 v2 中脚手架 Webhook 时会添加如下标记:
// These are v2 markers

// This is for the mutating webhook
// +kubebuilder:webhook:path=/mutate-batch-tutorial-kubebuilder-io-v1-cronjob,mutating=true,failurePolicy=fail,groups=batch.tutorial.kubebuilder.io,resources=cronjobs,verbs=create;update,versions=v1,name=mcronjob.kb.io

...

// This is for the validating webhook
// +kubebuilder:webhook:path=/validate-batch-tutorial-kubebuilder-io-v1-cronjob,mutating=false,failurePolicy=fail,groups=batch.tutorial.kubebuilder.io,resources=cronjobs,verbs=create;update,versions=v1,name=vcronjob.kb.io
默认动词为 verbs=create;update。请根据需要调整。例如仅需在创建时校验,则改为 verbs=create。
同时确认 failure-policy 是否符合预期。
如下标记已不再需要(它们用于“自部署证书配置”,而该机制在 v2 中移除):
// v1 markers
// +kubebuilder:webhook:port=9876,cert-dir=/tmp/cert
// +kubebuilder:webhook:service=test-system:webhook-service,selector=app:webhook-server
// +kubebuilder:webhook:secret=test-system:webhook-server-secret
// +kubebuilder:webhook:mutating-webhook-config-name=test-mutating-webhook-cfg
// +kubebuilder:webhook:validating-webhook-config-name=test-validating-webhook-cfg
在 v1 中,同一段内可能以多个标记表示一个 Webhook;在 v2 中,每个 Webhook 必须由单一标记表示。
其他
若 v1 的 main.go 有手工改动,需要迁移到新的 main.go,并确保所有需要的 scheme 都已注册。
config 目录下新增的清单同样需要迁移。
如有需要,更新 Makefile 中的镜像名。
验证
最后,运行 make 与 make docker-build 确认一切正常。
Kubebuilder v2 与 v3 对比(Legacy:从 v2.0.0+ 布局到 3.0.0+)
本文覆盖从 v2 迁移到 v3 时的所有破坏性变更。
更多(含非破坏性)变更详情可参考 controller-runtime、 controller-tools 以及 kb-releases 的发布说明。
共同变化(Common changes)
v3 项目使用 Go modules,且要求 Go 1.18+;不再支持使用 Dep 管理依赖。
Kubebuilder
-
引入对插件的初步支持。详见可扩展 CLI 与脚手架插件:Phase 1、 Phase 1.5 与 Phase 2 的设计文档;亦可参考插件章节。
-
PROJECT文件采用了新布局,记录更多资源信息,以便插件在脚手架时做出合理决策。另外,
PROJECT文件本身也引入版本:version字段表示PROJECT文件版本;layout字段表示脚手架与主插件版本。 -
gcr.io/kubebuilder/kube-rbac-proxy镜像版本从0.5.0升级到0.11.0(该组件默认开启,用于保护 manager 的请求),以解决安全问题。详情见 kube-rbac-proxy。
新版 go/v3 插件要点(TL;DR)
更多细节见 kubebuilder 发布说明,核心高亮如下:
-
生成的 API/清单变化:
- 生成的 CRD 使用
apiextensions/v1(apiextensions/v1beta1在 Kubernetes1.16中已弃用) - 生成的 Webhook 使用
admissionregistration.k8s.io/v1(v1beta1在 Kubernetes1.16中已弃用) - 使用 Webhook 时,证书管理切换为
cert-manager.io/v1(v1alpha2在 Cert-Manager0.14中弃用,参见文档)
- 生成的 CRD 使用
-
代码变化:
- manager 的
--metrics-addr与enable-leader-election现更名为--metrics-bind-address与--leader-elect,与 Kubernetes 核心组件命名保持一致。详见 #1839 - 默认添加存活/就绪探针,使用
healthz.Ping - 新增以 ComponentConfig 方式创建项目的选项,详见增强提案与教程
- Manager 清单默认使用
SecurityContext以提升安全性,详见 #1637
- manager 的
-
其他:
- 支持 controller-tools
v0.9.0(go/v2为v0.3.0,更早为v0.2.5) - 支持 controller-runtime
v0.12.1(go/v2为v0.6.4,更早为v0.5.0) - 支持 kustomize
v3.8.7(go/v2为v3.5.4,更早为v3.1.0) - 自动下载所需的 Envtest 二进制
- 最低 Go 版本升至
1.18(此前为1.13)
- 支持 controller-tools
迁移到 Kubebuilder v3
若希望升级到最新脚手架特性,请参考以下指南,获得最直观的步骤:
- v2 → v3 迁移指南(推荐)
通过手动更新文件
若希望在不改变现有脚手架的前提下使用最新 Kubebuilder CLI,可参考下述“仅更新 PROJECT 版本并切换插件版本”的手动步骤。
该方式复杂、易错且不保证成功;并且不会获得默认脚手架文件中的改进与修复。
你仍可通过 go/v2 插件继续使用旧布局(不会把 controller-runtime 与 controller-tools 升至 go/v3 所用的版本,以避免破坏性变更)。本文也提供了如何手动修改文件以切换到 go/v3 插件与依赖版本的说明。
从 v2 迁移到 v3
在继续之前,请先了解 Kubebuilder v2 与 v3 的差异。
请确保已按安装指南安装所需组件。
推荐的迁移方式是:新建一个 v3 项目,然后将 API 与调谐(reconciliation)代码拷贝过去。这样最终得到的项目就是原生的 v3 布局。 在某些情况下,也可以“就地升级”(复用 v2 的项目布局,同时升级 controller-runtime 与 controller-tools)。
初始化 v3 项目
新建一个以项目名命名的目录。注意该名称会用于脚手架中,默认影响 manager Pod 的名称以及其部署的 Namespace:
$ mkdir migration-project-name
$ cd migration-project-name
初始化 v3 项目前,若不在 GOPATH 内,建议先初始化一个新的 Go 模块(在 GOPATH 内虽非必须,但仍推荐):
go mod init tutorial.kubebuilder.io/migration-project
然后使用 kubebuilder 完成初始化:
kubebuilder init --domain tutorial.kubebuilder.io
迁移 API 与 Controller
接下来重新脚手架 API 类型与控制器。
kubebuilder create api --group batch --version v1 --kind CronJob
迁移 API
现在,把旧项目中的 api/v1/<kind>_types.go 拷贝到新项目中。
这些文件在新插件中没有功能性修改,因此可以直接用旧文件覆盖新生成的文件。若存在格式差异,也可以只拷贝类型定义本身。
迁移 Controller
将旧项目中的 controllers/cronjob_controller.go 迁移到新项目。此处存在一个破坏性变化,且可能出现一些格式差异。
新的 Reconcile 方法现在将 context 作为入参,而不再需要 context.Background()。你可以将旧控制器中的其它逻辑复制到新脚手架的方法中,将:
func (r *CronJobReconciler) Reconcile(req ctrl.Request) (ctrl.Result, error) {
    ctx := context.Background()
    log := r.Log.WithValues("cronjob", req.NamespacedName)
替换为:
func (r *CronJobReconciler) Reconcile(ctx context.Context, req ctrl.Request) (ctrl.Result, error) {
	log := r.Log.WithValues("cronjob", req.NamespacedName)
迁移 Webhook
为 CRD(CronJob)脚手架 Webhook。需要带上 --defaulting 与 --programmatic-validation(示例项目用到了默认化与校验 Webhook):
kubebuilder create webhook --group batch --version v1 --kind CronJob --defaulting --programmatic-validation
然后,将旧项目中的 api/v1/<kind>_webhook.go 拷贝到新项目中。
其他
如果 v2 的 main.go 有手工改动,需要迁移到新项目的 main.go 中。同时确保所有需要的 scheme 都已注册。
若 config 目录下存在新增清单,同步迁移它们。
如有需要,请更新 Makefile 中的镜像名等配置。
验证
最后,运行 make 与 make docker-build 以确认一切正常。
通过手动更新文件从 v2 迁移到 v3
在继续之前,请先了解 Kubebuilder v2 与 v3 的差异。
请确保已按安装指南安装所需组件。
本文描述手动升级项目配置版本并开启插件化版本所需的步骤。
注意:这种方式更复杂、容易出错且无法保证成功;同时你也得不到默认脚手架文件中的改进与修复。
通常仅在你对项目做了大量定制、严重偏离推荐脚手架时才建议走手动。继续前务必阅读项目定制化的提示。与其手动硬迁移,不如先收敛项目结构到推荐布局,会更有利于长期维护与升级。
推荐优先采用从 v2 迁移到 v3的“新建项目+迁移代码”的方式。
将项目配置版本从 “2” 升级到 “3”
在不同项目配置版本之间迁移,意味着需要在 init 命令生成的 PROJECT 文件中进行字段的新增、删除与修改。
PROJECT 文件采用了新布局,会记录更多资源信息,以便插件在脚手架时做出合理决策。
此外,PROJECT 文件本身也引入版本:version 字段表示 PROJECT 文件版本;layout 字段表示脚手架与主插件版本。
迁移步骤
以下为需要对 PROJECT(位于根目录)进行的手工修改。其目的在于补上 Kubebuilder 生成该文件时会写入的信息。
新增 projectName
项目名为项目目录的小写名:
...
projectName: example
...
新增 layout
与旧版本等价的默认插件布局为 go.kubebuilder.io/v2:
...
layout:
- go.kubebuilder.io/v2
...
更新 version
version 表示项目布局版本,更新为 "3":
...
version: "3"
...
补充资源信息
resources 属性表示项目已脚手架出来的资源清单。
为项目中的每个资源补充以下信息:
添加 Kubernetes API 版本:resources[entry].api.crdVersion: v1beta1
...
resources:
- api:
    ...
    crdVersion: v1beta1
  domain: my.domain
  group: webapp
  kind: Guestbook
  ...
添加 CRD 作用域:resources[entry].api.namespaced: true(集群级则为 false)
...
resources:
- api:
    ...
    namespaced: true
  group: webapp
  kind: Guestbook
  ...
若该 API 脚手架了控制器,则添加 resources[entry].controller: true
...
resources:
- api:
    ...
  controller: true
  group: webapp
  kind: Guestbook
为资源添加域名,例如 resources[entry].domain: testproject.org
通常使用项目域名;若为核心类型或外部类型,规则见下方说明:
...
resources:
- api:
    ...
  domain: testproject.org
  group: webapp
  kind: Guestbook
仅当核心类型在其 Kubernetes API 组的 scheme 定义中 Domain 不为空时,才需在项目中设置 domain。
例如:apps/v1 中 Kind 的域为空;而 authentication/v1 的域为 k8s.io。
核心类型与其 domain 参考表:
| Core Type | Domain |
|---|---|
| admission | “k8s.io” |
| admissionregistration | “k8s.io” |
| apps | empty |
| auditregistration | “k8s.io” |
| apiextensions | “k8s.io” |
| authentication | “k8s.io” |
| authorization | “k8s.io” |
| autoscaling | empty |
| batch | empty |
| certificates | “k8s.io” |
| coordination | “k8s.io” |
| core | empty |
| events | “k8s.io” |
| extensions | empty |
| imagepolicy | “k8s.io” |
| networking | “k8s.io” |
| node | “k8s.io” |
| metrics | “k8s.io” |
| policy | empty |
| rbac.authorization | “k8s.io” |
| scheduling | “k8s.io” |
| setting | “k8s.io” |
| storage | “k8s.io” |
示例:通过 create api --group apps --version v1 --kind Deployment --controller=true --resource=false --make=false 为核心类型 Deployment 脚手架控制器:
- controller: true
  group: apps
  kind: Deployment
  path: k8s.io/api/apps/v1
  version: v1
添加 resources[entry].path(API 的 import 路径)
...
resources:
- api:
    ...
  ...
  group: webapp
  kind: Guestbook
  path: example/api/v1
若项目使用 Webhook,则为每类 Webhook 添加 resources[entry].webhooks.[type]: true,并设置 resources[entry].webhooks.webhookVersion: v1beta1
resources:
- api:
    ...
  ...
  group: webapp
  kind: Guestbook
  webhooks:
    defaulting: true
    validation: true
    webhookVersion: v1beta1
检查 PROJECT 文件
确保使用 Kubebuilder v3 CLI 生成清单时,你的 PROJECT 文件包含一致的信息。
以 QuickStart 为例,手动升级后、使用 go.kubebuilder.io/v2 的 PROJECT 文件类似:
domain: my.domain
layout:
- go.kubebuilder.io/v2
projectName: example
repo: example
resources:
- api:
    crdVersion: v1
    namespaced: true
  controller: true
  domain: my.domain
  group: webapp
  kind: Guestbook
  path: example/api/v1
  version: v1
version: "3"
你可以通过下方示例对比 version 2 与 version 3 在 go.kubebuilder.io/v2 布局下的差异(示例涉及多个 API 与 Webhook):
Example (Project version 2)
domain: testproject.org
repo: sigs.k8s.io/kubebuilder/example
resources:
- group: crew
  kind: Captain
  version: v1
- group: crew
  kind: FirstMate
  version: v1
- group: crew
  kind: Admiral
  version: v1
version: "2"
Example (Project version 3)
domain: testproject.org
layout:
- go.kubebuilder.io/v2
projectName: example
repo: sigs.k8s.io/kubebuilder/example
resources:
- api:
    crdVersion: v1
    namespaced: true
  controller: true
  domain: testproject.org
  group: crew
  kind: Captain
  path: example/api/v1
  version: v1
  webhooks:
    defaulting: true
    validation: true
    webhookVersion: v1
- api:
    crdVersion: v1
    namespaced: true
  controller: true
  domain: testproject.org
  group: crew
  kind: FirstMate
  path: example/api/v1
  version: v1
  webhooks:
    conversion: true
    webhookVersion: v1
- api:
    crdVersion: v1
  controller: true
  domain: testproject.org
  group: crew
  kind: Admiral
  path: example/api/v1
  plural: admirales
  version: v1
  webhooks:
    defaulting: true
    webhookVersion: v1
version: "3"
验证
以上步骤仅更新了代表项目配置的 PROJECT 文件,它只对 CLI 生效,不应影响项目运行行为。
没有“自动验证是否正确更新配置”的办法。最佳做法是用相同的 API、Controller 与 Webhook 新建一个 v3 项目,对比其生成的配置与手动修改后的配置。
若上述过程有误,后续使用 CLI 时可能会遇到问题。
将项目切换为使用 go/v3 插件
在项目插件之间迁移,意味着对 init、create 等插件支持的命令所创建的文件执行新增、删除与修改。
每个插件可支持一个或多个项目配置版本;请先将项目配置升级到目标插件支持的最新版本,再切换插件版本。
以下为手工修改项目布局以启用 go/v3 插件的步骤。注意,这无法覆盖已生成脚手架中的所有缺陷修复。
迁移步骤
在 PROJECT 中更新插件版本
更新 layout 之前,请先完成项目版本升级到 3。随后将 layout 改为 go.kubebuilder.io/v3:
domain: my.domain
layout:
- go.kubebuilder.io/v3
...
升级 Go 版本与依赖
在 go.mod 中使用 Go 1.18(至少满足示例版本),并对齐以下依赖版本:
module example

go 1.18

require (
    github.com/onsi/ginkgo/v2 v2.1.4
    github.com/onsi/gomega v1.19.0
    k8s.io/api v0.24.0
    k8s.io/apimachinery v0.24.0
    k8s.io/client-go v0.24.0
    sigs.k8s.io/controller-runtime v0.12.1
)
Update the golang image
In the Dockerfile, replace:
# Build the manager binary
FROM docker.io/golang:1.13 as builder
With:
# Build the manager binary
FROM docker.io/golang:1.16 as builder
Update your Makefile
To allow controller-gen to scaffold the nw Kubernetes APIs
To allow controller-gen and the scaffolding tool to use the new API versions, replace:
CRD_OPTIONS ?= "crd:trivialVersions=true"
With:
CRD_OPTIONS ?= "crd"
To allow automatic downloads
To allow downloading the newer versions of the Kubernetes binaries required by Envtest into the testbin/ directory of your project instead of the global setup, replace:
# Run tests
test: generate fmt vet manifests
	go test ./... -coverprofile cover.out
With:
# Setting SHELL to bash allows bash commands to be executed by recipes.
# Options are set to exit when a recipe line exits non-zero or a piped command fails.
SHELL = /usr/bin/env bash -o pipefail
.SHELLFLAGS = -ec

ENVTEST_ASSETS_DIR=$(shell pwd)/testbin
test: manifests generate fmt vet ## Run tests.
	mkdir -p ${ENVTEST_ASSETS_DIR}
	test -f ${ENVTEST_ASSETS_DIR}/setup-envtest.sh || curl -sSLo ${ENVTEST_ASSETS_DIR}/setup-envtest.sh https://raw.githubusercontent.com/kubernetes-sigs/controller-runtime/v0.8.3/hack/setup-envtest.sh
	source ${ENVTEST_ASSETS_DIR}/setup-envtest.sh; fetch_envtest_tools $(ENVTEST_ASSETS_DIR); setup_envtest_env $(ENVTEST_ASSETS_DIR); go test ./... -coverprofile cover.out
To upgrade controller-gen and kustomize dependencies versions used
To upgrade the controller-gen and kustomize version used to generate the manifests replace:
# find or download controller-gen
# download controller-gen if necessary
controller-gen:
ifeq (, $(shell which controller-gen))
	@{ \
	set -e ;\
	CONTROLLER_GEN_TMP_DIR=$$(mktemp -d) ;\
	cd $$CONTROLLER_GEN_TMP_DIR ;\
	go mod init tmp ;\
	go get sigs.k8s.io/controller-tools/cmd/controller-gen@v0.2.5 ;\
	rm -rf $$CONTROLLER_GEN_TMP_DIR ;\
	}
CONTROLLER_GEN=$(GOBIN)/controller-gen
else
CONTROLLER_GEN=$(shell which controller-gen)
endif
With:
##@ Build Dependencies

## Location to install dependencies to
LOCALBIN ?= $(shell pwd)/bin
$(LOCALBIN):
	mkdir -p $(LOCALBIN)

## Tool Binaries
KUSTOMIZE ?= $(LOCALBIN)/kustomize
CONTROLLER_GEN ?= $(LOCALBIN)/controller-gen
ENVTEST ?= $(LOCALBIN)/setup-envtest

## Tool Versions
KUSTOMIZE_VERSION ?= v3.8.7
CONTROLLER_TOOLS_VERSION ?= v0.9.0

KUSTOMIZE_INSTALL_SCRIPT ?= "https://raw.githubusercontent.com/kubernetes-sigs/kustomize/master/hack/install_kustomize.sh"
.PHONY: kustomize
kustomize: $(KUSTOMIZE) ## Download kustomize locally if necessary.
$(KUSTOMIZE): $(LOCALBIN)
	test -s $(LOCALBIN)/kustomize || { curl -Ss $(KUSTOMIZE_INSTALL_SCRIPT) | bash -s -- $(subst v,,$(KUSTOMIZE_VERSION)) $(LOCALBIN); }

.PHONY: controller-gen
controller-gen: $(CONTROLLER_GEN) ## Download controller-gen locally if necessary.
$(CONTROLLER_GEN): $(LOCALBIN)
	test -s $(LOCALBIN)/controller-gen || GOBIN=$(LOCALBIN) go install sigs.k8s.io/controller-tools/cmd/controller-gen@$(CONTROLLER_TOOLS_VERSION)

.PHONY: envtest
envtest: $(ENVTEST) ## Download envtest-setup locally if necessary.
$(ENVTEST): $(LOCALBIN)
	test -s $(LOCALBIN)/setup-envtest || GOBIN=$(LOCALBIN) go install sigs.k8s.io/controller-runtime/tools/setup-envtest@latest
And then, to make your project use the kustomize version defined in the Makefile, replace all usage of kustomize with $(KUSTOMIZE)
更新控制器
Replace:
func (r *<MyKind>Reconciler) Reconcile(req ctrl.Request) (ctrl.Result, error) {
    ctx := context.Background()
    log := r.Log.WithValues("cronjob", req.NamespacedName)
With:
func (r *<MyKind>Reconciler) Reconcile(ctx context.Context, req ctrl.Request) (ctrl.Result, error) {
    log := r.Log.WithValues("cronjob", req.NamespacedName)
Update your controller and webhook test suite
Replace:
. "github.com/onsi/ginkgo"
With:
. "github.com/onsi/ginkgo/v2"
同时调整你的测试用例:
For Controller Suite:
	RunSpecsWithDefaultAndCustomReporters(t,
		"Controller Suite",
		[]Reporter{printer.NewlineReporter{}})
With:
RunSpecs(t, "Controller Suite")
For Webhook Suite:
	RunSpecsWithDefaultAndCustomReporters(t,
		"Webhook Suite",
		[]Reporter{printer.NewlineReporter{}})
With:
RunSpecs(t, "Webhook Suite")
最后,从 BeforeSuite 中移除超时参数:
Replace:
var _ = BeforeSuite(func(done Done) {
	....
}, 60)
With
var _ = BeforeSuite(func(done Done) {
	....
})
调整 Logger,使用 flag 选项
在 main.go 中将如下内容:
flag.Parse()

ctrl.SetLogger(zap.New(zap.UseDevMode(true)))
替换为:
opts := zap.Options{
	Development: true,
}
opts.BindFlags(flag.CommandLine)
flag.Parse()

ctrl.SetLogger(zap.New(zap.UseFlagOptions(&opts)))
重命名 manager 参数
--metrics-addr 与 enable-leader-election 改为 --metrics-bind-address 与 --leader-elect,以与 Kubernetes 核心组件保持一致。详见 #1839。
在 main.go 中,将:
func main() {
	var metricsAddr string
	var enableLeaderElection bool
	flag.StringVar(&metricsAddr, "metrics-addr", ":8080", "The address the metric endpoint binds to.")
	flag.BoolVar(&enableLeaderElection, "enable-leader-election", false,
		"Enable leader election for controller manager. "+
			"Enabling this will ensure there is only one active controller manager.")
替换为:
func main() {
	var metricsAddr string
	var enableLeaderElection bool
	flag.StringVar(&metricsAddr, "metrics-bind-address", ":8080", "The address the metric endpoint binds to.")
	flag.BoolVar(&enableLeaderElection, "leader-elect", false,
		"Enable leader election for controller manager. "+
			"Enabling this will ensure there is only one active controller manager.")
随后在 config/default/manager_auth_proxy_patch.yaml 与 config/default/manager.yaml 中同步重命名:
- name: manager
args:
- "--health-probe-bind-address=:8081"
- "--metrics-bind-address=127.0.0.1:8080"
- "--leader-elect"
验证
最后,运行 make 与 make docker-build 确认一切正常。
移除对已弃用 Kubernetes API 版本的使用
以下步骤描述如何移除对已弃用 API 的使用:apiextensions.k8s.io/v1beta1、admissionregistration.k8s.io/v1beta1、cert-manager.io/v1alpha2。
Kubebuilder CLI 不支持“同一项目同时脚手架两代 Kubernetes API”的情况,例如既有 apiextensions.k8s.io/v1beta1 又有 v1 的 CRD。
首先更新 PROJECT 文件,将 api.crdVersion:v1beta 与 webhooks.WebhookVersion:v1beta 改为 api.crdVersion:v1 与 webhooks.WebhookVersion:v1,例如:
domain: my.domain
layout: go.kubebuilder.io/v3
projectName: example
repo: example
resources:
- api:
    crdVersion: v1
    namespaced: true
  group: webapp
  kind: Guestbook
  version: v1
  webhooks:
    defaulting: true
    webhookVersion: v1
version: "3"
你可以尝试通过 --force 重新生成 API(CRD)与 Webhook 的清单。
随后对相同 Group/Kind/Version 使用 kubebuilder create api 与 kubebuilder create webhook 并加上 --force,分别重建 CRD 与 Webhook 清单。
V3 - 插件布局迁移指南
以下从插件版本角度总结迁移路径。请注意:插件生态在 Kubebuilder v3.0.0 中引入,
自 2021-04-28 起,go/v3 成为默认布局。
因此,你可以在此了解如何将使用 go/v3 插件构建的 Kubebuilder 3.x 项目迁移到最新版本。
go/v3 与 go/v4 对比
本文覆盖从使用 go/v3 插件(自 2021-04-28 起为默认脚手架)构建的项目迁移到新版 go/v4 插件时的所有破坏性变更。
更多(含非破坏性)变更详情可参考:
共同变化(Common changes)
go/v4项目使用 Kustomize v5x(不再是 v3x)。config/目录下若干清单已调整,去除了 Kustomize 的废弃用法(例如环境变量)。config/samples下新增kustomization.yaml,可通过kustomize build config/samples简单灵活地生成样例清单。- 增加对 Apple Silicon M1(darwin/arm64)的支持。
- 移除对 Kubernetes
v1beta1版 CRD/Webhook API 的支持(自 k8s 1.22 起废弃)。 - 不再脚手架引用
"k8s.io/api/admission/v1beta1"的 webhook 测试文件(该 API 自 k8s 1.25 起不再提供);默认改为"k8s.io/api/admission/v1"(自 k8s 1.20 可用)。 - 不再保证兼容 k8s
< 1.16。 - 布局调整以贴合社区对标准 Go 项目结构的诉求:API 置于
api/,控制器置于internal/,main.go置于cmd/。
新版 go/v4 插件要点(TL;DR)
更多细节见 kubebuilder 发布说明,核心高亮如下:
迁移到 Kubebuilder go/v4
若希望升级到最新脚手架特性,请参考以下指南获取最直观的步骤,帮助你获得全部改进:
通过手动更新文件
若希望在不改变现有脚手架的前提下使用最新 Kubebuilder CLI,可参考下述“仅更新 PROJECT 版本并切换插件版本”的手动步骤。
该方式复杂、易错且不保证成功;并且不会获得默认脚手架文件中的改进与修复。
从 go/v3 迁移到 go/v4
在继续之前,请先了解 Kubebuilder go/v3 与 go/v4 的差异。
请确保已按安装指南安装所需组件。
推荐的迁移方式是:新建一个 go/v4 项目,然后将 API 与调谐(reconciliation)代码拷贝过去。这样最终得到的项目就是原生的 go/v4 布局(最新版本)。
不过在某些场景下,也可以“就地升级”(复用 go/v3 的项目布局,手动升级 PROJECT 与脚手架)。详见手动更新文件从 go/v3 迁移到 go/v4。
初始化 go/v4 项目
新建一个以项目名命名的目录。注意该名称会用于脚手架中,默认影响 manager Pod 的名称以及其部署的 Namespace:
$ mkdir migration-project-name
$ cd migration-project-name
现在初始化 go/v4 项目。在进入这一步前,如果不在 GOPATH 内,建议先初始化一个新的 Go 模块(在 GOPATH 内虽然技术上非必须,但仍然推荐):
go mod init tutorial.kubebuilder.io/migration-project
随后使用 kubebuilder 完成初始化:
kubebuilder init --domain tutorial.kubebuilder.io --plugins=go/v4
迁移 API 与 Controller
接下来,重新脚手架 API 类型与控制器。
kubebuilder create api --group batch --version v1 --kind CronJob
迁移 API
现在,把旧项目中的 api/v1/<kind>_types.go 拷贝到新项目中。
这些文件在新插件中没有功能性修改,因此可以直接用旧文件覆盖新生成的文件。若存在格式差异,也可以只拷贝类型定义本身。
迁移 Controller
将旧项目的 controllers/cronjob_controller.go 迁移到新项目的 internal/controller/cronjob_controller.go。
迁移 Webhook
为 CRD(CronJob)脚手架 Webhook。需要带上 --defaulting 与 --programmatic-validation(示例项目用到了默认化与校验 Webhook):
kubebuilder create webhook --group batch --version v1 --kind CronJob --defaulting --programmatic-validation
然后,将旧项目中的 api/v1/<kind>_webhook.go 拷贝到新项目中。
其他
如果 v3 的 main.go 有手工改动,需要将其迁移到新项目的 main.go 中。同时确保所需的 controller-runtime schemes 全部完成注册。
若 config 目录下存在新增清单,同步迁移它们。注意 go/v4 使用 Kustomize v5 而非 v4,因此你若在 config 中做过定制,需要确认其兼容 v5,必要时按新版本修复不兼容之处。
在 v4 中,Kustomize 的安装方式由 bash 脚本改为 go install。请在 Makefile 中将 kustomize 依赖改为:
.PHONY: kustomize
kustomize: $(KUSTOMIZE) ## Download kustomize locally if necessary. If wrong version is installed, it will be removed before downloading.
$(KUSTOMIZE): $(LOCALBIN)
	@if test -x $(LOCALBIN)/kustomize && ! $(LOCALBIN)/kustomize version | grep -q $(KUSTOMIZE_VERSION); then \
		echo "$(LOCALBIN)/kustomize version is not expected $(KUSTOMIZE_VERSION). Removing it before installing."; \
		rm -rf $(LOCALBIN)/kustomize; \
	fi
	test -s $(LOCALBIN)/kustomize || GOBIN=$(LOCALBIN) GO111MODULE=on go install sigs.k8s.io/kustomize/kustomize/v5@$(KUSTOMIZE_VERSION)
如有需要,请同步更新 Makefile 中的镜像名等配置。
验证
最后,运行 make 与 make docker-build 以确认一切正常。
通过手动更新文件从 go/v3 迁移到 go/v4
在继续之前,请先了解 Kubebuilder go/v3 与 go/v4 的差异。
请确保已按安装指南安装所需组件。
本文描述如何手动修改 PROJECT 配置以开始使用 go/v4。
注意:这种方式更复杂、容易出错且无法保证成功;同时你也得不到默认脚手架文件中的改进与修复。
通常仅在你对项目做了大量定制、严重偏离推荐脚手架时才建议走手动。继续前务必阅读[项目定制化][project-customizations]的提示。与其手动硬迁移,不如先收敛项目结构到推荐布局,会更有利于长期维护与升级。
推荐优先采用从 go/v3 迁移到 go/v4的“新建项目+迁移代码”的方式。
将 PROJECT 的布局从 “go/v3” 迁移到 “go/v4”
更新 PROJECT 文件(记录资源与插件信息,供脚手架决策)。其中 layout 字段指明脚手架与主插件版本。
迁移步骤
在 PROJECT 中调整 layout 版本
以下为需要对 PROJECT(位于根目录)进行的手工修改。其目的在于补上 Kubebuilder 生成该文件时会写入的信息。
将:
layout:
- go.kubebuilder.io/v3
替换为:
layout:
- go.kubebuilder.io/v4
布局变化
新布局:
- 目录
apis重命名为api controllers目录移至新目录internal且改为单数controller- 根目录下的
main.go移至新目录cmd
因此,布局会变为:
...
├── cmd
│ └── main.go
├── internal
│ └── controller
└── api
迁移到新布局:
- 新建目录
cmd,将main.go移入其中 - 若项目启用 multi-group,API 原本位于
apis,需重命名为api - 将
controllers目录移动到internal下并重命名为controller - 更新 import:
- 修改
main.go的导入路径,使其引用internal/controller下的新路径
- 修改
接着,更新脚手架相关路径
- 更新 Dockerfile,确保包含:
COPY cmd/main.go cmd/main.go
COPY api/ api/
COPY internal/controller/ internal/controller/
然后将:
RUN CGO_ENABLED=0 GOOS=${TARGETOS:-linux} GOARCH=${TARGETARCH} go build -a -o manager main.go
替换为:
RUN CGO_ENABLED=0 GOOS=${TARGETOS:-linux} GOARCH=${TARGETARCH} go build -a -o manager cmd/main.go
- 更新 Make 目标以构建并运行 manager,将:
.PHONY: build
build: manifests generate fmt vet ## Build manager binary.
	go build -o bin/manager main.go

.PHONY: run
run: manifests generate fmt vet ## Run a controller from your host.
	go run ./main.go
替换为:
.PHONY: build
build: manifests generate fmt vet ## Build manager binary.
	go build -o bin/manager cmd/main.go

.PHONY: run
run: manifests generate fmt vet ## Run a controller from your host.
	go run ./cmd/main.go
- 更新
internal/controller/suite_test.go中CRDDirectoryPaths的路径:
将:
CRDDirectoryPaths: []string{filepath.Join("..", "config", "crd", "bases")},
替换为:
CRDDirectoryPaths: []string{filepath.Join("..", "..", "config", "crd", "bases")},
注意:若项目为多 Group(multigroup:true),则需要再多加一层,即 "..", "..", "..",。
同步更新 PROJECT 中的路径
PROJECT 会跟踪项目中所有 API 的路径。确认它们已指向 api/...,例如:
更新前:
  group: crew
  kind: Captain
  path: sigs.k8s.io/kubebuilder/testdata/project-v4/apis/crew/v1
更新后:
  group: crew
  kind: Captain
  path: sigs.k8s.io/kubebuilder/testdata/project-v4/api/crew/v1
用新变更更新 kustomize 清单
- 将
config/下的清单与go/v4默认脚手架保持一致(可参考testdata/project-v4/config/) - 在
config/samples下新增kustomization.yaml,聚合该目录中的 CR 样例(参考testdata/project-v4/config/samples/kustomization.yaml)
若项目包含 Webhook
在 Webhook 测试文件中,将 admissionv1beta1 "k8s.io/api/admission/v1beta1" 替换为 admissionv1 "k8s.io/api/admission/v1"。
Makefile 更新
参考对应版本的 testdata 示例更新 Makefile(如 testdata/project-v4/Makefile)。
依赖更新
参考对应版本 testdata 中的 go.mod(如 testdata/project-v4/go.mod)更新你的 go.mod,随后运行 go mod tidy 以确保依赖最新且无编译问题。
验证
以上步骤旨在让你的项目手动追平 go/v4 插件在脚手架与布局上的变更。
没有“自动验证是否正确更新 PROJECT”的办法。最佳做法是用 go/v4 插件新建一个同等规模的项目(例如执行 kubebuilder init --domain tutorial.kubebuilder.io plugins=go/v4,并生成相同的 API、Controller 与 Webhook),对比其生成的配置与手动修改后的配置。
全部更新完成后,建议至少执行:
make manifests(更新 Makefile 后,用最新 controller-gen 重新生成)make all(确保能构建并完成所有操作)
从单 Group 迁移到多 Group(Multi-Group)
下面以 CronJob 示例 进行迁移演示。
将项目切换为多 Group 布局:
运行 kubebuilder edit --multigroup=true。切换后,新建的 Kind 会按多 Group 布局生成;但已有的 API 组需手动迁移到新布局。
通常我们以 API 组前缀作为目录名。可查看 api/v1/groupversion_info.go 获取组名:
// +groupName=batch.tutorial.kubebuilder.io
package v1
然后,将现有 API 移动到以组名命名的子目录下。以 CronJob 示例 为例,子目录为 “batch”:
mkdir api/batch
mv api/* api/batch
API 移动后,Controller 也需按相同规则迁移(以 go/v4 为例):
mkdir internal/controller/batch
mv internal/controller/* internal/controller/batch/
已有的 Webhook 亦需同样处理:
mkdir internal/webhook/batch
mv internal/webhook/* internal/webhook/batch/
后续为新组创建的 Webhook,会生成在 internal/webhook/<group>/ 下。
接着,更新对旧包路径的所有引用。以 CronJob 为例,需调整 main.go 与 controllers/batch/cronjob_controller.go 中的导入路径,指向新结构下的位置。
如果项目中还有其它自定义文件,也需要同步修正导入路径。
最后手动修正 PROJECT 文件。kubebuilder edit --multigroup=true 仅开启多 Group,不会修复已存在 API 的 path。需要为每个资源更新其路径。
例如,原文件:
# Code generated by tool. DO NOT EDIT.
# This file is used to track the info used to scaffold your project
# and allow the plugins properly work.
# More info: https://book.kubebuilder.io/reference/project-config.html
domain: tutorial.kubebuilder.io
layout:
- go.kubebuilder.io/v4
multigroup: true
projectName: test
repo: tutorial.kubebuilder.io/project
resources:
- api:
crdVersion: v1
namespaced: true
controller: true
domain: tutorial.kubebuilder.io
group: batch
kind: CronJob
path: tutorial.kubebuilder.io/project/api/v1beta1
version: v1beta1
version: "3"
需将 path: tutorial.kubebuilder.io/project/api/v1beta1 替换为
path: tutorial.kubebuilder.io/project/api/batch/v1beta1。
对于非新建项目,已实现的旧 API 也需按需调整。
注意在多 Group 布局下,Kind 的 API 文件位置为 api/<group>/<version>(而非 api/<version>);控制器位置为 internal/controller/<group>(而非 internal/controller)。
这就是我们需要把既有 API/Controller 移动到新结构对应位置的原因。别忘了同步更新导入路径。
为使 envtest 能正确安装 CRD 到测试环境,需要在每个 internal/controller/<group>/suite_test.go 中更新 CRD 目录的相对路径,多加一层 "..",例如:
By("bootstrapping test environment")
testEnv = &envtest.Environment{
CRDDirectoryPaths: []string{filepath.Join("..", "..", "config", "crd", "bases")},
}
CronJob 教程对上述变更有更详细的说明(针对单 Group 项目的自动生成情况)。
Alpha 命令
Kubebuilder 提供了实验性的 Alpha 命令,用于协助项目迁移、脚手架再生成等高级操作。
这些命令通过自动化或半自动化的方式,简化了以往手动且易出错的任务。
当前可用的 Alpha 命令包括:
alpha generate— 使用当前安装的 CLI 版本重新生成项目脚手架alpha update— 通过脚手架快照执行三方合并以自动化迁移流程
更多信息请查看各命令的专门文档。
使用 alpha generate 重新生成项目
概述
kubebuilder alpha generate 命令会使用当前安装的 CLI 与插件版本为你的项目重新生成脚手架。
它会基于 PROJECT 文件中指定的配置重新生成完整脚手架。这使你能够应用 Kubebuilder 新版本引入的最新布局变更、插件特性与代码生成改进。
你可以选择在原地重新生成(覆盖现有文件),或输出到其他目录以进行差异比较与手动集成。
适用场景
当 Kubebuilder 引入新变更时,你可以使用 kubebuilder alpha generate 升级项目脚手架。这包括插件更新(例如 go.kubebuilder.io/v3 → go.kubebuilder.io/v4)或 CLI 版本更新(例如 4.3.1 → 最新)。
当你想要:
- 让项目使用最新布局或插件版本
- 重新生成脚手架以包含最近的变更
- 将当前脚手架与最新版本进行比较并手动应用更新
- 创建一个干净的脚手架以审阅或测试变更
当你希望完全掌控升级流程时,请使用该命令。如果项目由较旧的 CLI 版本创建且不支持 alpha update,该命令也很有用。
这种方式允许你对比当前分支与上游脚手架更新(例如主分支)之间的差异,并帮助你将自定义代码覆盖到新脚手架之上。
如何使用
将当前项目升级到已安装的 CLI 版本(最新脚手架)
kubebuilder alpha generate
运行该命令后,项目会在原地重新生成脚手架。你可以将本地变更与主分支对比以查看更新内容,并按需将自定义代码叠加上去。
在新目录生成脚手架
使用 --input-dir 与 --output-dir 指定输入与输出路径。
kubebuilder alpha generate \
--input-dir=/path/to/existing/project \
--output-dir=/path/to/new/project
执行后,你可以在指定的输出目录中查看生成的脚手架。
参数
| Flag | 描述 |
|---|---|
--input-dir | 含 PROJECT 文件的目录路径。默认 CWD。原地模式下会删除除 .git 与 PROJECT 外的所有文件 |
--output-dir | 输出脚手架的目录。未设置时在原地重新生成 |
--plugins | 本次生成所使用的插件键 |
-h, --help | 显示帮助 |
更多资源
使用 alpha update 升级项目
概述
kubebuilder alpha update 通过 Git 的三方合并将你的项目脚手架升级到更新的 Kubebuilder 版本。它会为旧版本与新版本分别重建干净的脚手架,将你当前的代码合并进新的脚手架,并生成一个便于审阅的输出分支。它负责繁重工作,让你专注于审阅与解决冲突,而不是重复应用你的代码。
默认情况下,最终结果会在专用输出分支上被压缩为单个提交(squash)。若希望保留完整历史(不 squash),请使用 --show-commits。
适用场景
在以下情况下使用该命令:
- 希望迁移到更新的 Kubebuilder 版本或插件布局
- 希望在独立分支上审阅脚手架变更
- 希望专注于解决合并冲突(而非重复应用自定义代码)
工作原理
你需要告知工具“目标版本”以及当前项目所在的分支。它会重建两个脚手架,并通过“三方合并”将你的代码并入新脚手架,最后给出一个可供审阅与安全合并的输出分支。你可以决定是只保留一个干净提交、保留完整历史,还是自动推送到远端。
第一步:检测版本
- 读取
PROJECT文件或命令行参数 - 通过
PROJECT文件中的cliVersion字段(若存在)确定“来源版本” - 确定“目标版本”(默认最新发布版本)
- 选择当前代码所在分支(默认
main)
第二步:创建脚手架
命令会创建三个临时分支:
- Ancestor:来自旧版本的干净项目脚手架
- Original:你的当前代码快照
- Upgrade:来自新版本的干净脚手架
第三步:执行三方合并
- 使用 Git 的三方合并将 Original(你的代码)合并到 Upgrade(新脚手架)
- 在引入上游变更的同时保留你的自定义
- 如果发生冲突:
- 默认:停止并让你手动解决
- 使用
--force:即使存在冲突标记也继续提交(适合自动化)
- 运行
make manifests generate fmt vet lint-fix进行整理
第四步:写入输出分支
- 默认情况下,所有变更会在一个安全的输出分支上被压缩为单个提交:
kubebuilder-update-from-<from-version>-to-<to-version> - 你可以调整行为:
--show-commits:保留完整历史--restore-path:在 squash 模式下,从基分支恢复特定文件(例如 CI 配置)--output-branch:自定义输出分支名--push:自动推送结果到origin--git-config:设置 Git 配置--open-gh-issue:创建带检查清单与对比链接的 GitHub Issue(需要gh)--use-gh-models:使用gh models向 Issue 添加 AI 概览评论
第五步:清理
- 输出分支就绪后,所有临时工作分支会被删除
- 你会得到一个干净的分支,可用于测试、审阅并合并回主分支
如何使用(命令)
Run from your project root:
kubebuilder alpha update
固定版本与基分支:
kubebuilder alpha update \
--from-version v4.5.2 \
--to-version v4.6.0 \
--from-branch main
适合自动化(即使发生冲突也继续):
kubebuilder alpha update --force
保留完整历史而非 squash:
kubebuilder alpha update --from-version v4.5.0 --to-version v4.7.0 --force --show-commits
默认 squash,但保留基分支中的 CI/workflows:
kubebuilder alpha update --force \
--restore-path .github/workflows \
--restore-path docs
使用自定义输出分支名:
kubebuilder alpha update --force \
--output-branch upgrade/kb-to-v4.7.0
执行更新并将结果推送到 origin:
kubebuilder alpha update --from-version v4.6.0 --to-version v4.7.0 --force --push
处理冲突(--force 与默认行为)
使用 --force 时,即使存在冲突 Git 也会完成合并。提交中会包含如下冲突标记:
<<<<<<< HEAD
Your changes
=======
Incoming changes
>>>>>>> (original)
This allows you to run the command in CI or cron jobs without manual intervention.
- Without
--force: the command stops on the merge branch and prints guidance; no commit is created. - With
--force: the merge is committed (merge or output branch) and contains the markers.
After you fix conflicts, always run:
make manifests generate fmt vet lint-fix
# or
make all
Using with GitHub Issues (--open-gh-issue) and AI (--use-gh-models) assistance
Pass --open-gh-issue to have the command create a GitHub Issue in your repository
to assist with the update. Also, if you also pass --use-gh-models, the tool posts a follow-up comment
on that Issue with an AI-generated overview of the most important changes plus brief conflict-resolution
guidance.
Examples
Create an Issue with a compare link:
kubebuilder alpha update --open-gh-issue
Create an Issue and add an AI summary:
kubebuilder alpha update --open-gh-issue --use-gh-models
What you’ll see
The command opens an Issue that links to the diff so you can create the PR and review it, for example:
With --use-gh-models, an AI comment highlights key changes and suggests how to resolve any conflicts:
Moreover, AI models are used to help you understand what changes are needed to keep your project up to date, and to suggest resolutions if conflicts are encountered, as in the following example:
Automation
This integrates cleanly with automation. The autoupdate.kubebuilder.io/v1-alpha plugin can scaffold a GitHub Actions workflow that runs the command on a schedule (e.g., weekly). When a new Kubebuilder release is available, it opens an Issue with a compare link so you can create the PR and review it.
Changing Extra Git configs only during the run (does not change your ~/.gitconfig)_
By default, kubebuilder alpha update applies safe Git configs:
merge.renameLimit=999999, diff.renameLimit=999999, merge.conflictStyle=merge
You can add more, or disable them.
- Add more on top of defaults
kubebuilder alpha update \
--git-config rerere.enabled=true
- Disable defaults entirely
kubebuilder alpha update --git-config disable
- Disable defaults and set your own
kubebuilder alpha update \
--git-config disable \
--git-config rerere.enabled=true
参数
| Flag | 描述 |
|---|---|
--force | 即使发生合并冲突也继续。将带有冲突标记的文件提交(适合 CI/定时任务) |
--from-branch | 当前项目代码所在的 Git 分支。默认 main |
--from-version | 迁移来源的 Kubebuilder 版本(例如 v4.6.0)。未设置时尽可能从 PROJECT 读取 |
--git-config | 可重复。以 -c key=value 形式传入 Git 配置。默认(未指定时):-c merge.renameLimit=999999 -c diff.renameLimit=999999。你的配置会叠加其上。若要禁用默认值,添加 --git-config disable |
--open-gh-issue | 更新完成后创建带预填检查清单与对比链接的 GitHub Issue(需要 gh) |
--output-branch | 输出分支名称。默认:kubebuilder-update-from-<from-version>-to-<to-version> |
--push | 更新完成后将输出分支推送到 origin 远端 |
--restore-path | 可重复。在 squash 模式下,从基分支保留的路径(例如 .github/workflows)。与 --show-commits 不兼容 |
--show-commits | 保留完整历史(不 squash)。与 --restore-path 不兼容 |
--to-version | 迁移目标的 Kubebuilder 版本(例如 v4.7.0)。未设置时默认最新可用版本 |
--use-gh-models | 使用 gh models 作为 Issue 评论发布 AI 概览。需要 gh 与 gh-models 扩展。仅当同时设置 --open-gh-issue 时有效 |
-h, --help | Show help for this command. |
演示
更多资源
参考(Reference)
-
使用 Finalizer Finalizer 允许在对象从 Kubernetes 集群中被删除之前执行自定义清理逻辑。
-
监听资源(Watching Resources) 监听集群中的资源变化,并据此采取动作。
-
什么是 Webhook? Webhook 是 HTTP 回调。Kubernetes 中常见的三类:1)准入(admission)2)CRD 转换 3)鉴权(authorization)。
- Admission Webhook Admission Webhook 在 API Server 接受对象前,用于变更或校验资源。
生成 CRD(Generating CRDs)
Kubebuilder 使用名为 controller-gen 的工具来生成实用代码与 Kubernetes 对象 YAML(例如 CRD)。
它依赖源码中的特殊“标记注释”(以 // + 开头)来为字段、类型与包提供额外元信息。针对 CRD,相关标记通常写在你的 _types.go 文件中。更多标记说明请参考标记参考文档。
Kubebuilder 提供了一个 make 目标来运行 controller-gen 以生成 CRD:make manifests。
执行 make manifests 后,你会在 config/crd/bases 目录下看到生成的 CRD。make manifests 还会生成其他若干产物——详见标记参考文档。
校验(Validation)
CRD 在其 validation 段落中通过 OpenAPI v3 schema 支持声明式校验。
通常,校验相关标记可以加在字段或类型上。若校验逻辑较复杂、需要复用,或需要校验切片元素,建议定义一个新的类型以承载你的校验描述。
例如:
type ToySpec struct {
// +kubebuilder:validation:MaxLength=15
// +kubebuilder:validation:MinLength=1
Name string `json:"name,omitempty"`
// +kubebuilder:validation:MaxItems=500
// +kubebuilder:validation:MinItems=1
// +kubebuilder:validation:UniqueItems=true
Knights []string `json:"knights,omitempty"`
Alias Alias `json:"alias,omitempty"`
Rank Rank `json:"rank"`
}
// +kubebuilder:validation:Enum=Lion;Wolf;Dragon
type Alias string
// +kubebuilder:validation:Minimum=1
// +kubebuilder:validation:Maximum=3
// +kubebuilder:validation:ExclusiveMaximum=false
type Rank int32
自定义输出列(Additional Printer Columns)
自 Kubernetes 1.11 起,kubectl get 可以向服务端询问应显示哪些列。对 CRD 而言,这使其能像内建资源一样,在 kubectl get 中展示更贴合类型的信息。
展示哪些信息由 CRD 的 additionalPrinterColumns 字段控制,而该字段又由你在 Go 类型上标注的 +kubebuilder:printcolumn 标记决定。
例如,下面示例为之前的校验示例添加几列,显示 alias、rank 与 knights 的信息:
// +kubebuilder:printcolumn:name="Alias",type=string,JSONPath=`.spec.alias`
// +kubebuilder:printcolumn:name="Rank",type=integer,JSONPath=`.spec.rank`
// +kubebuilder:printcolumn:name="Bravely Run Away",type=boolean,JSONPath=`.spec.knights[?(@ == "Sir Robin")]`,description="when danger rears its ugly head, he bravely turned his tail and fled",priority=10
// +kubebuilder:printcolumn:name="Age",type="date",JSONPath=".metadata.creationTimestamp"
type Toy struct {
metav1.TypeMeta `json:",inline"`
metav1.ObjectMeta `json:"metadata,omitempty"`
Spec ToySpec `json:"spec,omitempty"`
Status ToyStatus `json:"status,omitempty"`
}
子资源(Subresources)
自 Kubernetes 1.13 起,CRD 可以选择实现 /status 与 /scale 子资源。
一般建议:凡是具有 status 字段的资源,都应启用 /status 子资源。
上述两个子资源均有对应的标记。
Status
使用 +kubebuilder:subresource:status 启用 status 子资源。启用后,对主资源的更新不会直接修改其 status;同样,对 status 子资源的更新也只能修改 status 字段。
例如:
// +kubebuilder:subresource:status
type Toy struct {
metav1.TypeMeta `json:",inline"`
metav1.ObjectMeta `json:"metadata,omitempty"`
Spec ToySpec `json:"spec,omitempty"`
Status ToyStatus `json:"status,omitempty"`
}
Scale
使用 +kubebuilder:subresource:scale 启用 scale 子资源。启用后,用户可以对你的资源使用 kubectl scale。若 selectorpath 指向标签选择器的字符串形式,HPA 也能自动伸缩你的资源。
例如:
type CustomSetSpec struct {
Replicas *int32 `json:"replicas"`
}
type CustomSetStatus struct {
Replicas int32 `json:"replicas"`
Selector string `json:"selector"` // this must be the string form of the selector
}
// +kubebuilder:subresource:status
// +kubebuilder:subresource:scale:specpath=.spec.replicas,statuspath=.status.replicas,selectorpath=.status.selector
type CustomSet struct {
metav1.TypeMeta `json:",inline"`
metav1.ObjectMeta `json:"metadata,omitempty"`
Spec CustomSetSpec `json:"spec,omitempty"`
Status CustomSetStatus `json:"status,omitempty"`
}
多版本(Multiple Versions)
自 Kubernetes 1.13 起,你可以在同一个 CRD 中定义某个 Kind 的多个版本,并通过 Webhook 在版本间进行转换。
更多细节见多版本教程。
出于与旧版 Kubernetes 的兼容性考虑,Kubebuilder 默认不会为不同版本生成不同的校验规则。
如需启用,请修改 Makefile 中的选项:若使用 v1beta CRD,将 CRD_OPTIONS ?= "crd:trivialVersions=true,preserveUnknownFields=false 改为 CRD_OPTIONS ?= crd:preserveUnknownFields=false;若使用 v1(推荐),则为 CRD_OPTIONS ?= crd。
随后,可使用 +kubebuilder:storageversion 标记 指定由 API Server 用于持久化数据的 GVK。
实现细节(Under the hood)
Kubebuilder 通过脚手架提供了运行 controller-gen 的 make 规则;若本地尚无该可执行文件,会使用 Go Modules 的 go install 自动安装。
你也可以直接运行 controller-gen 来观察其行为。
controller-gen 的每个“生成器”都通过命令行选项进行控制(语法与标记一致)。同时它也支持不同的输出“规则”,用于控制产物的输出位置与形式。如下所示为 manifests 规则(为示例简化为仅生成 CRD):
# Generate manifests for CRDs
manifests: controller-gen
$(CONTROLLER_GEN) rbac:roleName=manager-role crd webhook paths="./..." output:crd:artifacts:config=config/crd/bases
它通过 output:crd:artifacts 输出规则将与 CRD 相关的配置类(非代码)产物输出至 config/crd/bases,而非 config/crd。
想要查看 controller-gen 的所有生成器与选项,运行:
controller-gen -h
or, for more details:
$ controller-gen -hhh
使用 Finalizer(Using Finalizers)
Finalizer 允许控制器实现异步的“删除前”钩子。举例来说,如果你的每个自定义对象在外部系统中都对应着某个资源(例如对象存储的桶),当该对象在 Kubernetes 中被删除时,你希望同步清理外部资源,此时即可借助 Finalizer 实现。
关于 Finalizer 的更多背景请参阅 Kubernetes 参考文档。下文展示如何在控制器的 Reconcile 方法中注册并触发删除前的处理逻辑。
关键点:Finalizer 会让对对象的“删除”变为一次“更新”,即为对象打上删除时间戳。对象上存在删除时间戳意味着其处于删除流程中。否则(没有 Finalizer 时),删除表现为一次调谐(reconcile)里对象已从缓存中缺失的情况。
要点摘录:
- 当对象未被删除且尚未注册 Finalizer 时,需添加 Finalizer 并更新该对象。
- 当对象进入删除流程且 Finalizer 仍存在时,执行删除前逻辑,随后移除 Finalizer 并更新对象。
- 删除前逻辑应具备幂等性。
Apache License
Licensed under the Apache License, Version 2.0 (the “License”); you may not use this file except in compliance with the License. You may obtain a copy of the License at
http://www.apache.org/licenses/LICENSE-2.0
Unless required by applicable law or agreed to in writing, software distributed under the License is distributed on an “AS IS” BASIS, WITHOUT WARRANTIES OR CONDITIONS OF ANY KIND, either express or implied. See the License for the specific language governing permissions and limitations under the License.
Imports
First, we start out with some standard imports. As before, we need the core controller-runtime library, as well as the client package, and the package for our API types.
package controllers
import (
"context"
"k8s.io/kubernetes/pkg/apis/batch"
ctrl "sigs.k8s.io/controller-runtime"
"sigs.k8s.io/controller-runtime/pkg/client"
"sigs.k8s.io/controller-runtime/pkg/controller/controllerutil"
batchv1 "tutorial.kubebuilder.io/project/api/v1"
)
By default, kubebuilder will include the RBAC rules necessary to update finalizers for CronJobs.
// +kubebuilder:rbac:groups=batch.tutorial.kubebuilder.io,resources=cronjobs,verbs=get;list;watch;create;update;patch;delete
// +kubebuilder:rbac:groups=batch.tutorial.kubebuilder.io,resources=cronjobs/status,verbs=get;update;patch
// +kubebuilder:rbac:groups=batch.tutorial.kubebuilder.io,resources=cronjobs/finalizers,verbs=update
The code snippet below shows skeleton code for implementing a finalizer.
func (r *CronJobReconciler) Reconcile(ctx context.Context, req ctrl.Request) (ctrl.Result, error) {
log := r.Log.WithValues("cronjob", req.NamespacedName)
cronJob := &batchv1.CronJob{}
if err := r.Get(ctx, req.NamespacedName, cronJob); err != nil {
log.Error(err, "unable to fetch CronJob")
// we'll ignore not-found errors, since they can't be fixed by an immediate
// requeue (we'll need to wait for a new notification), and we can get them
// on deleted requests.
return ctrl.Result{}, client.IgnoreNotFound(err)
}
// name of our custom finalizer
myFinalizerName := "batch.tutorial.kubebuilder.io/finalizer"
// examine DeletionTimestamp to determine if object is under deletion
if cronJob.ObjectMeta.DeletionTimestamp.IsZero() {
// The object is not being deleted, so if it does not have our finalizer,
// then let's add the finalizer and update the object. This is equivalent
// to registering our finalizer.
if !controllerutil.ContainsFinalizer(cronJob, myFinalizerName) {
controllerutil.AddFinalizer(cronJob, myFinalizerName)
if err := r.Update(ctx, cronJob); err != nil {
return ctrl.Result{}, err
}
}
} else {
// The object is being deleted
if controllerutil.ContainsFinalizer(cronJob, myFinalizerName) {
// our finalizer is present, so let's handle any external dependency
if err := r.deleteExternalResources(cronJob); err != nil {
// if fail to delete the external dependency here, return with error
// so that it can be retried.
return ctrl.Result{}, err
}
// remove our finalizer from the list and update it.
controllerutil.RemoveFinalizer(cronJob, myFinalizerName)
if err := r.Update(ctx, cronJob); err != nil {
return ctrl.Result{}, err
}
}
// Stop reconciliation as the item is being deleted
return ctrl.Result{}, nil
}
// Your reconcile logic
return ctrl.Result{}, nil
}
func (r *Reconciler) deleteExternalResources(cronJob *batch.CronJob) error {
//
// delete any external resources associated with the cronJob
//
// Ensure that delete implementation is idempotent and safe to invoke
// multiple times for same object.
}
最佳实践(Good Practices)
什么是 Operator 的 “Reconciliation”?
用 Kubebuilder 创建项目后,你会在 cmd/main.go 看到脚手架代码。该代码初始化一个 Manager,项目基于 controller-runtime 框架。Manager 管理若干控制器,每个控制器提供 reconcile 函数,使资源在集群中不断向期望状态收敛。
“Reconciliation(调谐)” 是一个持续循环,按 Kubernetes 的控制回路原理执行必要操作以维持期望状态。更多背景可参考 Operator 模式 文档。
为什么调谐应具备幂等性?
开发 Operator 时,控制器的调谐循环需要是幂等的。遵循Operator 模式,我们实现的控制器应能在集群中不断同步资源直至达到期望状态。幂等的设计有助于正确应对通用或意外事件、顺利处理启动与升级。更多说明见此处。
将调谐逻辑严格绑定到特定事件会违背 Operator 模式与 controller-runtime 的设计原则,可能导致资源卡死、需要人工介入等问题。
理解 Kubernetes API 并遵循 API 约定
构建 Operator 通常涉及扩展 Kubernetes API。理解 CRD 与 API 的交互方式至关重要。建议阅读 Kubebuilder 文档 中的 Group/Version/Kind 章节,以及 Kubernetes 的 Operator 模式 文档。
为什么要遵循 Kubernetes API 约定与标准
遵循 Kubernetes API 约定与标准 对应用与部署至关重要:
- 互操作性:遵循约定可减少兼容性问题,带来一致体验;
- 可维护性:一致的模式/结构便于调试与支持,提高效率;
- 发挥平台能力:在标准框架下更好地利用特性,实现可扩展与高可用;
- 面向未来:与生态演进保持一致,兼容后续更新与特性。
总之,遵循这些约定能显著提升集成、维护、性能与演进能力。
为何应避免一个控制器同时管理多个 CRD(例如 “install_all_controller.go”)?
避免让同一个控制器调谐多个 Kind。这通常违背 controller-runtime 的设计,也损害封装、单一职责与内聚性等原则,增加扩展/复用/维护难度。问题包括:
- 复杂性:单控多 CR 会显著增加代码复杂度;
- 可扩展性:易成为瓶颈,降低系统效率与响应性;
- 单一职责:每个控制器聚焦一个职责更稳健;
- 错误隔离:单控多 CR 时,一处错误可能影响所有受管 CR;
- 并发与同步:多 CR 并行易引发竞态与复杂同步(尤其存在依赖关系时)。
因此,通常遵循单一职责:一个 CR 对应一个控制器。
推荐使用 Status Conditions
建议按 K8s API 约定 使用 Status Conditions 管理状态,原因包括:
- 标准化:为自定义资源提供统一的状态表示,便于人和工具理解;
- 可读性:多 Condition 组合可表达复杂状态;
- 可扩展:新增特性/状态时易于扩展,而无需重构 API;
- 可观测:便于运维/监控工具跟踪资源状态;
- 兼容性:与生态一致,带来一致的使用体验。
创建事件(Events)
在控制器的 Reconcile 函数中发布 Event 通常很有用:它让用户或自动化流程能够了解某个对象上发生了什么,并据此作出反应。
可通过 $ kubectl describe <资源类型> <资源名> 查看某对象的近期事件,或通过 $ kubectl get events 查看全局事件列表。
编写事件(Writing Events)
事件的函数原型:
Event(object runtime.Object, eventtype, reason, message string)
object:事件关联的对象。eventtype:事件类型,为 Normal 或 Warning(更多)。reason:事件原因。建议短小唯一、采用UpperCamelCase,便于自动化流程在 switch 中处理(更多)。message:展示给人看的详细描述(更多)。
如何在控制器中触发事件?
在控制器的调谐流程中,你可以使用 EventRecorder 发布事件。通过在 Manager 上调用 GetRecorder(name string) 可创建对应的 recorder。下面演示如何修改 cmd/main.go:
if err := (&controller.MyKindReconciler{
Client: mgr.GetClient(),
Scheme: mgr.GetScheme(),
// Note that we added the following line:
Recorder: mgr.GetEventRecorderFor("mykind-controller"),
}).SetupWithManager(mgr); err != nil {
setupLog.Error(err, "unable to create controller", "controller", "MyKind")
os.Exit(1)
}
在控制器中接入 EventRecorder
为触发事件,控制器需要持有 record.EventRecorder:
import (
...
"k8s.io/client-go/tools/record"
...
)
// MyKindReconciler reconciles a MyKind object
type MyKindReconciler struct {
client.Client
Scheme *runtime.Scheme
// See that we added the following code to allow us to pass the record.EventRecorder
Recorder record.EventRecorder
}
将 EventRecorder 传入控制器
仍以 cmd/main.go 为例,向控制器构造体传入 recorder:
if err := (&controller.MyKindReconciler{
Client: mgr.GetClient(),
Scheme: mgr.GetScheme(),
// Note that we added the following line:
Recorder: mgr.GetEventRecorderFor("mykind-controller"),
}).SetupWithManager(mgr); err != nil {
setupLog.Error(err, "unable to create controller", "controller", "MyKind")
os.Exit(1)
}
授权所需权限(RBAC)
还需为项目授予创建事件的权限。在控制器上添加如下 RBAC 标记:
...
// +kubebuilder:rbac:groups=core,resources=events,verbs=create;patch
...
func (r *MyKindReconciler) Reconcile(ctx context.Context, req ctrl.Request) (ctrl.Result, error) {
然后执行 $ make manifests 更新 config/rbac/role.yaml 中的规则。
监听资源(Watching Resources)
在扩展 Kubernetes API 时,我们希望方案的行为与 Kubernetes 本身保持一致。以 Deployment 为例,其由一个控制器管理:当集群中发生创建、更新、删除等事件时,控制器触发调谐以使资源状态与期望一致。
类似地,开发控制器时,我们需要监听与方案相关的资源变化;无论是创建、更新还是删除,都应触发调谐循环以采取相应动作并保持一致性。
controller-runtime 提供了多种监听与管理资源的方式。
主资源(Primary Resources)
主资源 是控制器直接负责管理的资源。例如,为 MyApp 创建了 CRD,则相应控制器负责管理 MyApp 实例。
在这种情况下,MyApp 是该控制器的主资源,调谐循环的目标就是维持这些主资源的期望状态。
使用 Kubebuilder 创建新 API 时,会脚手架如下默认代码,保证控制器通过 For() 监听该 API 的创建、更新与删除事件:
该设置确保当 API 实例被创建、更新或删除时,都会触发调谐:
// Watches the primary resource (e.g., MyApp) for create, update, delete events
if err := ctrl.NewControllerManagedBy(mgr).
For(&<YourAPISpec>{}). <-- See there that the Controller is For this API
Complete(r); err != nil {
return err
}
二级资源(Secondary Resources)
控制器通常还需管理 二级资源,即为支撑主资源在集群中运行所需的各类资源。
二级资源的变化会直接影响主资源,因此控制器需相应地监听并调谐它们。
由控制器“拥有”的二级资源
当二级资源(如 Service、ConfigMap、Deployment)被控制器 Owned 时,意味着它们由该控制器创建并通过 OwnerReferences 与主资源关联。
For example, if we have a controller to manage our CR(s) of the Kind MyApp
on the cluster, which represents our application solution, all resources required
to ensure that MyApp is up and running with the desired number of instances
will be Secondary Resources. The code responsible for creating, deleting,
and updating these resources will be part of the MyApp Controller.
We would add the appropriate OwnerReferences
using the controllerutil.SetControllerReference
function to indicate that these resources are owned by the same controller
responsible for managing MyApp instances, which will be reconciled by the MyAppReconciler.
此外,当主资源被删除时,Kubernetes 的垃圾回收会级联删除关联的二级资源。
非本控制器“拥有”的二级资源
二级资源既可能来自本项目,也可能来自其他项目,与主资源相关,但并非由本控制器创建或管理。
For example, if we have a CRD that represents a backup solution (i.e. MyBackup) for our MyApp,
it might need to watch changes in the MyApp resource to trigger reconciliation in MyBackup
to ensure the desired state. Similarly, MyApp’s behavior might also be impacted by
CRDs/APIs defined in other projects.
在这两种情况下,即便它们不是 MyAppController 的 Owned 资源,仍被视为二级资源。
In Kubebuilder, resources that are not defined in the project itself and are not a Core Type (those not defined in the Kubernetes API) are called External Types.
An External Type refers to a resource that is not defined in your
project but one that you need to watch and respond to.
For example, if Operator A manages a MyApp CRD for application deployment,
and Operator B handles backups, Operator B can watch the MyApp CRD as an external type
to trigger backup operations based on changes in MyApp.
In this scenario, Operator B could define a BackupConfig CRD that relies on the state of MyApp.
By treating MyApp as a Secondary Resource, Operator B can watch and reconcile changes in Operator A’s MyApp,
ensuring that backup processes are initiated whenever MyApp is updated or scaled.
监听资源的一般思路
Whether a resource is defined within your project or comes from an external project, the concept of Primary and Secondary Resources remains the same:
- The Primary Resource is the resource the controller is primarily responsible for managing.
- Secondary Resources are those that are required to ensure the primary resource works as desired.
Therefore, regardless of whether the resource was defined by your project or by another project, your controller can watch, reconcile, and manage changes to these resources as needed.
Why does watching the secondary resources matter?
When building a Kubernetes controller, it’s crucial to not only focus on Primary Resources but also to monitor Secondary Resources. Failing to track these resources can lead to inconsistencies in your controller’s behavior and the overall cluster state.
Secondary resources may not be directly managed by your controller, but changes to these resources can still significantly impact the primary resource and your controller’s functionality. Here are the key reasons why it’s important to watch them:
-
Ensuring Consistency:
- Secondary resources (e.g., child objects or external dependencies) may diverge from their desired state. For instance, a secondary resource may be modified or deleted, causing the system to fall out of sync.
- Watching secondary resources ensures that any changes are detected immediately, allowing the controller to reconcile and restore the desired state.
-
Avoiding Random Self-Healing:
- Without watching secondary resources, the controller may “heal” itself only upon restart or when specific events are triggered. This can cause unpredictable or delayed reactions to issues.
- Monitoring secondary resources ensures that inconsistencies are addressed promptly, rather than waiting for a controller restart or external event to trigger reconciliation.
-
Effective Lifecycle Management:
- Secondary resources might not be owned by the controller directly, but their state still impacts the behavior of primary resources. Without watching these, you risk leaving orphaned or outdated resources.
- Watching non-owned secondary resources lets the controller respond to lifecycle events (create, update, delete) that might affect the primary resource, ensuring consistent behavior across the system.
示例见:监听非 Owned 的二级资源。
为何不直接用 RequeueAfter X 代替监听?
Kubernetes 控制器本质上是事件驱动的:调谐循环通常由资源的创建、更新、删除等事件触发。相较于固定周期的 RequeueAfter 轮询,事件驱动更高效、更及时,能在需要时才行动,兼顾性能与效率。
In many cases, watching resources is the preferred approach for ensuring Kubernetes resources
remain in the desired state. It is more efficient, responsive, and aligns with Kubernetes’ event-driven architecture.
However, there are scenarios where RequeueAfter is appropriate and necessary, particularly for managing external
systems that do not emit events or for handling resources that take time to converge, such as long-running processes.
Relying solely on RequeueAfter for all scenarios can lead to unnecessary overhead and
delayed reactions. Therefore, it is essential to prioritize event-driven reconciliation by configuring
your controller to watch resources whenever possible, and reserving RequeueAfter for situations
where periodic checks are required.
何时应使用 RequeueAfter X
While RequeueAfter is not the primary method for triggering reconciliations, there are specific cases where it is
necessary, such as:
- 观察无事件外部系统:例如外部数据库、三方服务等不产生活动事件的对象,可用
RequeueAfter周期性检查。 - 基于时间的操作:如轮换密钥、证书续期等需按固定间隔进行的任务。
- 处理错误/延迟:当资源需要时间自愈时,
RequeueAfter可避免持续触发调谐,改为延时再查。
使用 Predicates
在更复杂的场景中,可使用 Predicates 精细化触发条件:按特定字段、标签或注解的变化过滤事件,使控制器只对相关事件响应并保持高效。
监听由控制器“拥有”的二级资源
在 Kubernetes 控制器中,通常同时管理 主资源(Primary Resources) 与 二级资源(Secondary Resources)。主资源是控制器直接负责的对象;二级资源则由控制器创建与管理,用于支撑主资源的运行。
本节介绍如何管理被控制器 Owned 的二级资源。示例涵盖:
- 在主资源(
Busybox)与二级资源(Deployment)之间设置 OwnerReference,以确保生命周期正确关联; - 在
SetupWithManager()中通过Owns()让控制器监听该二级资源。由于Deployment由Busybox控制器创建并管理,因此属于其 Owned 资源。
设置 OwnerReference
要将二级资源(Deployment)的生命周期与主资源(Busybox)关联,需要在二级资源上设置 OwnerReference。这样,当主资源被删除时,Kubernetes 会级联删除二级资源。
controller-runtime 提供了 controllerutil.SetControllerReference 来设置该关系。
设置 OwnerReference 示例
Below, we create the Deployment and set the Owner reference between the Busybox custom resource and the Deployment using controllerutil.SetControllerReference().
// deploymentForBusybox returns a Deployment object for Busybox
func (r *BusyboxReconciler) deploymentForBusybox(busybox *examplecomv1alpha1.Busybox) *appsv1.Deployment {
replicas := busybox.Spec.Size
dep := &appsv1.Deployment{
ObjectMeta: metav1.ObjectMeta{
Name: busybox.Name,
Namespace: busybox.Namespace,
},
Spec: appsv1.DeploymentSpec{
Replicas: &replicas,
Selector: &metav1.LabelSelector{
MatchLabels: map[string]string{"app": busybox.Name},
},
Template: metav1.PodTemplateSpec{
ObjectMeta: metav1.ObjectMeta{
Labels: map[string]string{"app": busybox.Name},
},
Spec: corev1.PodSpec{
Containers: []corev1.Container{
{
Name: "busybox",
Image: "busybox:latest",
},
},
},
},
},
}
// 为 Deployment 设置 ownerRef,保证 Busybox 被删除时它也会被删除
controllerutil.SetControllerReference(busybox, dep, r.Scheme)
return dep
}
说明
设置 OwnerReference 后,当 Busybox 被删除时,Deployment 也会被自动清理。控制器也可据此监听 Deployment 的变化,确保副本数等期望状态得以维持。
例如,若有人将 Deployment 的副本数改为 3,而 Busybox CR 期望为 1,控制器会在调谐中将其缩回到 1。
Reconcile 函数示例
// Reconcile handles the main reconciliation loop for Busybox and the Deployment
func (r *BusyboxReconciler) Reconcile(ctx context.Context, req ctrl.Request) (ctrl.Result, error) {
log := logf.FromContext(ctx)
// Fetch the Busybox instance
busybox := &examplecomv1alpha1.Busybox{}
if err := r.Get(ctx, req.NamespacedName, busybox); err != nil {
if apierrors.IsNotFound(err) {
log.Info("Busybox resource not found. Ignoring since it must be deleted")
return ctrl.Result{}, nil
}
log.Error(err, "Failed to get Busybox")
return ctrl.Result{}, err
}
// Check if the Deployment already exists, if not create a new one
found := &appsv1.Deployment{}
err := r.Get(ctx, types.NamespacedName{Name: busybox.Name, Namespace: busybox.Namespace}, found)
if err != nil && apierrors.IsNotFound(err) {
// Define a new Deployment
dep := r.deploymentForBusybox(busybox)
log.Info("Creating a new Deployment", "Deployment.Namespace", dep.Namespace, "Deployment.Name", dep.Name)
if err := r.Create(ctx, dep); err != nil {
log.Error(err, "Failed to create new Deployment", "Deployment.Namespace", dep.Namespace, "Deployment.Name", dep.Name)
return ctrl.Result{}, err
}
// Requeue the request to ensure the Deployment is created
return ctrl.Result{RequeueAfter: time.Minute}, nil
} else if err != nil {
log.Error(err, "Failed to get Deployment")
return ctrl.Result{}, err
}
// Ensure the Deployment size matches the desired state
size := busybox.Spec.Size
if *found.Spec.Replicas != size {
found.Spec.Replicas = &size
if err := r.Update(ctx, found); err != nil {
log.Error(err, "Failed to update Deployment size", "Deployment.Namespace", found.Namespace, "Deployment.Name", found.Name)
return ctrl.Result{}, err
}
// Requeue the request to ensure the correct state is achieved
return ctrl.Result{Requeue: true}, nil
}
// Update Busybox status to reflect that the Deployment is available
busybox.Status.AvailableReplicas = found.Status.AvailableReplicas
if err := r.Status().Update(ctx, busybox); err != nil {
log.Error(err, "Failed to update Busybox status")
return ctrl.Result{}, err
}
return ctrl.Result{}, nil
}
Watching Secondary Resources
To ensure that changes to the secondary resource (such as the Deployment) trigger
a reconciliation of the primary resource (Busybox), we configure the controller
to watch both resources.
The Owns() method allows you to specify secondary resources
that the controller should monitor. This way, the controller will
automatically reconcile the primary resource whenever the secondary
resource changes (e.g., is updated or deleted).
Example: Configuring SetupWithManager to Watch Secondary Resources
// SetupWithManager sets up the controller with the Manager.
// The controller will watch both the Busybox primary resource and the Deployment secondary resource.
func (r *BusyboxReconciler) SetupWithManager(mgr ctrl.Manager) error {
return ctrl.NewControllerManagedBy(mgr).
For(&examplecomv1alpha1.Busybox{}). // Watch the primary resource
Owns(&appsv1.Deployment{}). // Watch the secondary resource (Deployment)
Complete(r)
}
Ensuring the Right Permissions
Kubebuilder uses markers to define RBAC permissions
required by the controller. In order for the controller to
properly watch and manage both the primary (Busybox) and secondary (Deployment)
resources, it must have the appropriate permissions granted;
i.e. to watch, get, list, create, update, and delete permissions for those resources.
Example: RBAC Markers
Before the Reconcile method, we need to define the appropriate RBAC markers.
These markers will be used by controller-gen to generate the necessary
roles and permissions when you run make manifests.
// +kubebuilder:rbac:groups=example.com,resources=busyboxes,verbs=get;list;watch;create;update;patch;delete
// +kubebuilder:rbac:groups=apps,resources=deployments,verbs=get;list;watch;create;update;patch;delete
- The first marker gives the controller permission to manage the
Busyboxcustom resource (the primary resource). - The second marker grants the controller permission to manage
Deploymentresources (the secondary resource).
Note that we are granting permissions to watch the resources.
监听非本控制器“拥有”的二级资源
在某些场景下,控制器需要监听并响应那些并非由自身创建或管理(即非 Owned)的资源的变化——这些资源通常由其他控制器创建与维护。
以下示例展示控制器如何监测并调谐其未直接管理的资源。这适用于任何非 Owned 的资源,包括由其他控制器或项目管理、在独立进程中调谐的 核心类型(Core Types) 或 自定义资源(CR)。
例如,有两个自定义资源 Busybox 与 BackupBusybox。如果希望 Busybox 的变化触发 BackupBusybox 控制器的调谐,则可让 BackupBusybox 控制器去监听 Busybox 的变化。
示例:监听非 Owned 的 Busybox 以调谐 BackupBusybox
假设某控制器负责管理 BackupBusybox,但也需要关注集群中的 Busybox 变化。我们只希望当 Busybox 启用了备份能力时,才触发调谐。
- 为何要监听二级资源?
BackupBusybox控制器不创建/不拥有Busybox,但后者的更新与删除会直接影响其主资源(BackupBusybox)。- 通过只监听具有特定标签的
Busybox实例,可确保仅对相关对象执行必要动作(如备份)。
配置示例
如下配置使 BackupBusyboxReconciler 监听 Busybox 的变化,并触发对 BackupBusybox 的调谐:
// SetupWithManager sets up the controller with the Manager.
// The controller will watch both the BackupBusybox primary resource and the Busybox resource.
func (r *BackupBusyboxReconciler) SetupWithManager(mgr ctrl.Manager) error {
return ctrl.NewControllerManagedBy(mgr).
For(&examplecomv1alpha1.BackupBusybox{}). // Watch the primary resource (BackupBusybox)
Watches(
&examplecomv1alpha1.Busybox{}, // Watch the Busybox CR
handler.EnqueueRequestsFromMapFunc(func(ctx context.Context, obj client.Object) []reconcile.Request {
// Trigger reconciliation for the BackupBusybox in the same namespace
return []reconcile.Request{
{
NamespacedName: types.NamespacedName{
Name: "backupbusybox", // Reconcile the associated BackupBusybox resource
Namespace: obj.GetNamespace(), // Use the namespace of the changed Busybox
},
},
}
}),
). // Trigger reconciliation when the Busybox resource changes
Complete(r)
}
进一步,我们可以只针对带有特定标签的 Busybox 触发调谐:
// SetupWithManager sets up the controller with the Manager.
// The controller will watch both the BackupBusybox primary resource and the Busybox resource, filtering by a label.
func (r *BackupBusyboxReconciler) SetupWithManager(mgr ctrl.Manager) error {
return ctrl.NewControllerManagedBy(mgr).
For(&examplecomv1alpha1.BackupBusybox{}). // Watch the primary resource (BackupBusybox)
Watches(
&examplecomv1alpha1.Busybox{}, // Watch the Busybox CR
handler.EnqueueRequestsFromMapFunc(func(ctx context.Context, obj client.Object) []reconcile.Request {
// 检查 Busybox 是否带有 'backup-enable: "true"' 标签
if val, ok := obj.GetLabels()["backup-enable"]; ok && val == "true" {
// 若命中该标签,则触发 BackupBusybox 的调谐
return []reconcile.Request{
{
NamespacedName: types.NamespacedName{
Name: "backupbusybox", // Reconcile the associated BackupBusybox resource
Namespace: obj.GetNamespace(), // Use the namespace of the changed Busybox
},
},
}
}
// 未命中标签时不触发
return []reconcile.Request{}
}),
). // Trigger reconciliation when the labeled Busybox resource changes
Complete(r)
}
使用 Predicates 精细化 Watch
在编写控制器时,使用 Predicates 来过滤事件、控制何时触发调谐往往很有帮助。
Predicates 允许基于事件(创建、更新、删除)和资源字段(标签、注解、状态等)定义触发条件。借助 Predicates,可以让控制器仅对关心的变化做出响应。
当需要精确限定哪些变化应触发调谐时,Predicates 尤其有用:它能避免无谓的调谐,让控制器只对真正相关的变更做出反应。
何时使用 Predicates
适用场景:
- 忽略不相关的变更,例如不影响业务字段的更新;
- 仅对带特定标签/注解的资源触发调谐;
- 监听外部资源时仅对特定变化作出反应。
示例:使用 Predicates 过滤更新事件
设想我们只在 Busybox 的特定字段变化(例如 spec.size)时触发 BackupBusybox 控制器调谐,忽略其它变化(如 status 更新)。
定义 Predicate
如下定义仅在 Busybox 发生“有意义”的更新时允许调谐:
import (
"sigs.k8s.io/controller-runtime/pkg/predicate"
"sigs.k8s.io/controller-runtime/pkg/event"
)
// 仅在 Busybox 的 spec.size 变化时触发调谐
updatePred := predicate.Funcs{
// 仅当 spec.size 发生变化时允许更新事件通过
UpdateFunc: func(e event.UpdateEvent) bool {
oldObj := e.ObjectOld.(*examplecomv1alpha1.Busybox)
newObj := e.ObjectNew.(*examplecomv1alpha1.Busybox)
// 仅当 spec.size 字段变化时返回 true
return oldObj.Spec.Size != newObj.Spec.Size
},
// 放行创建事件
CreateFunc: func(e event.CreateEvent) bool {
return true
},
// 放行删除事件
DeleteFunc: func(e event.DeleteEvent) bool {
return true
},
// 放行通用事件(如外部触发)
GenericFunc: func(e event.GenericEvent) bool {
return true
},
}
说明
在本例中:
- 仅当
spec.size发生变化时UpdateFunc才返回true,其余spec变更(注解等)会被忽略; CreateFunc、DeleteFunc、GenericFunc返回true,意味着这三类事件依旧会触发调谐。
这样可确保控制器仅在 spec.size 被修改时进行调谐,忽略与业务无关的其它变更。
在 Watches 中使用 Predicates
Now, we apply this predicate in the Watches() method of
the BackupBusyboxReconciler to trigger reconciliation only for relevant events:
// SetupWithManager 配置控制器。控制器会监听主资源 BackupBusybox 与 Busybox,并应用 predicates。
func (r *BackupBusyboxReconciler) SetupWithManager(mgr ctrl.Manager) error {
return ctrl.NewControllerManagedBy(mgr).
For(&examplecomv1alpha1.BackupBusybox{}). // 监听主资源(BackupBusybox)
Watches(
&examplecomv1alpha1.Busybox{}, // 监听 Busybox CR
handler.EnqueueRequestsFromMapFunc(func(ctx context.Context, obj client.Object) []reconcile.Request {
return []reconcile.Request{
{
NamespacedName: types.NamespacedName{
Name: "backupbusybox", // 对应的 BackupBusybox 资源
Namespace: obj.GetNamespace(), // 使用 Busybox 的命名空间
},
},
}
}),
builder.WithPredicates(updatePred), // 应用 Predicate
). // 当 Busybox 变化且满足条件时触发调谐
Complete(r)
}
说明
builder.WithPredicates(updatePred):应用谓词,确保仅当Busybox的spec.size变化时才触发调谐。- 其他事件:控制器仍会响应
Create、Delete与Generic事件。
在本地开发与 CI 中使用 Kind
为什么用 Kind
- 搭建迅速: 本地启动多节点集群通常不到 1 分钟。
- 销毁快捷: 数秒内即可销毁集群,提升迭代效率。
- 直接使用本地镜像: 无需推送到远端仓库即可部署。
- 轻量高效: 适合本地开发与 CI/CD 场景。
这里仅覆盖使用 kind 集群的基础内容。更多细节请参阅 kind 官方文档。
安装(Installation)
按照安装指南安装 kind。
创建集群(Create a Cluster)
创建最简单的 kind 集群:
kind create cluster
如需自定义集群,可提供额外配置。下面是一个示例 kind 配置:
kind: Cluster
apiVersion: kind.x-k8s.io/v1alpha4
nodes:
- role: control-plane
- role: worker
- role: worker
- role: worker
使用上述配置,执行以下命令将创建一个包含 1 个控制面与 3 个工作节点的 k8s v1.17.2 集群:
kind create cluster --config hack/kind-config.yaml --image=kindest/node:v1.17.2
可以通过 --image 指定目标集群版本,例如 --image=kindest/node:v1.17.2。支持的版本见
镜像标签列表。
向集群加载本地镜像(Load Docker Image)
本地开发时,可将镜像直接加载到 kind 集群,无需使用镜像仓库:
kind load docker-image your-image-name:your-tag
更多信息见:将本地镜像加载到 kind 集群。
删除集群(Delete a Cluster)
kind delete cluster
Webhook 概览
Webhook 是一种阻塞式的 HTTP 回调机制:当特定事件发生时,实现了 Webhook 的系统会向目标端发送 HTTP 请求并等待响应。
在 Kubernetes 生态中,主要存在三类 Webhook:
controller-runtime 库目前支持 Admission Webhook 与 CRD Conversion Webhook。
Kubernetes 自 1.9(beta)起支持动态 Admission Webhook;自 1.15(beta)起支持 Conversion Webhook。
Admission Webhooks
Admission Webhook 是一种用于接收并处理准入请求的 HTTP 回调,返回相应的准入响应。
Kubernetes 提供两类 Admission Webhook:
-
Mutating Admission Webhook(变更型): 在对象被持久化前(创建或更新时)修改对象。常用于为资源设置默认值(例如为用户未指定的 Deployment 字段赋默认值),或注入 sidecar 容器。
-
Validating Admission Webhook(校验型): 在对象被持久化前(创建或更新时)进行校验。它能实现比纯 schema 校验更复杂的逻辑,例如跨字段校验或镜像白名单等。
默认情况下,apiserver 不会对 Webhook 端进行自我认证。如果你需要在 Webhook 侧认证 apiserver,可以配置 apiserver 使用 Basic Auth、Bearer Token 或证书进行认证。详见 官方文档。
在 Admission Webhook 中处理资源 Status
原因说明
Mutating Admission Webhook 的职责
Mutating Webhook 主要用于拦截并修改关于对象创建、变更或删除的请求。尽管它可以修改对象的规范(spec),但直接修改 status 并非标准做法,且常常带来意外结果。
// MutatingWebhookConfiguration 允许修改对象
// 但直接修改 status 可能导致非预期行为
type MutatingWebhookConfiguration struct {
...
}
设置初始 Status
对于自定义控制器而言,理解“设置初始 status”的概念至关重要。该初始化通常在控制器内部完成:当控制器(通常通过 watch)发现受管资源的新实例时,应由控制器赋予该资源一个初始的 status。
// 自定义控制器的调谐函数示例
func (r *ReconcileMyResource) Reconcile(request reconcile.Request) (reconcile.Result, error) {
// ...
// 发现新实例时设置初始 status
instance.Status = SomeInitialStatus
// ...
}
Status 子资源
在 Kubernetes 的自定义资源中,spec(期望状态)与 status(观察状态)是明确分离的。为 CRD 启用 /status 子资源会将 status 与 spec 分离到各自的 API 端点。
这保证了用户发起的修改(例如更新 spec)与系统驱动的变更(例如更新 status)互不干扰。因此,试图在一次修改 spec 的操作中利用 Mutating Webhook 去更改 status,往往不会得到预期结果。
apiVersion: apiextensions.k8s.io/v1
kind: CustomResourceDefinition
metadata:
name: myresources.mygroup.mydomain
spec:
...
subresources:
status: {} # 启用 /status 子资源
结论
虽然在某些极端场景下 Mutating Webhook 似乎能顺带修改 status,但这既不通用,也不被推荐。将 status 更新逻辑放在控制器中处理,仍是最佳实践。
用于配置/代码生成的标记(Markers)
Kubebuilder 使用 controller-gen 来生成实用代码与 Kubernetes YAML。生成行为由 Go 代码中的特殊“标记注释”控制。
“标记注释”是以加号开头的单行注释,后跟标记名称,并可选带有该标记的配置:
// +kubebuilder:validation:Optional
// +kubebuilder:validation:MaxItems=2
// +kubebuilder:printcolumn:JSONPath=".status.replicas",name=Replicas,type=string
See each subsection for information about different types of code and YAML generation.
在 Kubebuilder 中生成代码与产物
Kubebuilder 项目通常使用两个与 controller-gen 相关的 make 目标:
-
make manifests生成 Kubernetes 对象 YAML,例如 CustomResourceDefinitions、 WebhookConfigurations 与 RBAC 角色。 -
make generate生成代码,例如 runtime.Object/DeepCopy 的实现。
完整概览请见生成 CRD。
标记语法(Marker Syntax)
精确语法可参阅 controller-tools 的 godocs。
一般而言,标记可分为:
-
空标记(Empty,
+kubebuilder:validation:Optional):类似命令行里的布尔开关,仅标注即可开启某行为。 -
匿名标记(Anonymous,
+kubebuilder:validation:MaxItems=2):接收一个无名参数。 -
多选项标记(Multi-option,
+kubebuilder:printcolumn:JSONPath=".status.replicas",name=Replicas,type=string): 接收一个或多个具名参数。第一个参数与标记名以冒号分隔,其后参数以逗号分隔。参数顺序无关,且部分参数可选。
标记参数可以是字符串、整型、布尔、切片或这些类型的映射。字符串、整型和布尔值遵循 Go 语法:
// +kubebuilder:validation:ExclusiveMaximum=false
// +kubebuilder:validation:Format="date-time"
// +kubebuilder:validation:Maximum=42
为方便起见,在简单场景下字符串可省略引号(不建议在除单词外的场景使用):
// +kubebuilder:validation:Type=string
切片可以使用花括号加逗号分隔:
// +kubebuilder:webhooks:Enum={"crackers, Gromit, we forgot the crackers!","not even wensleydale?"}
或在简单场景下使用分号分隔:
// +kubebuilder:validation:Enum=Wallace;Gromit;Chicken
映射以字符串为键、任意类型为值(等价于 map[string]interface{})。使用花括号包裹({}),键值以冒号分隔(:),键值对之间以逗号分隔:
// +kubebuilder:default={magic: {numero: 42, stringified: forty-two}}
CRD 生成(CRD Generation)
以下标记用于指导如何基于一组 Go 类型与包来构建自定义资源定义(CRD)。关于校验 schema 的生成,请参见校验相关标记。
示例请参见生成 CRD。
- // +groupName
- string
specifies the API group name for this package.
- string
- // +kubebuilder:deprecatedversion
- warning
- string
marks this version as deprecated.
- warning
- string
message to be shown on the deprecated version
- // +kubebuilder:metadata
- annotations
- string
- labels
- string
configures the additional annotations or labels for this CRD.
For example adding annotation "api-approved.kubernetes.io" for a CRD with Kubernetes groups, or annotation "cert-manager.io/inject-ca-from-secret" for a CRD that needs CA injection.
- annotations
- string
will be added into the annotations of this CRD.
- labels
- string
will be added into the labels of this CRD.
- // +kubebuilder:printcolumn
- JSONPath
- string
- description
- string
- format
- string
- name
- string
- priority
- int
- type
- string
adds a column to "kubectl get" output for this CRD.
- JSONPath
- string
specifies the jsonpath expression used to extract the value of the column.
- description
- string
specifies the help/description for this column.
- format
- string
specifies the format of the column.
It may be any OpenAPI data format corresponding to the type, listed at https://github.com/OAI/OpenAPI-Specification/blob/master/versions/2.0.md#data-types.
- name
- string
specifies the name of the column.
- priority
- int
indicates how important it is that this column be displayed.
Lower priority (higher numbered) columns will be hidden if the terminal width is too small.
- type
- string
indicates the type of the column.
It may be any OpenAPI data type listed at https://github.com/OAI/OpenAPI-Specification/blob/master/versions/2.0.md#data-types.
- // +kubebuilder:resource
- categories
- string
- path
- string
- scope
- string
- shortName
- string
- singular
- string
configures naming and scope for a CRD.
- categories
- string
specifies which group aliases this resource is part of.
Group aliases are used to work with groups of resources at once. The most common one is "all" which covers about a third of the base resources in Kubernetes, and is generally used for "user-facing" resources.
- path
- string
specifies the plural "resource" for this CRD.
It generally corresponds to a plural, lower-cased version of the Kind. See https://book.kubebuilder.io/cronjob-tutorial/gvks.html.
- scope
- string
overrides the scope of the CRD (Cluster vs Namespaced).
Scope defaults to "Namespaced". Cluster-scoped ("Cluster") resources don't exist in namespaces.
- shortName
- string
specifies aliases for this CRD.
Short names are often used when people have work with your resource over and over again. For instance, "rs" for "replicaset" or "crd" for customresourcedefinition.
- singular
- string
overrides the singular form of your resource.
The singular form is otherwise defaulted off the plural (path).
- // +kubebuilder:selectablefield
- JSONPath
- string
adds a field that may be used with field selectors.
- JSONPath
- string
specifies the jsonpath expression which is used to produce a field selector value.
- // +kubebuilder:skip
don't consider this package as an API version.
- // +kubebuilder:skipversion
removes the particular version of the CRD from the CRDs spec.
This is useful if you need to skip generating and listing version entries for 'internal' resource versions, which typically exist if using the Kubernetes upstream conversion-gen tool.
- // +kubebuilder:storageversion
marks this version as the "storage version" for the CRD for conversion.
When conversion is enabled for a CRD (i.e. it's not a trivial-versions/single-version CRD), one version is set as the "storage version" to be stored in etcd. Attempting to store any other version will result in conversion to the storage version via a conversion webhook.
- // +kubebuilder:subresource:scale
- selectorpath
- string
- specpath
- string
- statuspath
- string
enables the "/scale" subresource on a CRD.
- selectorpath
- string
specifies the jsonpath to the pod label selector field for the scale's status.
The selector field must be the string form (serialized form) of a selector. Setting a pod label selector is necessary for your type to work with the HorizontalPodAutoscaler.
- specpath
- string
specifies the jsonpath to the replicas field for the scale's spec.
- statuspath
- string
specifies the jsonpath to the replicas field for the scale's status.
- // +kubebuilder:subresource:status
enables the "/status" subresource on a CRD.
- // +kubebuilder:unservedversion
does not serve this version.
This is useful if you need to drop support for a version in favor of a newer version.
- // +versionName
- string
overrides the API group version for this package (defaults to the package name).
- string
CRD 校验(CRD Validation)
以下标记用于控制针对相应类型或字段生成的 CRD 校验 schema。每个标记大致对应一个 OpenAPI/JSON schema 选项。
示例参见生成 CRD。
- // +default
- value
- any
Default sets the default value for this field.
A default value will be accepted as any value valid for the field. Only JSON-formatted values are accepted.
ref(...)values are ignored. Formatting for common types include: boolean:true, string:"Cluster", numerical:1.24, array:[1,2], object:{"policy": "delete"}). Defaults should be defined in pruned form, and only best-effort validation will be performed. Full validation of a default requires submission of the containing CRD to an apiserver.- value
- any
- // +kubebuilder:default
- any
sets the default value for this field.
A default value will be accepted as any value valid for the field. Formatting for common types include: boolean:
true, string:Cluster, numerical:1.24, array:{1,2}, object:{policy: "delete"}). Defaults should be defined in pruned form, and only best-effort validation will be performed. Full validation of a default requires submission of the containing CRD to an apiserver.- any
- // +kubebuilder:example
- any
sets the example value for this field.
An example value will be accepted as any value valid for the field. Formatting for common types include: boolean:
true, string:Cluster, numerical:1.24, array:{1,2}, object:{policy: "delete"}). Examples should be defined in pruned form, and only best-effort validation will be performed. Full validation of an example requires submission of the containing CRD to an apiserver.- any
- // +kubebuilder:title
- any
sets the title for this field.
The title is metadata that makes the OpenAPI documentation more user-friendly, making the schema more understandable when viewed in documentation tools. It's a metadata field that doesn't affect validation but provides important context about what the schema represents.
- any
- // +kubebuilder:validation:AtMostOneOf
- string
specifies a list of field names that must conform to the AtMostOneOf constraint.
- string
- // +kubebuilder:validation:EmbeddedResource
EmbeddedResource marks a fields as an embedded resource with apiVersion, kind and metadata fields.
An embedded resource is a value that has apiVersion, kind and metadata fields. They are validated implicitly according to the semantics of the currently running apiserver. It is not necessary to add any additional schema for these field, yet it is possible. This can be combined with PreserveUnknownFields.
- // +kubebuilder:validation:Enum
- any
specifies that this (scalar) field is restricted to the *exact* values specified here.
- any
- // +kubebuilder:validation:Enum
- any
specifies that this (scalar) field is restricted to the *exact* values specified here.
- any
- // +kubebuilder:validation:ExactlyOneOf
- string
specifies a list of field names that must conform to the ExactlyOneOf constraint.
- string
- // +kubebuilder:validation:ExclusiveMaximum
- bool
indicates that the maximum is "up to" but not including that value.
- bool
- // +kubebuilder:validation:ExclusiveMaximum
- bool
indicates that the maximum is "up to" but not including that value.
- bool
- // +kubebuilder:validation:ExclusiveMinimum
- bool
indicates that the minimum is "up to" but not including that value.
- bool
- // +kubebuilder:validation:ExclusiveMinimum
- bool
indicates that the minimum is "up to" but not including that value.
- bool
- // +kubebuilder:validation:Format
- string
specifies additional "complex" formatting for this field.
For example, a date-time field would be marked as "type: string" and "format: date-time".
- string
- // +kubebuilder:validation:Format
- string
specifies additional "complex" formatting for this field.
For example, a date-time field would be marked as "type: string" and "format: date-time".
- string
- // +kubebuilder:validation:MaxItems
- int
specifies the maximum length for this list.
- int
- // +kubebuilder:validation:MaxItems
- int
specifies the maximum length for this list.
- int
- // +kubebuilder:validation:MaxLength
- int
specifies the maximum length for this string.
- int
- // +kubebuilder:validation:MaxLength
- int
specifies the maximum length for this string.
- int
- // +kubebuilder:validation:MaxProperties
- int
restricts the number of keys in an object
- int
- // +kubebuilder:validation:MaxProperties
- int
restricts the number of keys in an object
- int
- // +kubebuilder:validation:Maximum
specifies the maximum numeric value that this field can have.
- // +kubebuilder:validation:Maximum
specifies the maximum numeric value that this field can have.
- // +kubebuilder:validation:MinItems
- int
specifies the minimum length for this list.
- int
- // +kubebuilder:validation:MinItems
- int
specifies the minimum length for this list.
- int
- // +kubebuilder:validation:MinLength
- int
specifies the minimum length for this string.
- int
- // +kubebuilder:validation:MinLength
- int
specifies the minimum length for this string.
- int
- // +kubebuilder:validation:MinProperties
- int
restricts the number of keys in an object
- int
- // +kubebuilder:validation:MinProperties
- int
restricts the number of keys in an object
- int
- // +kubebuilder:validation:Minimum
specifies the minimum numeric value that this field can have. Negative numbers are supported.
- // +kubebuilder:validation:Minimum
specifies the minimum numeric value that this field can have. Negative numbers are supported.
- // +kubebuilder:validation:MultipleOf
specifies that this field must have a numeric value that's a multiple of this one.
- // +kubebuilder:validation:MultipleOf
specifies that this field must have a numeric value that's a multiple of this one.
- // +kubebuilder:validation:Optional
specifies that this field is optional.
- // +kubebuilder:validation:Optional
specifies that all fields in this package are optional by default.
- // +kubebuilder:validation:Pattern
- string
specifies that this string must match the given regular expression.
- string
- // +kubebuilder:validation:Pattern
- string
specifies that this string must match the given regular expression.
- string
- // +kubebuilder:validation:Required
specifies that all fields in this package are required by default.
- // +kubebuilder:validation:Required
specifies that this field is required.
- // +kubebuilder:validation:Schemaless
marks a field as being a schemaless object.
Schemaless objects are not introspected, so you must provide any type and validation information yourself. One use for this tag is for embedding fields that hold JSONSchema typed objects. Because this field disables all type checking, it is recommended to be used only as a last resort.
- // +kubebuilder:validation:Type
- string
overrides the type for this field (which defaults to the equivalent of the Go type).
This generally must be paired with custom serialization. For example, the metav1.Time field would be marked as "type: string" and "format: date-time".
- string
- // +kubebuilder:validation:Type
- string
overrides the type for this field (which defaults to the equivalent of the Go type).
This generally must be paired with custom serialization. For example, the metav1.Time field would be marked as "type: string" and "format: date-time".
- string
- // +kubebuilder:validation:UniqueItems
- bool
specifies that all items in this list must be unique.
- bool
- // +kubebuilder:validation:UniqueItems
- bool
specifies that all items in this list must be unique.
- bool
- // +kubebuilder:validation:XEmbeddedResource
EmbeddedResource marks a fields as an embedded resource with apiVersion, kind and metadata fields.
An embedded resource is a value that has apiVersion, kind and metadata fields. They are validated implicitly according to the semantics of the currently running apiserver. It is not necessary to add any additional schema for these field, yet it is possible. This can be combined with PreserveUnknownFields.
- // +kubebuilder:validation:XIntOrString
IntOrString marks a fields as an IntOrString.
This is required when applying patterns or other validations to an IntOrString field. Known information about the type is applied during the collapse phase and as such is not normally available during marker application.
- // +kubebuilder:validation:XValidation
- fieldPath
- string
- message
- string
- messageExpression
- string
- optionalOldSelf
- bool
- reason
- string
- rule
- string
marks a field as requiring a value for which a given
expression evaluates to true.
This marker may be repeated to specify multiple expressions, all of which must evaluate to true.
- fieldPath
- string
- message
- string
- messageExpression
- string
- optionalOldSelf
- bool
- reason
- string
- rule
- string
- // +kubebuilder:validation:items:Enum
- any
for array items specifies that this (scalar) field is restricted to the *exact* values specified here.
- any
- // +kubebuilder:validation:items:Enum
- any
for array items specifies that this (scalar) field is restricted to the *exact* values specified here.
- any
- // +kubebuilder:validation:items:ExclusiveMaximum
- bool
for array items indicates that the maximum is "up to" but not including that value.
- bool
- // +kubebuilder:validation:items:ExclusiveMaximum
- bool
for array items indicates that the maximum is "up to" but not including that value.
- bool
- // +kubebuilder:validation:items:ExclusiveMinimum
- bool
for array items indicates that the minimum is "up to" but not including that value.
- bool
- // +kubebuilder:validation:items:ExclusiveMinimum
- bool
for array items indicates that the minimum is "up to" but not including that value.
- bool
- // +kubebuilder:validation:items:Format
- string
for array items specifies additional "complex" formatting for this field.
For example, a date-time field would be marked as "type: string" and "format: date-time".
- string
- // +kubebuilder:validation:items:Format
- string
for array items specifies additional "complex" formatting for this field.
For example, a date-time field would be marked as "type: string" and "format: date-time".
- string
- // +kubebuilder:validation:items:MaxItems
- int
for array items specifies the maximum length for this list.
- int
- // +kubebuilder:validation:items:MaxItems
- int
for array items specifies the maximum length for this list.
- int
- // +kubebuilder:validation:items:MaxLength
- int
for array items specifies the maximum length for this string.
- int
- // +kubebuilder:validation:items:MaxLength
- int
for array items specifies the maximum length for this string.
- int
- // +kubebuilder:validation:items:MaxProperties
- int
for array items restricts the number of keys in an object
- int
- // +kubebuilder:validation:items:MaxProperties
- int
for array items restricts the number of keys in an object
- int
- // +kubebuilder:validation:items:Maximum
for array items specifies the maximum numeric value that this field can have.
- // +kubebuilder:validation:items:Maximum
for array items specifies the maximum numeric value that this field can have.
- // +kubebuilder:validation:items:MinItems
- int
for array items specifies the minimum length for this list.
- int
- // +kubebuilder:validation:items:MinItems
- int
for array items specifies the minimum length for this list.
- int
- // +kubebuilder:validation:items:MinLength
- int
for array items specifies the minimum length for this string.
- int
- // +kubebuilder:validation:items:MinLength
- int
for array items specifies the minimum length for this string.
- int
- // +kubebuilder:validation:items:MinProperties
- int
for array items restricts the number of keys in an object
- int
- // +kubebuilder:validation:items:MinProperties
- int
for array items restricts the number of keys in an object
- int
- // +kubebuilder:validation:items:Minimum
for array items specifies the minimum numeric value that this field can have. Negative numbers are supported.
- // +kubebuilder:validation:items:Minimum
for array items specifies the minimum numeric value that this field can have. Negative numbers are supported.
- // +kubebuilder:validation:items:MultipleOf
for array items specifies that this field must have a numeric value that's a multiple of this one.
- // +kubebuilder:validation:items:MultipleOf
for array items specifies that this field must have a numeric value that's a multiple of this one.
- // +kubebuilder:validation:items:Pattern
- string
for array items specifies that this string must match the given regular expression.
- string
- // +kubebuilder:validation:items:Pattern
- string
for array items specifies that this string must match the given regular expression.
- string
- // +kubebuilder:validation:items:Type
- string
for array items overrides the type for this field (which defaults to the equivalent of the Go type).
This generally must be paired with custom serialization. For example, the metav1.Time field would be marked as "type: string" and "format: date-time".
- string
- // +kubebuilder:validation:items:UniqueItems
- bool
for array items specifies that all items in this list must be unique.
- bool
- // +kubebuilder:validation:items:UniqueItems
- bool
for array items specifies that all items in this list must be unique.
- bool
- // +kubebuilder:validation:items:XEmbeddedResource
for array items EmbeddedResource marks a fields as an embedded resource with apiVersion, kind and metadata fields.
An embedded resource is a value that has apiVersion, kind and metadata fields. They are validated implicitly according to the semantics of the currently running apiserver. It is not necessary to add any additional schema for these field, yet it is possible. This can be combined with PreserveUnknownFields.
- // +kubebuilder:validation:items:XIntOrString
for array items IntOrString marks a fields as an IntOrString.
This is required when applying patterns or other validations to an IntOrString field. Known information about the type is applied during the collapse phase and as such is not normally available during marker application.
- // +kubebuilder:validation:items:XValidation
- fieldPath
- string
- message
- string
- messageExpression
- string
- optionalOldSelf
- bool
- reason
- string
- rule
- string
for array items marks a field as requiring a value for which a given
expression evaluates to true.
This marker may be repeated to specify multiple expressions, all of which must evaluate to true.
- fieldPath
- string
- message
- string
- messageExpression
- string
- optionalOldSelf
- bool
- reason
- string
- rule
- string
- // +nullable
marks this field as allowing the "null" value.
This is often not necessary, but may be helpful with custom serialization.
- // +optional
specifies that this field is optional.
- // +required
specifies that this field is required.
CRD 处理(CRD Processing)
以下标记(marker)用于控制 Kubernetes API 服务器在处理与你的自定义资源(CR)相关的请求时的行为。
示例与用法见:生成 CRD。
- // +kubebuilder:pruning:PreserveUnknownFields
PreserveUnknownFields stops the apiserver from pruning fields which are not specified.
By default the apiserver drops unknown fields from the request payload during the decoding step. This marker stops the API server from doing so. It affects fields recursively, but switches back to normal pruning behaviour if nested properties or additionalProperties are specified in the schema. This can either be true or undefined. False is forbidden.
NB: The kubebuilder:validation:XPreserveUnknownFields variant is deprecated in favor of the kubebuilder:pruning:PreserveUnknownFields variant. They function identically.
- // +kubebuilder:validation:XPreserveUnknownFields
PreserveUnknownFields stops the apiserver from pruning fields which are not specified.
By default the apiserver drops unknown fields from the request payload during the decoding step. This marker stops the API server from doing so. It affects fields recursively, but switches back to normal pruning behaviour if nested properties or additionalProperties are specified in the schema. This can either be true or undefined. False is forbidden.
NB: The kubebuilder:validation:XPreserveUnknownFields variant is deprecated in favor of the kubebuilder:pruning:PreserveUnknownFields variant. They function identically.
- // +kubebuilder:validation:items:XPreserveUnknownFields
for array items PreserveUnknownFields stops the apiserver from pruning fields which are not specified.
By default the apiserver drops unknown fields from the request payload during the decoding step. This marker stops the API server from doing so. It affects fields recursively, but switches back to normal pruning behaviour if nested properties or additionalProperties are specified in the schema. This can either be true or undefined. False is forbidden.
NB: The kubebuilder:validation:XPreserveUnknownFields variant is deprecated in favor of the kubebuilder:pruning:PreserveUnknownFields variant. They function identically.
- // +listMapKey
- string
specifies the keys to map listTypes.
It indicates the index of a map list. They can be repeated if multiple keys must be used. It can only be used when ListType is set to map, and the keys should be scalar types.
- string
- // +listMapKey
- string
specifies the keys to map listTypes.
It indicates the index of a map list. They can be repeated if multiple keys must be used. It can only be used when ListType is set to map, and the keys should be scalar types.
- string
- // +listType
- string
specifies the type of data-structure that the list
represents (map, set, atomic).
Possible data-structure types of a list are:
-
"map": it needs to have a key field, which will be used to build an associative list. A typical example is a the pod container list, which is indexed by the container name.
-
"set": Fields need to be "scalar", and there can be only one occurrence of each.
-
"atomic": All the fields in the list are treated as a single value, are typically manipulated together by the same actor.
- string
-
- // +mapType
- string
specifies the level of atomicity of the map;
i.e. whether each item in the map is independent of the others, or all fields are treated as a single unit.
Possible values:
-
"granular": items in the map are independent of each other, and can be manipulated by different actors. This is the default behavior.
-
"atomic": all fields are treated as one unit. Any changes have to replace the entire map.
- string
-
- // +structType
- string
specifies the level of atomicity of the struct;
i.e. whether each field in the struct is independent of the others, or all fields are treated as a single unit.
Possible values:
-
"granular": fields in the struct are independent of each other, and can be manipulated by different actors. This is the default behavior.
-
"atomic": all fields are treated as one unit. Any changes have to replace the entire struct.
- string
-
Webhook
以下标记用于描述如何生成Webhook 配置。 通过这些标记,你可以让 Webhook 的描述尽可能贴近其实现代码。
- // +kubebuilder:webhook
- admissionReviewVersions
- string
- failurePolicy
- string
- groups
- string
- matchPolicy
- string
- mutating
- bool
- name
- string
- path
- string
- reinvocationPolicy
- string
- resources
- string
- serviceName
- string
- serviceNamespace
- string
- servicePort
- int
- sideEffects
- string
- timeoutSeconds
- int
- url
- string
- verbs
- string
- versions
- string
- webhookVersions
- string
specifies how a webhook should be served.
It specifies only the details that are intrinsic to the application serving it (e.g. the resources it can handle, or the path it serves on).
- admissionReviewVersions
- string
is an ordered list of preferred `AdmissionReview`
versions the Webhook expects.
- failurePolicy
- string
specifies what should happen if the API server cannot reach the webhook.
It may be either "ignore" (to skip the webhook and continue on) or "fail" (to reject the object in question).
- groups
- string
specifies the API groups that this webhook receives requests for.
- matchPolicy
- string
defines how the "rules" list is used to match incoming requests.
Allowed values are "Exact" (match only if it exactly matches the specified rule) or "Equivalent" (match a request if it modifies a resource listed in rules, even via another API group or version).
- mutating
- bool
marks this as a mutating webhook (it's validating only if false)
Mutating webhooks are allowed to change the object in their response, and are called before all validating webhooks. Mutating webhooks may choose to reject an object, similarly to a validating webhook.
- name
- string
indicates the name of this webhook configuration. Should be a domain with at least three segments separated by dots
- path
- string
specifies that path that the API server should connect to this webhook on. Must be
prefixed with a '/validate-' or '/mutate-' depending on the type, and followed by $GROUP-$VERSION-$KIND where all values are lower-cased and the periods in the group are substituted for hyphens. For example, a validating webhook path for type batch.tutorial.kubebuilder.io/v1,Kind=CronJob would be /validate-batch-tutorial-kubebuilder-io-v1-cronjob
- reinvocationPolicy
- string
allows mutating webhooks to request reinvocation after other mutations
To allow mutating admission plugins to observe changes made by other plugins, built-in mutating admission plugins are re-run if a mutating webhook modifies an object, and mutating webhooks can specify a reinvocationPolicy to control whether they are reinvoked as well.
- resources
- string
specifies the API resources that this webhook receives requests for.
- serviceName
- string
indicates the name of the K8s Service the webhook uses.
- serviceNamespace
- string
indicates the namespace of the K8s Service the webhook uses.
- servicePort
- int
indicates the port of the K8s Service the webhook uses
- sideEffects
- string
specify whether calling the webhook will have side effects.
This has an impact on dry runs and
kubectl diff: if the sideEffect is "Unknown" (the default) or "Some", then the API server will not call the webhook on a dry-run request and fails instead. If the value is "None", then the webhook has no side effects and the API server will call it on dry-run. If the value is "NoneOnDryRun", then the webhook is responsible for inspecting the "dryRun" property of the AdmissionReview sent in the request, and avoiding side effects if that value is "true."- timeoutSeconds
- int
allows configuring how long the API server should wait for a webhook to respond before treating the call as a failure.
If the timeout expires before the webhook responds, the webhook call will be ignored or the API call will be rejected based on the failure policy. The timeout value must be between 1 and 30 seconds. The timeout for an admission webhook defaults to 10 seconds.
- url
- string
allows mutating webhooks configuration to specify an external URL when generating
the manifests, instead of using the internal service communication. Should be in format of https://address:port/path When this option is specified, the serviceConfig.Service is removed from webhook the manifest. The URL configuration should be between quotes.
urlcannot be specified whenpathis specified.- verbs
- string
specifies the Kubernetes API verbs that this webhook receives requests for.
Only modification-like verbs may be specified. May be "create", "update", "delete", "connect", or "*" (for all).
- versions
- string
specifies the API versions that this webhook receives requests for.
- webhookVersions
- string
specifies the target API versions of the {Mutating,Validating}WebhookConfiguration objects
itself to generate. The only supported value is v1. Defaults to v1.
- // +kubebuilder:webhookconfiguration
- mutating
- bool
- name
- string
specifies how a webhook should be served.
It specifies only the details that are intrinsic to the application serving it (e.g. the resources it can handle, or the path it serves on).
- mutating
- bool
marks this as a mutating webhook (it's validating only if false)
Mutating webhooks are allowed to change the object in their response, and are called before all validating webhooks. Mutating webhooks may choose to reject an object, similarly to a validating webhook.
- name
- string
indicates the name of this webhook configuration. Should be a domain with at least three segments separated by dots
Object/DeepCopy
以下标记用于控制何时生成 DeepCopy 与 runtime.Object 的实现方法。
- // +k8s:deepcopy-gen
- raw
enables or disables object interface & deepcopy implementation generation for this package
- raw
- // +k8s:deepcopy-gen
- raw
overrides enabling or disabling deepcopy generation for this type
- raw
- // +k8s:deepcopy-gen:interfaces
- string
enables object interface implementation generation for this type
- string
- // +kubebuilder:object:generate
- bool
enables or disables object interface & deepcopy implementation generation for this package
- bool
- // +kubebuilder:object:generate
- bool
overrides enabling or disabling deepcopy generation for this type
- bool
- // +kubebuilder:object:root
- bool
enables object interface implementation generation for this type
- bool
RBAC
以下标记会生成一个 RBAC ClusterRole。 这使你能够在使用权限的代码附近直接描述控制器所需的权限集合。
- // +kubebuilder:rbac
- groups
- string
- namespace
- string
- resourceNames
- string
- resources
- string
- urls
- string
- verbs
- string
specifies an RBAC rule to all access to some resources or non-resource URLs.
- groups
- string
specifies the API groups that this rule encompasses.
- namespace
- string
specifies the scope of the Rule.
If not set, the Rule belongs to the generated ClusterRole. If set, the Rule belongs to a Role, whose namespace is specified by this field.
- resourceNames
- string
specifies the names of the API resources that this rule encompasses.
Create requests cannot be restricted by resourcename, as the object's name is not known at authorization time.
- resources
- string
specifies the API resources that this rule encompasses.
- urls
- string
URL specifies the non-resource URLs that this rule encompasses.
- verbs
- string
specifies the (lowercase) kubernetes API verbs that this rule encompasses.
Scaffold(脚手架)
+kubebuilder:scaffold 标记是 Kubebuilder 脚手架体系中的关键部分。它标注了在生成文件中的插入位置:当你脚手架出新的资源(例如控制器、Webhook 或 API)时,Kubebuilder 会在这些位置注入相应代码。
借助该机制,Kubebuilder 能够将新组件无缝集成到项目中,同时不影响用户自定义的代码。
工作原理(How It Works)
当你使用 Kubebuilder CLI(如 kubebuilder create api)来生成新资源时,CLI 会在关键位置寻找 +kubebuilder:scaffold 标记,并把它们当作占位点来插入必要的 import 或注册代码。
main.go 中的示例(Example Usage in main.go)
以下展示了 +kubebuilder:scaffold 在典型 main.go 文件中的用法。为便于说明,假设执行:
kubebuilder create api --group crew --version v1 --kind Admiral --controller=true --resource=true
添加新的导入(Imports)
+kubebuilder:scaffold:imports 标记允许 Kubebuilder CLI 注入额外的 import(例如新控制器或 Webhook 所需的包)。当我们创建新 API 时,CLI 会在此位置自动添加所需的导入路径。
以单组布局中新建 Admiral API 为例,CLI 会在 import 段落中添加 crewv1 "<repo-path>/api/v1":
import (
"crypto/tls"
"flag"
"os"
// Import all Kubernetes client auth plugins (e.g. Azure, GCP, OIDC, etc.)
// to ensure that exec-entrypoint and run can make use of them.
_ "k8s.io/client-go/plugin/pkg/client/auth"
...
crewv1 "sigs.k8s.io/kubebuilder/testdata/project-v4/api/v1"
// +kubebuilder:scaffold:imports
)
注册新的 Scheme(Register a New Scheme)
+kubebuilder:scaffold:scheme 标记用于将新创建的 API 版本注册到 runtime scheme,确保这些类型能被 manager 识别。
例如,在创建 Admiral API 之后,CLI 会在 init() 函数中注入如下代码:
func init() {
...
utilruntime.Must(crewv1.AddToScheme(scheme))
// +kubebuilder:scaffold:scheme
}
设置控制器(Set Up a Controller)
当我们创建新的控制器(如 Admiral)时,Kubebuilder CLI 会借助 +kubebuilder:scaffold:builder 标记将控制器的初始化代码注入到 manager。这一标记指示了新控制器的注册位置。
例如,在创建 AdmiralReconciler 后,CLI 会添加如下代码将控制器注册到 manager:
if err = (&crewv1.AdmiralReconciler{
Client: mgr.GetClient(),
Scheme: mgr.GetScheme(),
}).SetupWithManager(mgr); err != nil {
setupLog.Error(err, "unable to create controller", "controller", "Admiral")
os.Exit(1)
}
// +kubebuilder:scaffold:builder
+kubebuilder:scaffold:builder 标记确保新生成的控制器能正确注册至 manager,从而开始对资源进行调谐。
+kubebuilder:scaffold 标记列表
| 标记 | 常见位置 | 作用 |
|---|---|---|
+kubebuilder:scaffold:imports | main.go | 指示在此处为新控制器/Webhook/API 注入 import。 |
+kubebuilder:scaffold:scheme | main.go 的 init() | 向 runtime scheme 注册 API 版本。 |
+kubebuilder:scaffold:builder | main.go | 指示在此处向 manager 注册新控制器。 |
+kubebuilder:scaffold:webhook | Webhook 测试相关文件 | 指示在此处添加 Webhook 的初始化函数。 |
+kubebuilder:scaffold:crdkustomizeresource | config/crd | 指示在此处添加 CRD 自定义资源补丁。 |
+kubebuilder:scaffold:crdkustomizewebhookpatch | config/crd | 指示在此处添加 CRD Webhook 补丁。 |
+kubebuilder:scaffold:crdkustomizecainjectionns | config/default | 指示在此处添加转换 Webhook 的 CA 注入补丁(命名空间)。 |
+kubebuilder:scaffold:crdkustomizecainjectioname | config/default | 指示在此处添加转换 Webhook 的 CA 注入补丁(名称)。 |
(不再支持)+kubebuilder:scaffold:crdkustomizecainjectionpatch | config/crd | 旧的 Webhook CA 注入补丁位置;现已由上面两个标记替代。 |
+kubebuilder:scaffold:manifestskustomizesamples | config/samples | 指示在此处注入 Kustomize 示例清单。 |
+kubebuilder:scaffold:e2e-webhooks-checks | test/e2e | 基于已生成的 Webhook 类型添加相应的 e2e 校验。 |
controller-gen CLI
Kubebuilder 使用 controller-gen 来生成实用代码与 Kubernetes YAML。生成行为由 Go 代码中的特殊“标记注释”控制。
controller-gen 由不同的“生成器”(指定生成什么)与“输出规则”(指定输出位置与方式)组成。
二者均通过以标记格式书写的命令行选项进行配置。
例如,下述命令:
controller-gen paths=./... crd:trivialVersions=true rbac:roleName=controller-perms output:crd:artifacts:config=config/crd/bases
会生成 CRD 与 RBAC;其中 CRD YAML 被放入 config/crd/bases。RBAC 使用默认输出规则(config/rbac)。该命令会遍历当前目录树中的所有包(遵循 Go ... 通配符的规则)。
生成器(Generators)
每个生成器通过一个 CLI 选项进行配置。你可以在一次 controller-gen 调用中启用多个生成器。
- // +webhook
- headerFile
- string
- year
- string
generates (partial) {Mutating,Validating}WebhookConfiguration objects.
- headerFile
- string
specifies the header text (e.g. license) to prepend to generated files.
- year
- string
specifies the year to substitute for " YEAR" in the header file.
- // +schemapatch
- generateEmbeddedObjectMeta
- bool
- manifests
- string
- maxDescLen
- int
patches existing CRDs with new schemata.
It will generate output for each "CRD Version" (API version of the CRD type itself) , e.g. apiextensions/v1) available.
- generateEmbeddedObjectMeta
- bool
specifies if any embedded ObjectMeta in the CRD should be generated
- manifests
- string
contains the CustomResourceDefinition YAML files.
- maxDescLen
- int
specifies the maximum description length for fields in CRD's OpenAPI schema.
0 indicates drop the description for all fields completely. n indicates limit the description to at most n characters and truncate the description to closest sentence boundary if it exceeds n characters.
- // +rbac
- fileName
- string
- headerFile
- string
- roleName
- string
- year
- string
generates ClusterRole objects.
- fileName
- string
sets the file name for the generated manifest(s). If not set, defaults to "role.yaml".
- headerFile
- string
specifies the header text (e.g. license) to prepend to generated files.
- roleName
- string
sets the name of the generated ClusterRole.
- year
- string
specifies the year to substitute for " YEAR" in the header file.
- // +object
- headerFile
- string
- year
- string
generates code containing DeepCopy, DeepCopyInto, and
DeepCopyObject method implementations.
- headerFile
- string
specifies the header text (e.g. license) to prepend to generated files.
- year
- string
specifies the year to substitute for " YEAR" in the header file.
- // +crd
- allowDangerousTypes
- bool
- crdVersions
- string
- deprecatedV1beta1CompatibilityPreserveUnknownFields
- bool
- generateEmbeddedObjectMeta
- bool
- headerFile
- string
- ignoreUnexportedFields
- bool
- maxDescLen
- int
- year
- string
generates CustomResourceDefinition objects.
- allowDangerousTypes
- bool
allows types which are usually omitted from CRD generation
because they are not recommended.
Currently the following additional types are allowed when this is true: float32 float64
Left unspecified, the default is false
- crdVersions
- string
specifies the target API versions of the CRD type itself to
generate. Defaults to v1.
Currently, the only supported value is v1.
The first version listed will be assumed to be the "default" version and will not get a version suffix in the output filename.
You'll need to use "v1" to get support for features like defaulting, along with an API server that supports it (Kubernetes 1.16+).
- deprecatedV1beta1CompatibilityPreserveUnknownFields
- bool
indicates whether
or not we should turn off field pruning for this resource.
Specifies spec.preserveUnknownFields value that is false and omitted by default. This value can only be specified for CustomResourceDefinitions that were created with
apiextensions.k8s.io/v1beta1.The field can be set for compatibility reasons, although strongly discouraged, resource authors should move to a structural OpenAPI schema instead.
See https://kubernetes.io/docs/tasks/extend-kubernetes/custom-resources/custom-resource-definitions/#field-pruning for more information about field pruning and v1beta1 resources compatibility.
- generateEmbeddedObjectMeta
- bool
specifies if any embedded ObjectMeta in the CRD should be generated
- headerFile
- string
specifies the header text (e.g. license) to prepend to generated files.
- ignoreUnexportedFields
- bool
indicates that we should skip unexported fields.
Left unspecified, the default is false.
- maxDescLen
- int
specifies the maximum description length for fields in CRD's OpenAPI schema.
0 indicates drop the description for all fields completely. n indicates limit the description to at most n characters and truncate the description to closest sentence boundary if it exceeds n characters.
- year
- string
specifies the year to substitute for " YEAR" in the header file.
- // +applyconfiguration
- headerFile
- string
generates code containing apply configuration type implementations.
- headerFile
- string
specifies the header text (e.g. license) to prepend to generated files.
输出规则(Output Rules)
输出规则决定某个生成器如何输出产物。总会存在一个全局“兜底”输出规则(output:<rule>),也可以为某个生成器单独覆盖(output:<generator>:<rule>)。
为简洁起见,下方省略了逐生成器的输出规则写法(output:<generator>:<rule>)。它们与此处列出的全局兜底选项等价。
- // +output:artifacts
- code
- string
- config
- string
outputs artifacts to different locations, depending on
whether they're package-associated or not.
Non-package associated artifacts are output to the Config directory, while package-associated ones are output to their package's source files' directory, unless an alternate path is specified in Code.
- code
- string
overrides the directory in which to write new code (defaults to where the existing code lives).
- config
- string
points to the directory to which to write configuration.
- // +output:dir
- string
outputs each artifact to the given directory, regardless
of if it's package-associated or not.
- string
- // +output:none
skips outputting anything.
- // +output:stdout
outputs everything to standard-out, with no separation.
Generally useful for single-artifact outputs.
其他选项(Other Options)
- // +paths
- string
represents paths and go-style path patterns to use as package roots.
Multiple paths can be specified using "{path1, path2, path3}".
- string
启用命令行自动补全(Shell Autocompletion)
可以通过 kubebuilder completion [bash|fish|powershell|zsh] 生成 Kubebuilder 的自动补全脚本。
在你的 Shell 中 source 该脚本即可启用自动补全。
-
安装完成后,将
/usr/local/bin/bash加入/etc/shells:echo "/usr/local/bin/bash" | sudo tee -a /etc/shells -
切换当前用户的默认 Shell:
chsh -s /usr/local/bin/bash -
在
~/.bash_profile或~/.bashrc中加入:
# kubebuilder autocompletion
if [ -f /usr/local/share/bash-completion/bash_completion ]; then
. /usr/local/share/bash-completion/bash_completion
fi
. <(kubebuilder completion bash)
- 重启终端或对上述文件执行
source使其生效。
构建产物(Artifacts)
为了测试你的控制器,你需要包含相关二进制的压缩包(tarballs):
./bin/k8s/
└── 1.25.0-darwin-amd64
├── etcd
├── kube-apiserver
└── kubectl
这些压缩包由 controller-tools 发布,可用版本列表见:envtest-releases.yaml。
当你运行 make envtest 或 make test 时,所需压缩包会被自动下载并配置到你的项目中。
平台支持(Platforms Supported)
Kubebuilder 生成的方案默认可在多平台或特定平台运行,取决于你对工作负载的构建与配置方式。本文指导你按需正确配置项目。
概览(Overview)
要支持特定或多种平台,需确保工作负载所用镜像已针对目标平台构建。注意,目标平台未必与开发环境一致,而是你的方案实际运行与发布的目标环境。建议构建多平台镜像,以便在不同操作系统与架构的集群中通用。
如何声明/支持目标平台
以下说明为单平台或多平台/多架构提供支持需要做的工作。
1)构建支持目标平台的工作负载镜像
用于 Pod/Deployment 的镜像必须支持目标平台。可用 docker manifest inspect
$ docker manifest inspect myregistry/example/myimage:v0.0.1
{
"schemaVersion": 2,
"mediaType": "application/vnd.docker.distribution.manifest.list.v2+json",
"manifests": [
{
"mediaType": "application/vnd.docker.distribution.manifest.v2+json",
"size": 739,
"digest": "sha256:a274a1a2af811a1daf3fd6b48ff3d08feb757c2c3f3e98c59c7f85e550a99a32",
"platform": {
"architecture": "arm64",
"os": "linux"
}
},
{
"mediaType": "application/vnd.docker.distribution.manifest.v2+json",
"size": 739,
"digest": "sha256:d801c41875f12ffd8211fffef2b3a3d1a301d99f149488d31f245676fa8bc5d9",
"platform": {
"architecture": "amd64",
"os": "linux"
}
},
{
"mediaType": "application/vnd.docker.distribution.manifest.v2+json",
"size": 739,
"digest": "sha256:f4423c8667edb5372fb0eafb6ec599bae8212e75b87f67da3286f0291b4c8732",
"platform": {
"architecture": "s390x",
"os": "linux"
}
},
{
"mediaType": "application/vnd.docker.distribution.manifest.v2+json",
"size": 739,
"digest": "sha256:621288f6573c012d7cf6642f6d9ab20dbaa35de3be6ac2c7a718257ec3aff333",
"platform": {
"architecture": "ppc64le",
"os": "linux"
}
},
]
}
2)(最佳实践)配置与平台匹配的 nodeAffinity 表达式
Kubernetes 提供了 nodeAffinity 机制,用于限定 Pod 可调度到的节点集合。在多平台(异构)集群中,这对于保证正确的调度行为尤为重要。
Kubernetes 清单示例
affinity:
nodeAffinity:
requiredDuringSchedulingIgnoredDuringExecution:
nodeSelectorTerms:
- matchExpressions:
- key: kubernetes.io/arch
operator: In
values:
- amd64
- arm64
- ppc64le
- s390x
- key: kubernetes.io/os
operator: In
values:
- linux
Golang 示例
Template: corev1.PodTemplateSpec{
...
Spec: corev1.PodSpec{
Affinity: &corev1.Affinity{
NodeAffinity: &corev1.NodeAffinity{
RequiredDuringSchedulingIgnoredDuringExecution: &corev1.NodeSelector{
NodeSelectorTerms: []corev1.NodeSelectorTerm{
{
MatchExpressions: []corev1.NodeSelectorRequirement{
{
Key: "kubernetes.io/arch",
Operator: "In",
Values: []string{"amd64"},
},
{
Key: "kubernetes.io/os",
Operator: "In",
Values: []string{"linux"},
},
},
},
},
},
},
},
SecurityContext: &corev1.PodSecurityContext{
...
},
Containers: []corev1.Container{{
...
}},
},
产出支持多平台的项目
可使用 docker buildx 结合仿真(QEMU)来构建 manager 的多平台镜像。Kubebuilder 新版本脚手架默认包含 docker-buildx 目标。
使用示例
$ make docker-buildx IMG=myregistry/myoperator:v0.0.1
注意:需确保项目中所有镜像与工作负载均满足上述多平台支持要求,并为所有工作负载正确配置 nodeAffinity。因此请在 config/manager/manager.yaml 中取消注释如下示例:
# TODO(user): Uncomment the following code to configure the nodeAffinity expression
# according to the platforms which are supported by your solution.
# It is considered best practice to support multiple architectures. You can
# build your manager image using the makefile target docker-buildx.
# affinity:
# nodeAffinity:
# requiredDuringSchedulingIgnoredDuringExecution:
# nodeSelectorTerms:
# - matchExpressions:
# - key: kubernetes.io/arch
# operator: In
# values:
# - amd64
# - arm64
# - ppc64le
# - s390x
# - key: kubernetes.io/os
# operator: In
# values:
# - linux
默认会创建哪些(工作负载)镜像?
Projects created with the Kubebuilder CLI have two workloads which are:
Manager
运行 manager 的容器定义在 config/manager/manager.yaml。该镜像由脚手架生成的 Dockerfile 构建,包含本项目的二进制,默认通过 go build -a -o manager main.go 生成。
注意:执行 make docker-build 或 make docker-build IMG=myregistry/myprojectname:<tag> 时,会在本机构建镜像,其平台通常为 linux/amd64 或 linux/arm64。
使用 Pprof 监控性能
Pprof 是 Go 的性能分析工具,可用于定位 CPU、内存等方面的瓶颈。它与 controller-runtime 的 HTTP 服务器集成,可通过 HTTP 端点进行分析;并可使用 go tool pprof 进行可视化。由于 Pprof 已内置在 controller-runtime 中,无需单独安装。借助 Manager 选项,你可以方便地启用 pprof 并收集运行时指标,以优化控制器性能。
如何使用 Pprof?
-
启用 Pprof
在
cmd/main.go中添加:mgr, err := ctrl.NewManager(ctrl.GetConfigOrDie(), ctrl.Options{ ... // PprofBindAddress is the TCP address that the controller should bind to // for serving pprof. Specify the manager address and the port that should be bind. PprofBindAddress: ":8082", ... }) -
试运行
启用 Pprof 后,构建并部署你的控制器进行验证。参考快速开始在本地或集群中运行你的项目。
随后应用你的 CR/示例以观察控制器的性能表现。
-
导出数据
使用
curl导出分析数据到文件:# 注意:这里使用的是在 cmd/main.go Manager 选项中配置的地址与端口 curl -s "http://127.0.0.1:8082/debug/pprof/profile" > ./cpu-profile.out -
在浏览器中可视化结果
# Go 工具会在本地 8080 端口开启一个会话(可自定义端口) go tool pprof -http=:8080 ./cpu-profile.out可视化结果会随部署的工作负载与控制器行为而变化。你将看到类似如下的效果:
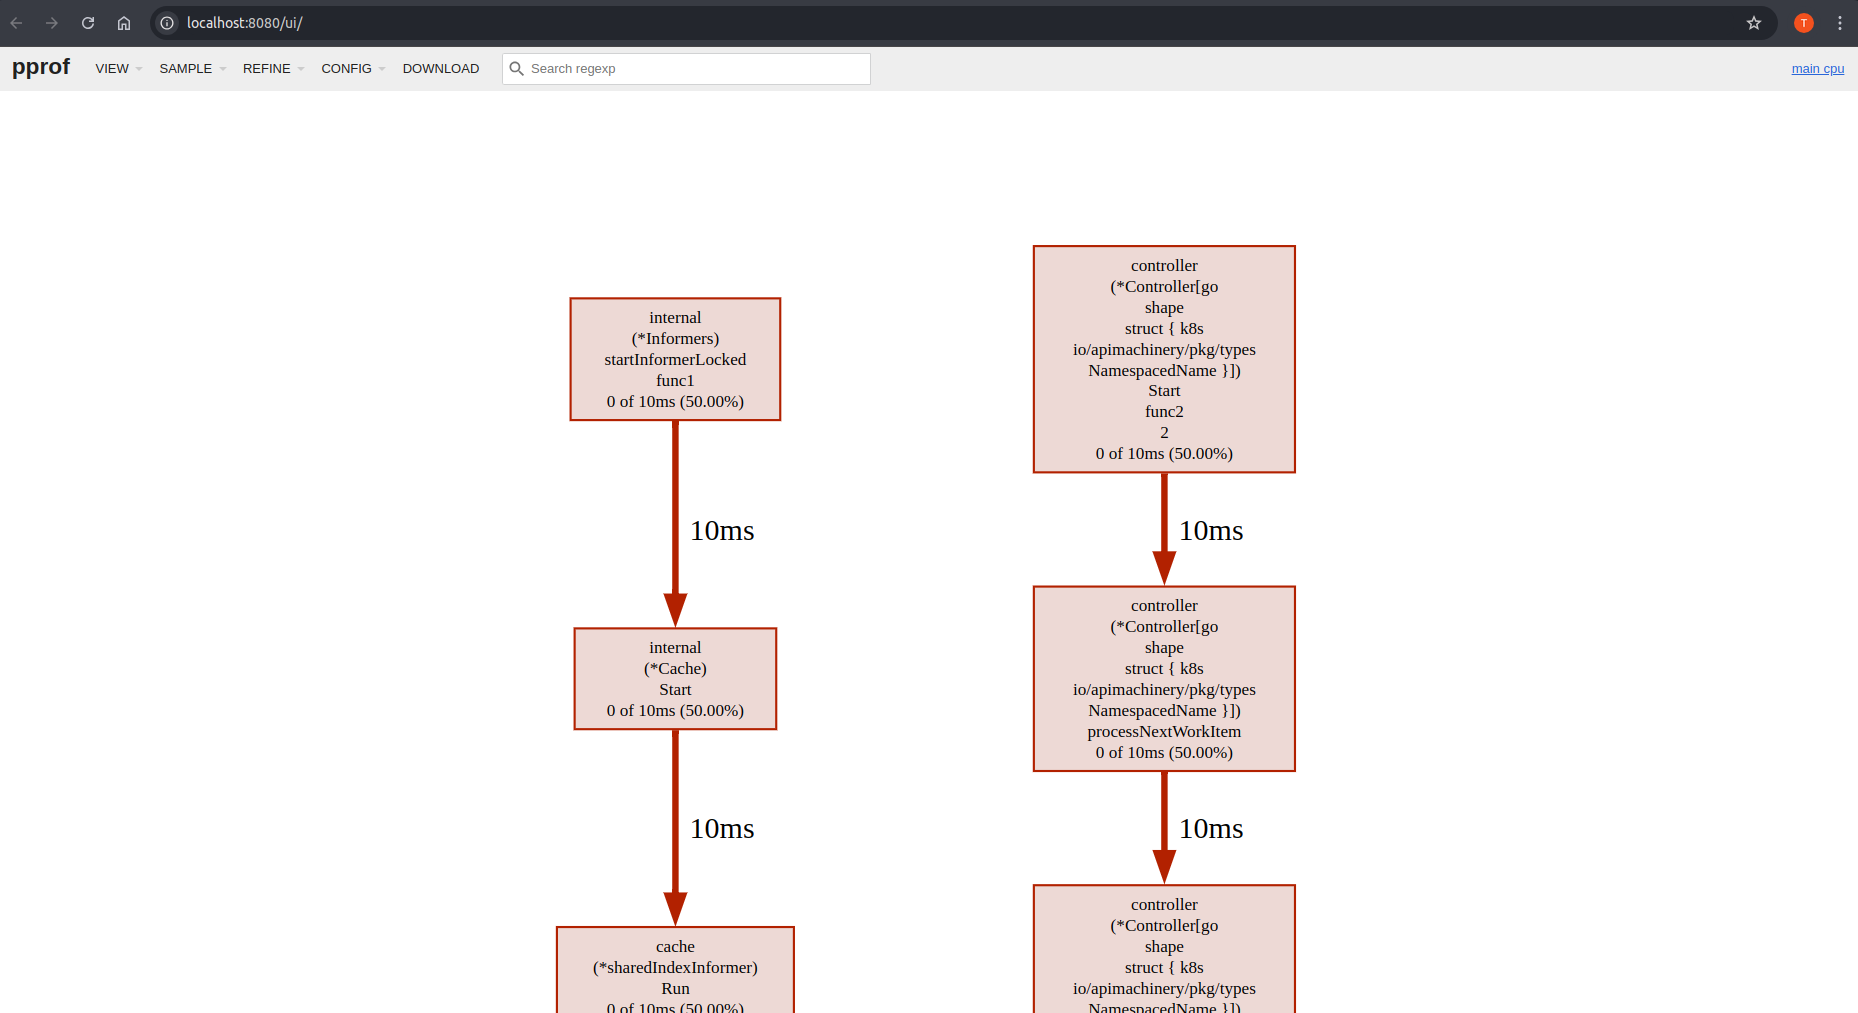
管理器(Operator)与 CRD 的作用域(Scopes)
本节介绍 Kubebuilder 项目中运行与资源层面的作用域配置。Kubernetes 中的 Manager(“Operator”)可以限定在某个命名空间或整个集群范围内,从而影响其对资源的监听与管理方式。
同时,CRD 也可定义为命名空间级或集群级,这会影响其在集群中的可见范围。
配置 Manager 的作用域
可根据所需管理的资源,选择不同的作用域:
(默认)监听全部命名空间
默认情况下,若未指定命名空间,manager 将监听所有命名空间:
mgr, err := ctrl.NewManager(ctrl.GetConfigOrDie(), ctrl.Options{
...
})
监听单个命名空间
如需限定到单个命名空间,可设置相应的 Cache 配置:
mgr, err := ctrl.NewManager(ctrl.GetConfigOrDie(), ctrl.Options{
...
Cache: cache.Options{
DefaultNamespaces: map[string]cache.Config{"operator-namespace": cache.Config{}},
},
})
监听多个命名空间
也可通过 Cache Config 指定多个命名空间:
mgr, err := ctrl.NewManager(ctrl.GetConfigOrDie(), ctrl.Options{
...
Cache: cache.Options{
DefaultNamespaces: map[string]cache.Config{
"operator-namespace1": cache.Config{},
"operator-namespace2": cache.Config{},
},
},
})
配置 CRD 的作用域
CRD 的作用域决定其仅在部分命名空间可见,还是在整个集群可见。
命名空间级(Namespace-scoped)CRD
当需要将资源隔离到特定命名空间时,可选择命名空间级 CRD,有助于按团队或应用进行划分。 但需注意:由于 CRD 的特殊性,验证新版本并不直接。需要设计合理的版本与转换策略(参见 Kubebuilder 多版本教程),并协调由哪一个 manager 实例负责转换(参见 Kubernetes 官方文档)。 此外,为确保在预期范围内生效,Mutating/Validating Webhook 的配置也应考虑命名空间作用域,从而支持更可控、分阶段的发布。
集群级(Cluster-scoped)CRD
对于需要在整个集群访问与管理的资源(例如共享配置或全局资源),应选择集群级 CRD。
配置 CRD 的作用域
在创建 API 时
CRD 的作用域会在生成清单时确定。Kubebuilder 的 API 创建命令支持该配置。
默认情况下,生成的 API 对应 CRD 为命名空间级;若需集群级,请使用 --namespaced=false,例如:
kubebuilder create api --group cache --version v1alpha1 --kind Memcached --resource=true --controller=true --namespaced=false
上述命令会生成集群级 CRD,意味着它可在所有命名空间访问与管理。
更新已有 API
在创建 API 之后仍可调整作用域。若想将 CRD 配置为集群级,可在 Go 类型定义上方添加 +kubebuilder:resource:scope=Cluster 标记。例如:
//+kubebuilder:object:root=true
//+kubebuilder:subresource:status
//+kubebuilder:resource:scope=Cluster,shortName=mc
...
设置标记后,运行 make manifests 以生成文件。该命令会调用 controller-gen,依据 Go 文件中的标记生成 CRD 清单。
生成的清单会正确体现作用域(Cluster 或 Namespaced),无需手动修改 YAML。
子模块布局(Sub-Module Layouts)
本节介绍如何将脚手架生成的项目调整为“API 与 Controller 各自拥有独立 go.mod”的布局。
子模块布局(某种意义上可视作 Monorepo 的一种特例)主要用于在不引入不必要的传递依赖的前提下复用 API,以便外部项目在仅消费 API 时不会被不应暴露的依赖污染。
概览(Overview)
将 API 与 Controller 拆分为不同的 go.mod 模块,适用于如下场景:
- 有企业版 Operator 需要复用社区版的 API;
- 有众多(可能是外部的)模块依赖该 API,需要严格限制传递依赖范围;
- 降低当该 API 被其他项目引用时所带来的传递依赖影响;
- 希望将 API 的发布生命周期与 Controller 的发布生命周期分离管理;
- 希望模块化而不想把代码拆到多个仓库。
但这也会带来一些权衡,使其不太适合作为通用默认做法或插件默认布局:
- Go 官方并不推荐单仓库内使用多个模块,多模块布局一般不被鼓励;
- 你随时可以将 API 抽取到一个独立仓库,这往往更利于明确跨仓库的版本管理与发布流程;
- 至少需要一条 replace 指令 来进行本地替换:要么使用
go.work(这引入 2 个文件并可能需要设置环境变量,在没有 GO_WORK 的构建环境中尤为明显),要么在go.mod里使用replace(每次发布前后都要手动增删)。
调整你的项目(Adjusting your Project)
下面的步骤将以脚手架生成的 API 为起点,逐步改造成子模块布局。
以下示例假设你在 GOPATH 下创建了项目:
kubebuilder init
并创建了 API 与 Controller:
kubebuilder create api --group operator --version v1alpha1 --kind Sample --resource --controller --make
为 API 创建第二个模块(Creating a second module for your API)
有了基础布局后,我们来启用多模块:
- 进入
api/v1alpha1 - 执行
go mod init创建新的子模块 - 执行
go mod tidy解析依赖
你的 API 模块的 go.mod 可能如下:
module YOUR_GO_PATH/test-operator/api/v1alpha1
go 1.21.0
require (
k8s.io/apimachinery v0.28.4
sigs.k8s.io/controller-runtime v0.16.3
)
require (
github.com/go-logr/logr v1.2.4 // indirect
github.com/gogo/protobuf v1.3.2 // indirect
github.com/google/gofuzz v1.2.0 // indirect
github.com/json-iterator/go v1.1.12 // indirect
github.com/modern-go/concurrent v0.0.0-20180306012644-bacd9c7ef1dd // indirect
github.com/modern-go/reflect2 v1.0.2 // indirect
golang.org/x/net v0.17.0 // indirect
golang.org/x/text v0.13.0 // indirect
gopkg.in/inf.v0 v0.9.1 // indirect
gopkg.in/yaml.v2 v2.4.0 // indirect
k8s.io/klog/v2 v2.100.1 // indirect
k8s.io/utils v0.0.0-20230406110748-d93618cff8a2 // indirect
sigs.k8s.io/json v0.0.0-20221116044647-bc3834ca7abd // indirect
sigs.k8s.io/structured-merge-diff/v4 v4.2.3 // indirect
)
如上所示,它仅包含 apimachinery 与 controller-runtime 等 API 所需依赖;你在 Controller 模块声明的依赖不会被一并带入为间接依赖。
开发期使用 replace 指令(Using replace directives for development)
在 Operator 根目录解析主模块时,如果使用 VCS 路径,可能会遇到类似错误:
go mod tidy
go: finding module for package YOUR_GO_PATH/test-operator/api/v1alpha1
YOUR_GO_PATH/test-operator imports
YOUR_GO_PATH/test-operator/api/v1alpha1: cannot find module providing package YOUR_GO_PATH/test-operator/api/v1alpha1: module YOUR_GO_PATH/test-operator/api/v1alpha1: git ls-remote -q origin in LOCALVCSPATH: exit status 128:
remote: Repository not found.
fatal: repository 'https://YOUR_GO_PATH/test-operator/' not found
原因在于你尚未把模块推送到 VCS,主模块在解析时不再能以包的方式直接访问 API 类型,只能从模块解析,因此会失败。
解决方法是告诉 Go 工具链将 API 模块 replace 成你本地路径。可选两种方式:基于 go modules,或基于 go workspaces。
基于 go modules(Using go modules)
在主模块的 go.mod 中添加 replace:
go mod edit -require YOUR_GO_PATH/test-operator/api/v1alpha1@v0.0.0 # Only if you didn't already resolve the module
go mod edit -replace YOUR_GO_PATH/test-operator/api/v1alpha1@v0.0.0=./api/v1alpha1
go mod tidy
注意这里使用了占位版本 v0.0.0。若你的 API 模块已发布过,也可以使用真实版本,但前提是该版本已可从 VCS 获取。
基于 go workspaces(Using go workspaces)
若使用 go workspace,则无需直接改 go.mod,而是依赖工作区:
在项目根目录执行 go work init 初始化 workspace。
随后把两个模块加入 workspace:
go work use . # This includes the main module with the controller
go work use api/v1alpha1 # This is the API submodule
go work sync
这样 go run、go build 等命令会遵循 workspace,从而优先使用本地解析。你可以在本地直接开发而无需先发布模块。
一般不建议把 go.work 提交到仓库,应在 .gitignore 中忽略:
go.work
go.work.sum
若发布流程中存在 go.work,务必设置环境变量 GOWORK=off(可通过 go env GOWORK 验证)以免影响发布。
调整 Dockerfile(Adjusting the Dockerfile)
构建 Controller 镜像时,Kubebuilder 默认并不了解多模块布局。你需要手动把新的 API 模块加入依赖下载步骤:
# Build the manager binary
FROM docker.io/golang:1.20 as builder
ARG TARGETOS
ARG TARGETARCH
WORKDIR /workspace
# Copy the Go Modules manifests
COPY go.mod go.mod
COPY go.sum go.sum
# Copy the Go Sub-Module manifests
COPY api/v1alpha1/go.mod api/go.mod
COPY api/v1alpha1/go.sum api/go.sum
# cache deps before building and copying source so that we don't need to re-download as much
# and so that source changes don't invalidate our downloaded layer
RUN go mod download
# Copy the go source
COPY cmd/main.go cmd/main.go
COPY api/ api/
COPY internal/controller/ internal/controller/
# Build
# the GOARCH has not a default value to allow the binary be built according to the host where the command
# was called. For example, if we call make docker-build in a local env which has the Apple Silicon M1 SO
# the docker BUILDPLATFORM arg will be linux/arm64 when for Apple x86 it will be linux/amd64. Therefore,
# by leaving it empty we can ensure that the container and binary shipped on it will have the same platform.
RUN CGO_ENABLED=0 GOOS=${TARGETOS:-linux} GOARCH=${TARGETARCH} go build -a -o manager cmd/main.go
# Use distroless as minimal base image to package the manager binary
# Refer to https://github.com/GoogleContainerTools/distroless for more details
FROM gcr.io/distroless/static:nonroot
WORKDIR /
COPY --from=builder /workspace/manager .
USER 65532:65532
ENTRYPOINT ["/manager"]
创建新的 API 与 Controller 版本(Creating a new API and controller release)
由于你调整了默认布局,在发布第一个版本之前,请先了解单仓库/多模块发布流程(仓库中不同子目录各有一个 go.mod)。
假设只有一个 API,发布流程可能如下:
git commit
git tag v1.0.0 # this is your main module release
git tag api/v1.0.0 # this is your api release
go mod edit -require YOUR_GO_PATH/test-operator/api@v1.0.0 # now we depend on the api module in the main module
go mod edit -dropreplace YOUR_GO_PATH/test-operator/api/v1alpha1 # this will drop the replace directive for local development in case you use go modules, meaning the sources from the VCS will be used instead of the ones in your monorepo checked out locally.
git push origin main v1.0.0 api/v1.0.0
完成后,模块即可从 VCS 获取,本地开发无需再保留 replace。若后续继续在本地迭代,请相应地恢复 replace 以便本地联调。
复用已抽出的 API 模块(Reusing your extracted API module)
当你希望在另一个 kubebuilder 项目中复用该 API 模块时,请参考:Using an external Type。 在“Edit the API files”那一步,引入依赖即可:
go get YOUR_GO_PATH/test-operator/api@v1.0.0
随后按指南继续使用。
使用外部资源(External Resources)
在某些场景下,你的项目需要处理并非由自身 API 定义的资源。这些外部资源主要分为两类:
- Core Types(核心类型):由 Kubernetes 本身定义的 API 类型,如
Pod、Service、Deployment等。 - External Types(外部类型):由其他项目定义的 API 类型,例如其他方案所定义的 CRD。
管理 External Types
为 External Type 创建控制器
在不脚手架资源定义的前提下,你可以为外部类型创建控制器:使用 create api 并带上 --resource=false,同时通过 --external-api-path 与 --external-api-domain 指定外部 API 类型所在路径与域名。这样会为项目外的类型(例如由其他 Operator 管理的 CRD)生成控制器。
命令示例:
kubebuilder create api --group <theirgroup> --version <theirversion> --kind <theirKind> --controller --resource=false --external-api-path=<their Golang path import> --external-api-domain=<theirdomain>
--external-api-path:外部类型的 Go import 路径。--external-api-domain:外部类型的 domain。该值用于生成 RBAC 时构造完整的 API 组名(如apiGroups: <group>.<domain>)。
例如,若需要管理 Cert Manager 的 Certificates:
kubebuilder create api --group certmanager --version v1 --kind Certificate --controller=true --resource=false --external-api-path=github.com/cert-manager/cert-manager/pkg/apis/certmanager/v1 --external-api-domain=io
由此生成的 RBAC 标记:
// +kubebuilder:rbac:groups=cert-manager.io,resources=certificates,verbs=get;list;watch;create;update;patch;delete
// +kubebuilder:rbac:groups=cert-manager.io,resources=certificates/status,verbs=get;update;patch
// +kubebuilder:rbac:groups=cert-manager.io,resources=certificates/finalizers,verbs=update
对应的 RBAC 角色:
- apiGroups:
- cert-manager.io
resources:
- certificates
verbs:
- create
- delete
- get
- list
- patch
- update
- watch
- apiGroups:
- cert-manager.io
resources:
- certificates/finalizers
verbs:
- update
- apiGroups:
- cert-manager.io
resources:
- certificates/status
verbs:
- get
- patch
- update
这会为外部类型生成控制器,但不会生成资源定义(因为该类型定义在外部项目)。
为 External Type 创建 Webhook
示例:
kubebuilder create webhook --group certmanager --version v1 --kind Issuer --defaulting --programmatic-validation --external-api-path=github.com/cert-manager/cert-manager/pkg/apis/certmanager/v1 --external-api-domain=cert-manager.io
管理 Core Types
Kubernetes 的核心 API 类型(如 Pod、Service、Deployment)由系统预先定义。要在不脚手架资源定义的情况下为这些核心类型创建控制器,请参考下表中的组名,并指定版本与 Kind。
| Group | K8s API Group |
|---|---|
| admission | k8s.io/admission |
| admissionregistration | k8s.io/admissionregistration |
| apps | apps |
| auditregistration | k8s.io/auditregistration |
| apiextensions | k8s.io/apiextensions |
| authentication | k8s.io/authentication |
| authorization | k8s.io/authorization |
| autoscaling | autoscaling |
| batch | batch |
| certificates | k8s.io/certificates |
| coordination | k8s.io/coordination |
| core | core |
| events | k8s.io/events |
| extensions | extensions |
| imagepolicy | k8s.io/imagepolicy |
| networking | k8s.io/networking |
| node | k8s.io/node |
| metrics | k8s.io/metrics |
| policy | policy |
| rbac.authorization | k8s.io/rbac.authorization |
| scheduling | k8s.io/scheduling |
| setting | k8s.io/setting |
| storage | k8s.io/storage |
为 Pod 创建控制器的命令示例:
kubebuilder create api --group core --version v1 --kind Pod --controller=true --resource=false
为 Deployment 创建控制器:
create api --group apps --version v1 --kind Deployment --controller=true --resource=false
由此生成的 RBAC 标记:
// +kubebuilder:rbac:groups=apps,resources=deployments,verbs=get;list;watch;create;update;patch;delete
// +kubebuilder:rbac:groups=apps,resources=deployments/status,verbs=get;update;patch
// +kubebuilder:rbac:groups=apps,resources=deployments/finalizers,verbs=update
对应的 RBAC 角色:
- apiGroups:
- apps
resources:
- deployments
verbs:
- create
- delete
- get
- list
- patch
- update
- watch
- apiGroups:
- apps
resources:
- deployments/finalizers
verbs:
- update
- apiGroups:
- apps
resources:
- deployments/status
verbs:
- get
- patch
- update
这会为核心类型(如 corev1.Pod)生成控制器,但不会生成资源定义(该类型已由 Kubernetes API 定义)。
为 Core Type 创建 Webhook
与创建控制器类似,使用核心类型的信息来创建 Webhook。示例:
kubebuilder create webhook --group core --version v1 --kind Pod --programmatic-validation
为集成测试配置 envtest
controller-runtime/pkg/envtest 是一个 Go 库,可通过启动内嵌的 etcd 与 Kubernetes API Server(无需 kubelet、controller-manager 等)来帮助为控制器编写集成测试。
安装(Installation)
运行 make envtest 即可安装所需二进制。默认会将 Kubernetes API Server 相关二进制下载到项目的 bin/ 目录。make test 则一站式完成下载、环境准备与测试执行。
你可以参考 Kubebuilder 脚手架的 Makefile。envtest 的设置与各版本 controller-runtime 保持一致;自 release-0.19 起,会自动从正确位置下载产物,确保 Kubebuilder 用户不受影响。
## Tool Binaries
..
ENVTEST ?= $(LOCALBIN)/setup-envtest
...
## Tool Versions
...
#ENVTEST_VERSION is the version of controller-runtime release branch to fetch the envtest setup script (i.e. release-0.20)
ENVTEST_VERSION ?= $(shell go list -m -f "{{ .Version }}" sigs.k8s.io/controller-runtime | awk -F'[v.]' '{printf "release-%d.%d", $$2, $$3}')
#ENVTEST_K8S_VERSION is the version of Kubernetes to use for setting up ENVTEST binaries (i.e. 1.31)
ENVTEST_K8S_VERSION ?= $(shell go list -m -f "{{ .Version }}" k8s.io/api | awk -F'[v.]' '{printf "1.%d", $$3}')
...
.PHONY: setup-envtest
setup-envtest: envtest ## Download the binaries required for ENVTEST in the local bin directory.
@echo "Setting up envtest binaries for Kubernetes version $(ENVTEST_K8S_VERSION)..."
@$(ENVTEST) use $(ENVTEST_K8S_VERSION) --bin-dir $(LOCALBIN) -p path || { \
echo "Error: Failed to set up envtest binaries for version $(ENVTEST_K8S_VERSION)."; \
exit 1; \
}
.PHONY: envtest
envtest: $(ENVTEST) ## Download setup-envtest locally if necessary.
$(ENVTEST): $(LOCALBIN)
$(call go-install-tool,$(ENVTEST),sigs.k8s.io/controller-runtime/tools/setup-envtest,$(ENVTEST_VERSION))
隔离/离线环境安装
若需在无法联外的环境中使用,可先通过 setup-envtest 在本地下载包含二进制的压缩包。避免联网的多种方式可参考此处。以下示例主要基于 setup-envtest 的默认配置安装 Kubernetes API 二进制。
下载二进制
make envtest will download the setup-envtest binary to ./bin/.
make envtest
使用 setup-envtest 安装时,会按操作系统类型放置二进制,详见这里
./bin/setup-envtest use 1.31.0
更新 test 目标
安装完成后,将 test 目标改为包含 -i(仅检查本地已安装的二进制,不访问远端)。也可设置 ENVTEST_INSTALLED_ONLY 环境变量:
test: manifests generate fmt vet
KUBEBUILDER_ASSETS="$(shell $(ENVTEST) use $(ENVTEST_K8S_VERSION) -i --bin-dir $(LOCALBIN) -p path)" go test ./... -coverprofile cover.out
注意:ENVTEST_K8S_VERSION 需与下载的 setup-envtest 版本匹配,否则会出现如下错误:
no such version (1.24.5) exists on disk for this architecture (darwin/amd64) -- try running `list -i` to see what's on disk
编写测试(Writing tests)
在集成测试中使用 envtest 的基本流程:
import sigs.k8s.io/controller-runtime/pkg/envtest
//specify testEnv configuration
testEnv = &envtest.Environment{
CRDDirectoryPaths: []string{filepath.Join("..", "config", "crd", "bases")},
}
//start testEnv
cfg, err = testEnv.Start()
//write test logic
//stop testEnv
err = testEnv.Stop()
kubebuilder 会在 /controllers 目录下生成 ginkgo 测试套件,并包含 testEnv 的初始化与清理样板代码。
测试日志默认以 test-env 作为前缀。
Configuring your test control plane
Controller-runtime’s envtest framework requires kubectl, kube-apiserver, and etcd binaries be present locally to simulate the API portions of a real cluster.
The make test command will install these binaries to the bin/ directory and use them when running tests that use envtest.
Ie,
./bin/k8s/
└── 1.25.0-darwin-amd64
├── etcd
├── kube-apiserver
└── kubectl
You can use environment variables and/or flags to specify the kubectl,api-server and etcd setup within your integration tests.
Environment Variables
| Variable name | Type | When to use |
|---|---|---|
USE_EXISTING_CLUSTER | boolean | Instead of setting up a local control plane, point to the control plane of an existing cluster. |
KUBEBUILDER_ASSETS | path to directory | Point integration tests to a directory containing all binaries (api-server, etcd and kubectl). |
TEST_ASSET_KUBE_APISERVER, TEST_ASSET_ETCD, TEST_ASSET_KUBECTL | paths to, respectively, api-server, etcd and kubectl binaries | Similar to KUBEBUILDER_ASSETS, but more granular. Point integration tests to use binaries other than the default ones. These environment variables can also be used to ensure specific tests run with expected versions of these binaries. |
KUBEBUILDER_CONTROLPLANE_START_TIMEOUT and KUBEBUILDER_CONTROLPLANE_STOP_TIMEOUT | durations in format supported by time.ParseDuration | Specify timeouts different from the default for the test control plane to (respectively) start and stop; any test run that exceeds them will fail. |
KUBEBUILDER_ATTACH_CONTROL_PLANE_OUTPUT | boolean | Set to true to attach the control plane’s stdout and stderr to os.Stdout and os.Stderr. This can be useful when debugging test failures, as output will include output from the control plane. |
See that the test makefile target will ensure that all is properly setup when you are using it. However, if you would like to run the tests without use the Makefile targets, for example via an IDE, then you can set the environment variables directly in the code of your suite_test.go:
var _ = BeforeSuite(func(done Done) {
Expect(os.Setenv("TEST_ASSET_KUBE_APISERVER", "../bin/k8s/1.25.0-darwin-amd64/kube-apiserver")).To(Succeed())
Expect(os.Setenv("TEST_ASSET_ETCD", "../bin/k8s/1.25.0-darwin-amd64/etcd")).To(Succeed())
Expect(os.Setenv("TEST_ASSET_KUBECTL", "../bin/k8s/1.25.0-darwin-amd64/kubectl")).To(Succeed())
// OR
Expect(os.Setenv("KUBEBUILDER_ASSETS", "../bin/k8s/1.25.0-darwin-amd64")).To(Succeed())
logf.SetLogger(zap.New(zap.WriteTo(GinkgoWriter), zap.UseDevMode(true)))
testenv = &envtest.Environment{}
_, err := testenv.Start()
Expect(err).NotTo(HaveOccurred())
close(done)
}, 60)
var _ = AfterSuite(func() {
Expect(testenv.Stop()).To(Succeed())
Expect(os.Unsetenv("TEST_ASSET_KUBE_APISERVER")).To(Succeed())
Expect(os.Unsetenv("TEST_ASSET_ETCD")).To(Succeed())
Expect(os.Unsetenv("TEST_ASSET_KUBECTL")).To(Succeed())
})
Flags
以下示例展示了在集成测试中如何调整 API Server 的启动参数(对比 envtest.DefaultKubeAPIServerFlags 的默认值):
customApiServerFlags := []string{
"--secure-port=6884",
"--admission-control=MutatingAdmissionWebhook",
}
apiServerFlags := append([]string(nil), envtest.DefaultKubeAPIServerFlags...)
apiServerFlags = append(apiServerFlags, customApiServerFlags...)
testEnv = &envtest.Environment{
CRDDirectoryPaths: []string{filepath.Join("..", "config", "crd", "bases")},
KubeAPIServerFlags: apiServerFlags,
}
测试注意事项(Testing considerations)
除非直接使用真实集群,否则测试环境中不会有内建控制器运行,因此行为与真实集群存在差异,影响测试编写。常见如垃圾回收:没有控制器监控内建资源,即便设置了 OwnerReference,对象也不会被删除。
若要验证删除生命周期,建议断言归属关系而非对象存在性。例如:
expectedOwnerReference := v1.OwnerReference{
Kind: "MyCoolCustomResource",
APIVersion: "my.api.example.com/v1beta1",
UID: "d9607e19-f88f-11e6-a518-42010a800195",
Name: "userSpecifiedResourceName",
}
Expect(deployment.ObjectMeta.OwnerReferences).To(ContainElement(expectedOwnerReference))
Cert-Manager and Prometheus options
Projects scaffolded with Kubebuilder can enable the metrics and the cert-manager options. Note that when we are using the ENV TEST we are looking to test the controllers and their reconciliation. It is considered an integrated test because the ENV TEST API will do the test against a cluster and because of this the binaries are downloaded and used to configure its pre-requirements, however, its purpose is mainly to unit test the controllers.
Therefore, to test a reconciliation in common cases you do not need to care about these options. However, if you would like to do tests with the Prometheus and the Cert-manager installed you can add the required steps to install them before running the tests. Following an example.
// Add the operations to install the Prometheus operator and the cert-manager
// before the tests.
BeforeEach(func() {
By("installing prometheus operator")
Expect(utils.InstallPrometheusOperator()).To(Succeed())
By("installing the cert-manager")
Expect(utils.InstallCertManager()).To(Succeed())
})
// You can also remove them after the tests::
AfterEach(func() {
By("uninstalling the Prometheus manager bundle")
utils.UninstallPrometheusOperManager()
By("uninstalling the cert-manager bundle")
utils.UninstallCertManager()
})
Check the following example of how you can implement the above operations:
const (
certmanagerVersion = "v1.5.3"
certmanagerURLTmpl = "https://github.com/cert-manager/cert-manager/releases/download/%s/cert-manager.yaml"
defaultKindCluster = "kind"
defaultKindBinary = "kind"
prometheusOperatorVersion = "0.51"
prometheusOperatorURL = "https://raw.githubusercontent.com/prometheus-operator/" + "prometheus-operator/release-%s/bundle.yaml"
)
func warnError(err error) {
_, _ = fmt.Fprintf(GinkgoWriter, "warning: %v\n", err)
}
// InstallPrometheusOperator installs the prometheus Operator to be used to export the enabled metrics.
func InstallPrometheusOperator() error {
url := fmt.Sprintf(prometheusOperatorURL, prometheusOperatorVersion)
cmd := exec.Command("kubectl", "apply", "-f", url)
_, err := Run(cmd)
return err
}
// UninstallPrometheusOperator uninstalls the prometheus
func UninstallPrometheusOperator() {
url := fmt.Sprintf(prometheusOperatorURL, prometheusOperatorVersion)
cmd := exec.Command("kubectl", "delete", "-f", url)
if _, err := Run(cmd); err != nil {
warnError(err)
}
}
// UninstallCertManager uninstalls the cert manager
func UninstallCertManager() {
url := fmt.Sprintf(certmanagerURLTmpl, certmanagerVersion)
cmd := exec.Command("kubectl", "delete", "-f", url)
if _, err := Run(cmd); err != nil {
warnError(err)
}
}
// InstallCertManager installs the cert manager bundle.
func InstallCertManager() error {
url := fmt.Sprintf(certmanagerURLTmpl, certmanagerVersion)
cmd := exec.Command("kubectl", "apply", "-f", url)
if _, err := Run(cmd); err != nil {
return err
}
// Wait for cert-manager-webhook to be ready, which can take time if cert-manager
//was re-installed after uninstalling on a cluster.
cmd = exec.Command("kubectl", "wait", "deployment.apps/cert-manager-webhook",
"--for", "condition=Available",
"--namespace", "cert-manager",
"--timeout", "5m",
)
_, err := Run(cmd)
return err
}
// LoadImageToKindClusterWithName loads a local docker image to the kind cluster
func LoadImageToKindClusterWithName(name string) error {
cluster := defaultKindCluster
if v, ok := os.LookupEnv("KIND_CLUSTER"); ok {
cluster = v
}
kindOptions := []string{"load", "docker-image", name, "--name", cluster}
kindBinary := defaultKindBinary
if v, ok := os.LookupEnv("KIND"); ok {
kindBinary = v
}
cmd := exec.Command(kindBinary, kindOptions...)
_, err := Run(cmd)
return err
}
However, see that tests for the metrics and cert-manager might fit better well as e2e tests and not under the tests done using ENV TEST for the controllers. You might want to give a look at the sample example implemented into Operator-SDK repository to know how you can write your e2e tests to ensure the basic workflows of your project. Also, see that you can run the tests against a cluster where you have some configurations in place they can use the option to test using an existing cluster:
testEnv = &envtest.Environment{
UseExistingCluster: true,
}
指标(Metrics)
默认情况下,controller-runtime 会构建全局 Prometheus 注册表,并为每个控制器发布一组性能指标。
指标配置(Metrics Configuration)
查看 config/default/kustomization.yaml 可知默认已暴露 metrics:
# [METRICS] Expose the controller manager metrics service.
- metrics_service.yaml
patches:
# [METRICS] The following patch will enable the metrics endpoint using HTTPS and the port :8443.
# More info: https://book.kubebuilder.io/reference/metrics
- path: manager_metrics_patch.yaml
target:
kind: Deployment
随后可在 cmd/main.go 中查看 metrics server 的配置:
// Metrics endpoint is enabled in 'config/default/kustomization.yaml'. The Metrics options configure the server.
// For more info: https://pkg.go.dev/sigs.k8s.io/controller-runtime/pkg/metrics/server
Metrics: metricsserver.Options{
...
},
在 Kubebuilder 中消费控制器指标
你可以使用 curl 或 Prometheus 等 HTTP 客户端访问控制器暴露的指标。
但在此之前,请确保客户端具备访问 /metrics 端点所需的 RBAC 权限。
授权访问指标端点
Kubebuilder 在如下位置脚手架了一个拥有读取权限的 ClusterRole:
config/rbac/metrics_reader_role.yaml
该文件包含了允许访问 metrics 端点所需的 RBAC 规则。
创建 ClusterRoleBinding
可通过 kubectl 创建绑定:
kubectl create clusterrolebinding metrics \
--clusterrole=<project-prefix>-metrics-reader \
--serviceaccount=<namespace>:<service-account-name>
或使用清单:
apiVersion: rbac.authorization.k8s.io/v1
kind: ClusterRoleBinding
metadata:
name: allow-metrics-access
roleRef:
apiGroup: rbac.authorization.k8s.io
kind: ClusterRole
name: metrics-reader
subjects:
- kind: ServiceAccount
name: controller-manager
namespace: system # Replace 'system' with your controller-manager's namespace
测试指标端点(通过 Curl Pod)
如需手动测试访问 metrics 端点,可执行:
- 创建 RoleBinding
kubectl create clusterrolebinding <project-name>-metrics-binding \
--clusterrole=<project-name>-metrics-reader \
--serviceaccount=<project-name>-system:<project-name>-controller-manager
- 生成 Token
export TOKEN=$(kubectl create token <project-name>-controller-manager -n <project-name>-system)
echo $TOKEN
- Launch Curl Pod
kubectl run curl-metrics --rm -it --restart=Never \
--image=curlimages/curl:7.87.0 -n <project-name>-system -- /bin/sh
- 调用 Metrics 端点
在 Pod 内使用:
curl -v -k -H "Authorization: Bearer $TOKEN" \
https://<project-name>-controller-manager-metrics-service.<project-name>-system.svc.cluster.local:8443/metrics
指标保护与可选方案
未加保护的 metrics 端点可能向未授权用户暴露敏感数据(系统性能、应用行为、运维指标等),从而带来安全风险。
使用 authn/authz(默认启用)
为降低风险,Kubebuilder 项目通过认证(authn)与鉴权(authz)保护 metrics 端点,确保仅授权用户/服务账号可访问敏感指标。
过去常使用 kube-rbac-proxy 进行保护;新版本已不再使用。自 v4.1.0 起,项目默认通过 controller-runtime 的 WithAuthenticationAndAuthorization 启用并保护 metrics 端点。
因此,你会看到如下配置:
- In the
cmd/main.go:
if secureMetrics {
...
metricsServerOptions.FilterProvider = filters.WithAuthenticationAndAuthorization
}
该配置通过 FilterProvider 对 metrics 端点实施认证与鉴权,确保仅具有相应权限的实体可访问。
- In the
config/rbac/kustomization.yaml:
# The following RBAC configurations are used to protect
# the metrics endpoint with authn/authz. These configurations
# ensure that only authorized users and service accounts
# can access the metrics endpoint.
- metrics_auth_role.yaml
- metrics_auth_role_binding.yaml
- metrics_reader_role.yaml
这样,只有使用相应 ServiceAccount token 的 Pod 才能读取 metrics。示例:
apiVersion: v1
kind: Pod
metadata:
name: metrics-consumer
namespace: system
spec:
# Use the scaffolded service account name to allow authn/authz
serviceAccountName: controller-manager
containers:
- name: metrics-consumer
image: curlimages/curl:latest
command: ["/bin/sh"]
args:
- "-c"
- >
while true;
do
# Note here that we are passing the token obtained from the ServiceAccount to curl the metrics endpoint
curl -s -k -H "Authorization: Bearer $(cat /var/run/secrets/kubernetes.io/serviceaccount/token)"
https://controller-manager-metrics-service.system.svc.cluster.local:8443/metrics;
sleep 60;
done
(推荐)在生产环境启用证书(默认关闭)
自 Kubebuilder 4.4.0 起,脚手架包含使用 CertManager 管理证书以保护 metrics server 的逻辑。按以下步骤可启用:
-
在
config/default/kustomization.yaml启用 Cert-Manager:-
取消注释 cert-manager 资源:
- ../certmanager
-
-
启用在
config/default/kustomization.yaml中用于挂载证书的 Patch:-
取消注释
cert_metrics_manager_patch.yaml,在 Manager 的 Deployment 中挂载serving-cert:# Uncomment the patches line if you enable Metrics and CertManager # [METRICS-WITH-CERTS] To enable metrics protected with certManager, uncomment the following line. # This patch will protect the metrics with certManager self-signed certs. - path: cert_metrics_manager_patch.yaml target: kind: Deployment
-
-
在
config/default/kustomization.yaml中启用为 Metrics Server 配置证书的 replacements:-
取消注释下方 replacements 块,为
config/certmanager下的证书正确设置 DNS 名称:# [CERTMANAGER] To enable cert-manager, uncomment all sections with 'CERTMANAGER' prefix. # Uncomment the following replacements to add the cert-manager CA injection annotations #replacements: # - source: # Uncomment the following block to enable certificates for metrics # kind: Service # version: v1 # name: controller-manager-metrics-service # fieldPath: metadata.name # targets: # - select: # kind: Certificate # group: cert-manager.io # version: v1 # name: metrics-certs # fieldPaths: # - spec.dnsNames.0 # - spec.dnsNames.1 # options: # delimiter: '.' # index: 0 # create: true # # - source: # kind: Service # version: v1 # name: controller-manager-metrics-service # fieldPath: metadata.namespace # targets: # - select: # kind: Certificate # group: cert-manager.io # version: v1 # name: metrics-certs # fieldPaths: # - spec.dnsNames.0 # - spec.dnsNames.1 # options: # delimiter: '.' # index: 1 # create: true #
-
-
在
config/prometheus/kustomization.yaml中启用ServiceMonitor的证书配置:-
添加或取消注释
ServiceMonitor的 patch,以使用 cert-manager 管理的 Secret 并启用证书校验:# [PROMETHEUS-WITH-CERTS] The following patch configures the ServiceMonitor in ../prometheus # to securely reference certificates created and managed by cert-manager. # Additionally, ensure that you uncomment the [METRICS WITH CERTMANAGER] patch under config/default/kustomization.yaml # to mount the "metrics-server-cert" secret in the Manager Deployment. patches: - path: monitor_tls_patch.yaml target: kind: ServiceMonitor
NOTE that the
ServiceMonitorpatch above will ensure that if you enable the Prometheus integration, it will securely reference the certificates created and managed by CertManager. But it will not enable the integration with Prometheus. To enable the integration with Prometheus, you need uncomment the#- ../certmanagerin theconfig/default/kustomization.yaml. For more information, see Exporting Metrics for Prometheus. -
(Optional) By using Network Policy (Disabled by default)
NetworkPolicy acts as a basic firewall for pods within a Kubernetes cluster, controlling traffic
flow at the IP address or port level. However, it doesn’t handle authn/authz.
Uncomment the following line in the config/default/kustomization.yaml:
# [NETWORK POLICY] Protect the /metrics endpoint and Webhook Server with NetworkPolicy.
# Only Pod(s) running a namespace labeled with 'metrics: enabled' will be able to gather the metrics.
# Only CR(s) which uses webhooks and applied on namespaces labeled 'webhooks: enabled' will be able to work properly.
#- ../network-policy
Exporting Metrics for Prometheus
使用 Prometheus Operator 导出指标的步骤:
-
安装 Prometheus 与 Prometheus Operator。 若无自建监控系统,生产环境建议使用 kube-prometheus。 若仅用于试验,可只安装 Prometheus 与 Prometheus Operator。
-
在
config/default/kustomization.yaml中取消注释- ../prometheus,以创建ServiceMonitor并启用指标导出:
# [PROMETHEUS] To enable prometheus monitor, uncomment all sections with 'PROMETHEUS'.
- ../prometheus
注意:当你将项目安装到集群时会创建 ServiceMonitor 用于导出指标。可通过 kubectl get ServiceMonitor -n <project>-system 检查,例如:
$ kubectl get ServiceMonitor -n monitor-system
NAME AGE
monitor-controller-manager-metrics-monitor 2m8s
另外,指标默认通过 8443 端口导出。你可以在 Prometheus 控制台中通过 {namespace="<project>-system"} 查询该命名空间导出的指标:
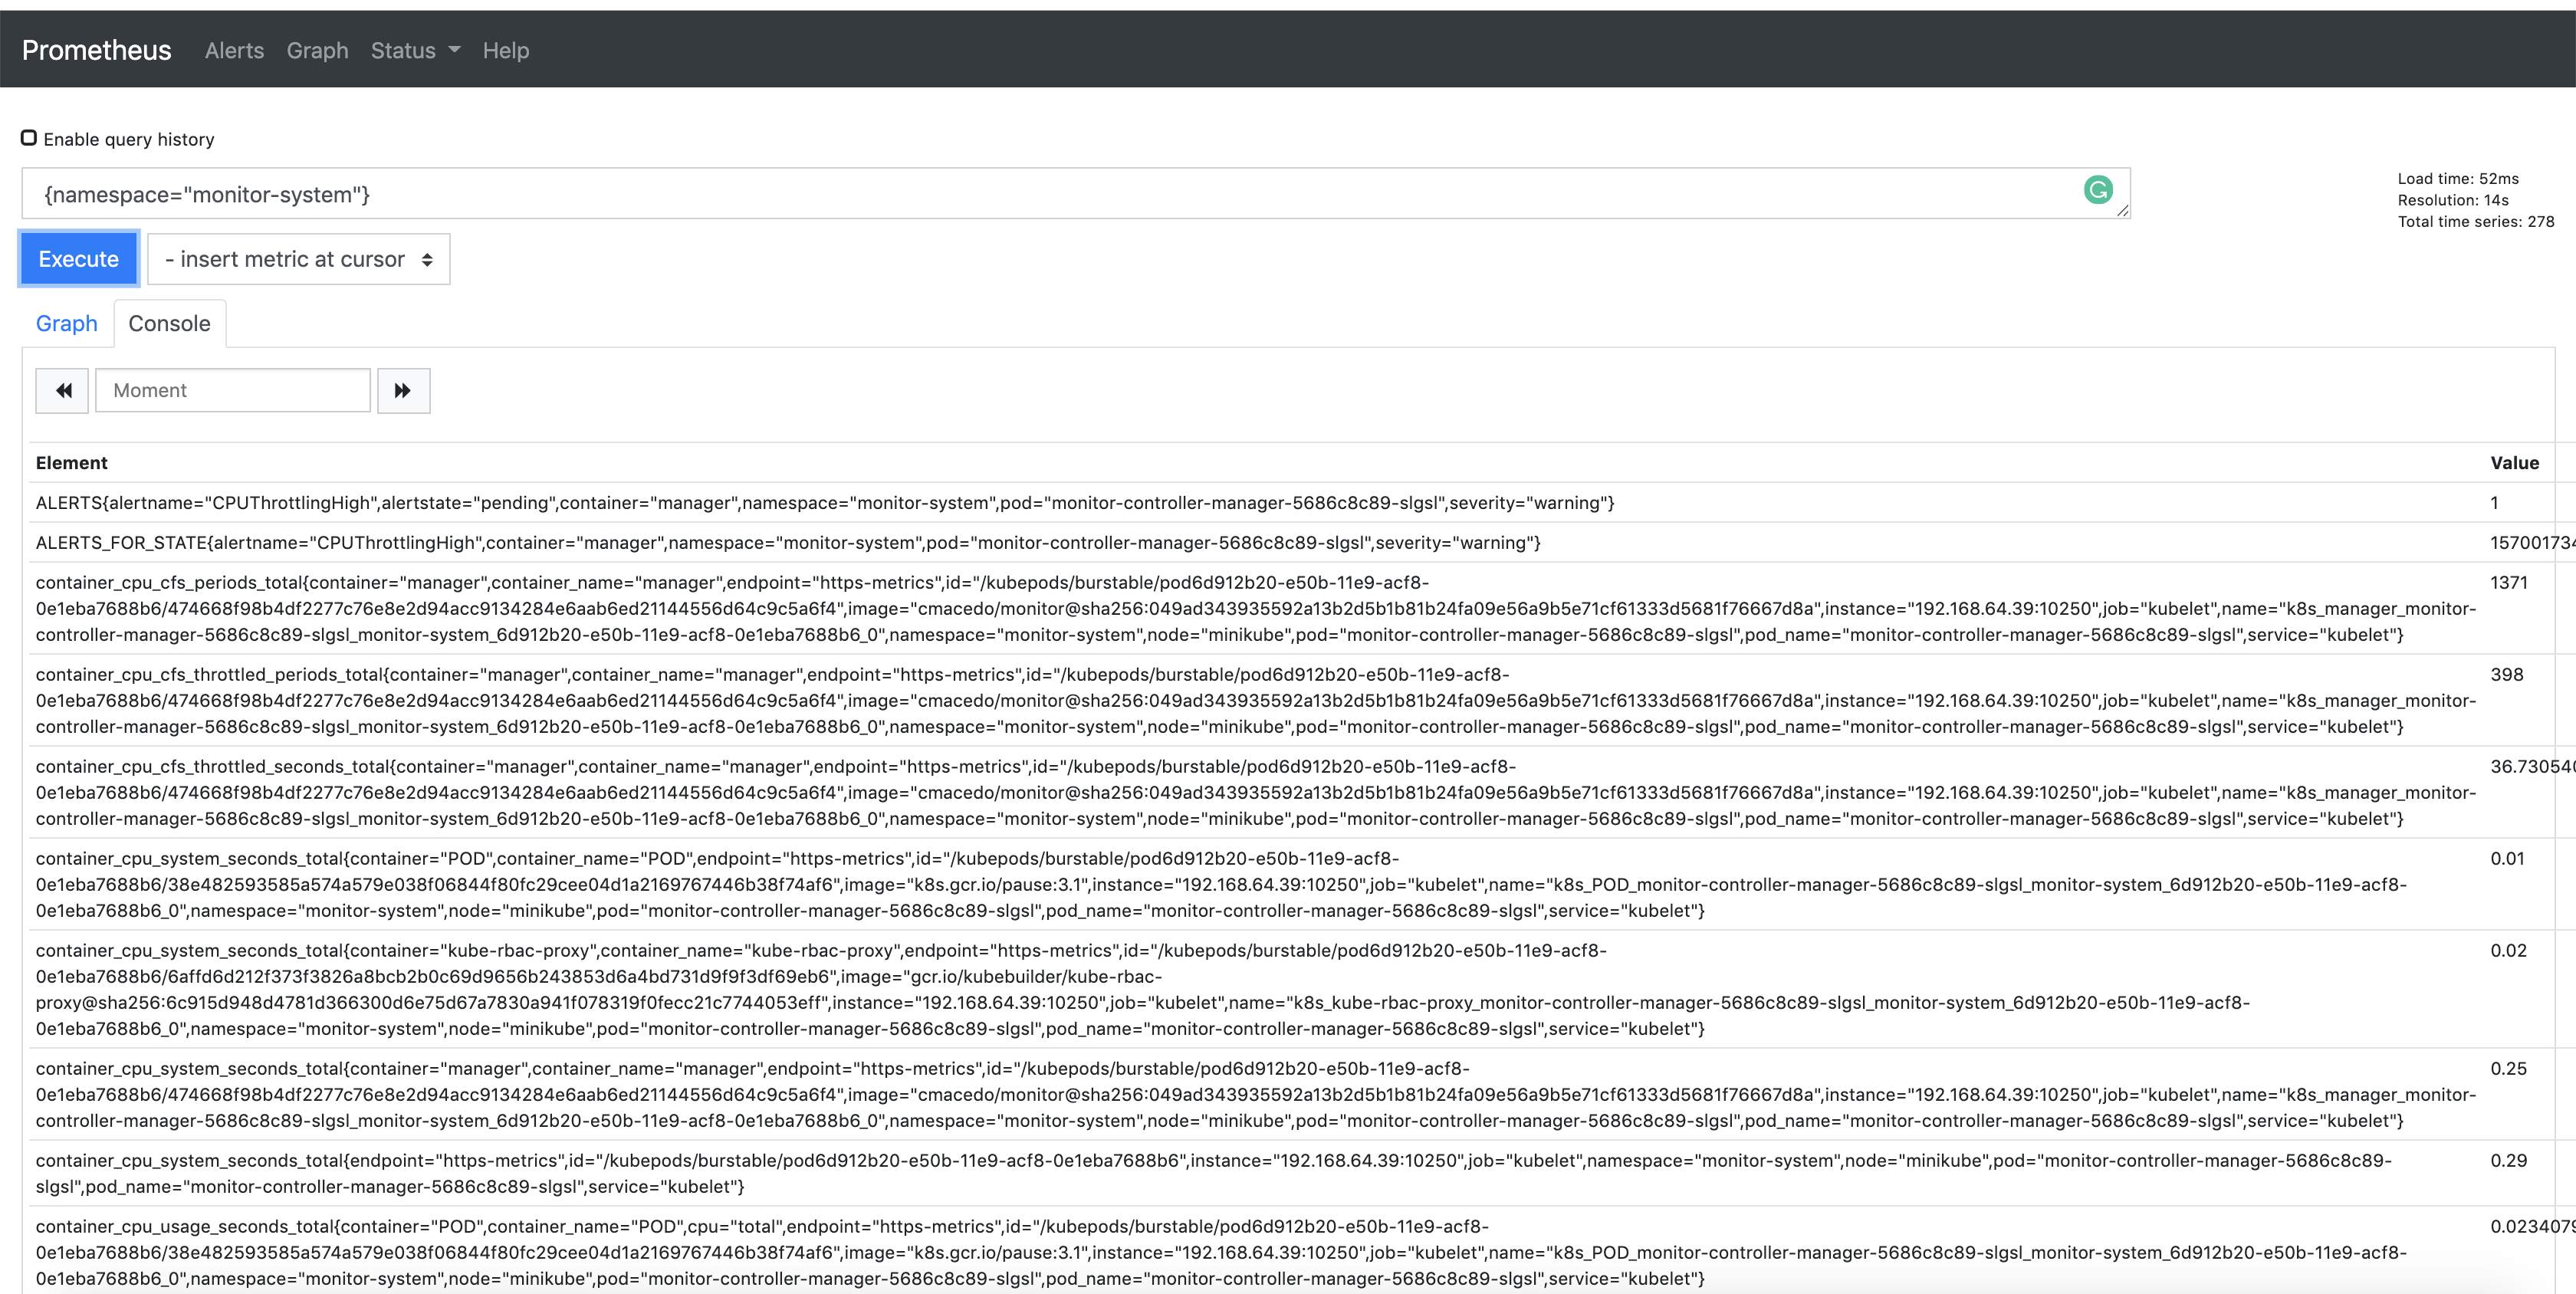
发布自定义指标
如果希望从控制器发布更多指标,可使用 controller-runtime/pkg/metrics 的全局注册表。
一种常见方式是在控制器包中将采集器声明为全局变量,并在 init() 中注册:
For example:
import (
"github.com/prometheus/client_golang/prometheus"
"sigs.k8s.io/controller-runtime/pkg/metrics"
)
var (
goobers = prometheus.NewCounter(
prometheus.CounterOpts{
Name: "goobers_total",
Help: "Number of goobers processed",
},
)
gooberFailures = prometheus.NewCounter(
prometheus.CounterOpts{
Name: "goober_failures_total",
Help: "Number of failed goobers",
},
)
)
func init() {
// Register custom metrics with the global prometheus registry
metrics.Registry.MustRegister(goobers, gooberFailures)
}
随后可在调谐循环中任意位置对这些采集器写入数据;在 operator 代码中的任意位置均可读取与评估这些指标。
上述指标可被 Prometheus 或其他 OpenMetrics 系统抓取。

默认导出的指标参考(Default Exported Metrics References)
以下为 controller-runtime 默认导出并提供的指标:
项目配置(Project Config)
概览(Overview)
Project Config 描述了一个 Kubebuilder 项目的配置信息。使用 CLI(KB 3.0+)脚手架生成的项目,都会在项目根目录生成 PROJECT 文件。该文件会记录用于生成项目与 API 的插件及输入数据,便于后续插件在脚手架过程中基于这些上下文做出正确决策。
示例(Example)
下面是一个使用 Deploy Image 插件 生成、且包含两个 API 的项目所对应的 PROJECT 示例:
# Code generated by tool. DO NOT EDIT.
# This file is used to track the info used to scaffold your project
# and allow the plugins properly work.
# More info: https://book.kubebuilder.io/reference/project-config.html
domain: testproject.org
cliVersion: v4.6.0
layout:
- go.kubebuilder.io/v4
plugins:
deploy-image.go.kubebuilder.io/v1-alpha:
resources:
- domain: testproject.org
group: example.com
kind: Memcached
options:
containerCommand: memcached,--memory-limit=64,-o,modern,-v
containerPort: "11211"
image: memcached:1.4.36-alpine
runAsUser: "1001"
version: v1alpha1
- domain: testproject.org
group: example.com
kind: Busybox
options:
image: busybox:1.28
version: v1alpha1
projectName: project-v4-with-deploy-image
repo: sigs.k8s.io/kubebuilder/testdata/project-v4-with-deploy-image
resources:
- api:
crdVersion: v1
namespaced: true
controller: true
domain: testproject.org
group: example.com
kind: Memcached
path: sigs.k8s.io/kubebuilder/testdata/project-v4-with-deploy-image/api/v1alpha1
version: v1alpha1
webhooks:
validation: true
webhookVersion: v1
- api:
crdVersion: v1
namespaced: true
controller: true
domain: testproject.org
group: example.com
kind: Busybox
path: sigs.k8s.io/kubebuilder/testdata/project-v4-with-deploy-image/api/v1alpha1
version: v1alpha1
version: "3"
为什么要存储所用插件与输入数据?
主要动机包括但不限于:
- 检查在现有插件之上能否继续脚手架另一个插件,即在串联多个插件时的兼容性判断。
- 约束允许/不允许的操作。例如:当前布局是否允许按组拆分、继续为不同 Group 的 API 进行脚手架生成。
- 校验 CLI 操作所需的数据是否可用,例如确保仅能为已存在的 API 创建 Webhook。
请注意,Kubebuilder 不仅是一个 CLI 工具,也可以作为库被复用,用于创建自定义插件/工具、在既有项目之上提供辅助与定制(例如 Operator-SDK 就是这样做的)。SDK 基于 Kubebuilder 构建插件,使其支持其他语言或为用户提供集成其项目的各种辅助能力,例如整合 Operator Framework/OLM。关于如何创建自定义插件,可查看插件文档。
另外,PROJECT 文件还能帮助我们实现“自动再脚手架(re-scaffold)”以便简化项目升级:把 API 及其配置与版本等必要元数据集中保存在 PROJECT 中,就能在插件版本迁移时自动化地再脚手架项目。更多设计说明。
版本(Versioning)
Project Config 会随布局(layout)产生版本。详见 Versioning。
布局定义(Layout Definition)
PROJECT 版本 3 的布局示例:
domain: testproject.org
cliVersion: v4.6.0
layout:
- go.kubebuilder.io/v4
plugins:
deploy-image.go.kubebuilder.io/v1-alpha:
resources:
- domain: testproject.org
group: example.com
kind: Memcached
options:
containerCommand: memcached,--memory-limit=64,-o,modern,-v
containerPort: "11211"
image: memcached:memcached:1.6.26-alpine3.19
runAsUser: "1001"
version: v1alpha1
- domain: testproject.org
group: example.com
kind: Busybox
options:
image: busybox:1.36.1
version: v1alpha1
projectName: project-v4-with-deploy-image
repo: sigs.k8s.io/kubebuilder/testdata/project-v4-with-deploy-image
resources:
- api:
crdVersion: v1
namespaced: true
controller: true
domain: testproject.org
group: example.com
kind: Memcached
path: sigs.k8s.io/kubebuilder/testdata/project-v4-with-deploy-image/api/v1alpha1
version: v1alpha1
webhooks:
validation: true
webhookVersion: v1
- api:
crdVersion: v1
namespaced: true
controller: true
domain: testproject.org
group: example.com
kind: Busybox
path: sigs.k8s.io/kubebuilder/testdata/project-v4-with-deploy-image/api/v1alpha1
version: v1alpha1
version: "3"
下面是各字段含义说明:
| Field | Description |
|---|---|
cliVersion | 记录通过 init 脚手架生成项目时所使用的 CLI 版本,用于定位所用工具版本,便于排错并确保与后续更新兼容。 |
layout | 定义全局插件。例如 init --plugins="go/v4,deploy-image/v1-alpha" 表示后续执行的任意子命令都会串联调用这两个插件的实现。 |
domain | 项目的域名。可在执行 init 子命令时通过 --domain 指定。 |
plugins | 定义用于自定义脚手架的插件。例如仅为某个特定 API 使用可选插件 deploy-image/v1-alpha:kubebuilder create api [options] --plugins=deploy-image/v1-alpha。 |
projectName | 项目名称。用于生成 manager 相关数据。默认取项目目录名,也可在 init 时通过 --project-name 指定。 |
repo | 项目仓库(Go 模块名),例如 github.com/example/myproject-operator。 |
resources | 项目中已脚手架生成的所有资源(数组)。 |
resources.api | 通过 create api 子命令生成的 API 信息。 |
resources.api.crdVersion | 生成 CRD 资源所使用的 Kubernetes API 版本(apiVersion)。 |
resources.api.namespaced | API 的 RBAC 作用域,是 Namespaced 还是 Cluster 级别。 |
resources.controller | 指示该 API 是否已生成对应的 Controller。 |
resources.domain | 资源的域名。来自项目初始化时的 --domain,或在为外部类型脚手架 Controller 时通过 --external-api-domain 指定。 |
resources.group | 资源的 GVK 中的 Group,来自执行 create api 时的 --group。 |
resources.version | 资源的 GVK 中的 Version,来自执行 create api 时的 --version。 |
resources.kind | 资源的 GVK 中的 Kind,来自执行 create api 时的 --kind。 |
resources.path | API 资源的 import 路径。默认是 <repo>/api/<kind>;若添加的是外部类型或核心类型,路径会不同。核心类型的路径映射见此处;外部类型也可以通过 --external-api-path 显式指定。 |
resources.core | 当使用的 Group 来自 Kubernetes 核心 API,且该 API 资源未在本项目中定义时为 true。 |
resources.external | 当使用 --external-api-path 为外部类型生成脚手架时为 true。 |
resources.webhooks | 当执行 create webhook 时记录 webhook 相关数据。 |
resources.webhooks.spoke | 转换(conversion)webhook 中,作为 Spoke 的 API 版本;对应的 Hub 版本在另外指定。 |
resources.webhooks.webhookVersion | 生成 webhook 资源所使用的 Kubernetes API 版本(apiVersion)。 |
resources.webhooks.conversion | 使用 --conversion 生成转换型 webhook 时为 true。 |
resources.webhooks.defaulting | 使用 --defaulting 生成默认化(Mutating)webhook 时为 true。 |
resources.webhooks.validation | 使用 --programmatic-validation 生成校验型(Validating)webhook 时为 true。 |
插件
Kubebuilder 的架构从根本上是基于插件的。 这种设计使 Kubebuilder CLI 能在保持对旧版本向后兼容的同时演进;允许用户按需启用或禁用特性,并能与外部工具无缝集成。
通过利用插件,项目可以扩展 Kubebuilder,并将其作为库来支持新的功能,或实现贴合用户需求的自定义脚手架。这种灵活性允许维护者在 Kubebuilder 的基础上构建,适配特定用例,同时受益于其强大的脚手架引擎。
插件具备以下关键优势:
- 兼容性:确保旧的布局与项目结构在新版本下仍能工作
- 可定制:允许用户按需启用或禁用特性(例如 Grafana 与 Deploy Image 插件)
- 可扩展:便于集成第三方工具与希望提供自有外部插件的项目,这些插件可与 Kubebuilder 协同使用,以修改和增强项目脚手架或引入新功能
例如,使用多个全局插件初始化项目:
kubebuilder init --plugins=pluginA,pluginB,pluginC
例如,使用特定插件应用自定义脚手架:
kubebuilder create api --plugins=pluginA,pluginB,pluginC
OR
kubebuilder create webhook --plugins=pluginA,pluginB,pluginC
OR
kubebuilder edit --plugins=pluginA,pluginB,pluginC
本节将介绍可用插件、如何扩展 Kubebuilder,以及如何在遵循相同布局结构的前提下创建你自己的插件。
可用插件
本节介绍 Kubebuilder 项目所支持并内置的插件。
脚手架生成整套项目
以下插件可用于借助工具一次性脚手架生成整个项目:
| 插件 | Key | 说明 |
|---|---|---|
| go.kubebuilder.io/v4(Kubebuilder init 的默认脚手架) | go/v4 | 由 base.go.kubebuilder.io/v4 与 kustomize.common.kubebuilder.io/v2 组合而成,负责 Golang 项目及其配置的脚手架生成。 |
增加可选特性
以下插件可用于生成代码并利用可选特性:
| 插件 | Key | 说明 |
|---|---|---|
| autoupdate.kubebuilder.io/v1-alpha | autoupdate/v1-alpha | 可选辅助插件,脚手架生成一个定时任务,帮助你的项目自动跟进生态变更,显著降低人工维护成本。 |
| deploy-image.go.kubebuilder.io/v1-alpha | deploy-image/v1-alpha | 可选辅助插件,可脚手架 API 与 Controller,并内置代码实现以部署并管理一个镜像(Operand)。 |
| grafana.kubebuilder.io/v1-alpha | grafana/v1-alpha | 可选辅助插件,可为 controller-runtime 导出的默认指标脚手架生成 Grafana Dashboard 清单。 |
| helm.kubebuilder.io/v1-alpha | helm/v1-alpha | 可选辅助插件,可在 dist 目录下脚手架生成 Helm Chart 用于项目分发。 |
供扩展使用
以下插件适用于其他工具及外部插件,用于扩展 Kubebuilder 的功能。
你可以使用 kustomize 插件来脚手架生成 config/ 下的 kustomize 文件;基础语言插件负责生成 Golang 相关文件。
这样你就能为其它语言创建自己的插件(例如 Operator-SDK 让用户可以使用 Ansible/Helm),或是在其上叠加更多能力。
例如 Operator-SDK 提供了与 OLM 集成的插件,为项目添加了其自有的能力。
| 插件 | Key | 说明 |
|---|---|---|
| kustomize.common.kubebuilder.io/v2 | kustomize/v2 | 负责脚手架生成 config/ 目录下的全部 kustomize 文件 |
base.go.kubebuilder.io/v4 | base/v4 | 负责脚手架生成所有 Golang 相关文件。该插件与其它插件组合后形成 go/v4 |
AutoUpdate(autoupdate/v1-alpha)
让你的 Kubebuilder 项目与最新改进保持同步不应该是件苦差事。经过少量设置,每当有新的 Kubebuilder 版本可用时,你都可以收到自动 Pull Request 建议——让项目保持维护良好、安全,并与生态变化保持一致。
该自动化使用带“三方合并策略”的 kubebuilder alpha update 命令来刷新项目脚手架,并通过一个 GitHub Actions 工作流包装:它会打开一个带 Pull Request 对比链接的 Issue,方便你创建 PR 并进行审阅。
何时使用
- 当你的项目没有过多偏离默认脚手架(请务必阅读此处的自定义注意事项:https://book.kubebuilder.io/versions_compatibility_supportability#project-customizations)
- 当你希望降低保持项目更新与良好维护的负担
- 当你希望借助 AI 的指引,了解保持项目最新所需的变更并解决冲突
如何使用
- 为现有项目添加
autoupdate插件:
kubebuilder edit --plugins="autoupdate.kubebuilder.io/v1-alpha"
- 创建启用
autoupdate插件的新项目:
kubebuilder init --plugins=go/v4,autoupdate/v1-alpha
工作原理
该操作会生成一个运行 kubebuilder alpha update 命令的 GitHub Actions 工作流。每当有新版本发布时,工作流都会自动打开一个带 PR 对比链接的 Issue,方便你创建 PR 并进行审阅,例如:
默认情况下,生成的工作流会使用 --use-gh-models 参数以利用 AI models 帮助你理解所需变更。你会获得一份简洁的变更文件列表,以加快审阅,例如:
如发生冲突,AI 生成的评论会指出并提供后续步骤,例如:
工作流细节
该工作流每周检查一次新版本;如有新版本,将创建带 PR 对比链接的 Issue,以便你创建 PR 并审阅。工作流调用的命令如下:
# 更多信息参见:https://kubebuilder.io/reference/commands/alpha_update
- name: Run kubebuilder alpha update
run: |
# 使用指定参数执行更新命令。
# --force:即使出现冲突也完成合并,保留冲突标记
# --push:将结果分支自动推送到 'origin'
# --restore-path:在 squash 时保留指定路径(例如 CI 工作流文件)
# --open-gh-issue:创建 Issue
# --use-gh-models:在创建的 Issue 中添加 AI 生成的评论,给出脚手架变更概览及(如有)冲突解决指引
kubebuilder alpha update \
--force \
--push \
--restore-path .github/workflows \
--open-gh-issue \
--use-gh-models
Deploy Image 插件(deploy-image/v1-alpha)
deploy-image 插件允许用户创建用于在集群中部署与管理容器镜像的控制器与自定义资源,遵循 Kubernetes 最佳实践。它简化了部署镜像的复杂性,同时允许用户按需自定义项目。
使用该插件,你将获得:
- 一个在集群中部署与管理 Operand(镜像)的控制器实现
- 使用 ENVTEST 的测试,以验证调谐逻辑
- 已填充必要规格的自定义资源样例
- 在 manager 中用于管理 Operand(镜像)的环境变量支持
何时使用?
- 该插件非常适合刚开始接触 Kubernetes Operator 的用户
- 它帮助用户使用Operator 模式 来部署并管理镜像(Operand)
- 如果你在寻找一种快速高效的方式来搭建自定义控制器并管理容器镜像,该插件是上佳选择
如何使用?
-
初始化项目: 使用
kubebuilder init创建新项目后,你可以使用该插件创建 API。在继续之前,请确保已完成快速开始。 -
创建 API: 使用该插件,你可以创建 API 以指定要在集群上部署的镜像(Operand)。你还可以通过参数选择性地指定命令、端口与安全上下文:
示例命令:
kubebuilder create api --group example.com --version v1alpha1 --kind Memcached --image=memcached:1.6.15-alpine --image-container-command="memcached,--memory-limit=64,modern,-v" --image-container-port="11211" --run-as-user="1001" --plugins="deploy-image/v1-alpha"
子命令
deploy-image 插件包含以下子命令:
create api:使用该命令为管理容器镜像生成 API 与控制器代码
受影响的文件
当使用该插件的 create api 命令时,除了 Kubebuilder 现有的脚手架外,以下文件会受到影响:
controllers/*_controller_test.go:为控制器生成测试controllers/*_suite_test.go:生成或更新测试套件api/<version>/*_types.go:生成 API 规格config/samples/*_.yaml:为自定义资源生成默认值main.go:更新以添加控制器初始化config/manager/manager.yaml:更新以包含用于存储镜像的环境变量
更多资源
- 查看此视频了解其工作方式
go/v4 (go.kubebuilder.io/v4)
(默认脚手架)
Kubebuilder 在初始化项目时指定 --plugins=go/v4 后将使用该插件进行脚手架生成。
该插件通过 Bundle Plugin 组合了 kustomize.common.kubebuilder.io/v2 与 base.go.kubebuilder.io/v4,
用于生成一套项目模板,便于你构建成组的 controllers。
按照快速开始创建项目时,默认即会使用该插件。
如何使用?
创建一个启用 go/v4 插件的新项目,可使用如下命令:
kubebuilder init --domain tutorial.kubebuilder.io --repo tutorial.kubebuilder.io/project --plugins=go/v4
支持的子命令
- Init -
kubebuilder init [OPTIONS] - Edit -
kubebuilder edit [OPTIONS] - Create API -
kubebuilder create api [OPTIONS] - Create Webhook -
kubebuilder create webhook [OPTIONS]
延伸阅读
- 查看插件组合方式:Kubebuilder 源码中的 main.go
- 查看基础 Go 插件实现:
base.go.kubebuilder.io/v4 - 查看 Kustomize/v2 插件实现:Kustomize/v2
- 了解更多控制器知识:controller-runtime
Grafana 插件(grafana/v1-alpha)
Grafana 插件是一个可选插件,用于脚手架生成 Grafana Dashboard,帮助你查看由使用 controller-runtime 的项目导出的默认指标。
何时使用?
- 当你希望使用 Grafana 通过 Prometheus 查看 controller-metrics 导出的指标。
如何使用?
前置条件
- 项目需使用 controller-runtime 暴露 默认控制器指标,并被 Prometheus 采集。
- 可访问 Prometheus:
- Prometheus 需暴露可访问的 endpoint(例如
prometheus-operator的http://prometheus-k8s.monitoring.svc:9090)。 - 该 endpoint 已配置为 Grafana 的数据源。参考 Add a data source。
- Prometheus 需暴露可访问的 endpoint(例如
- 可访问 Grafana,并确保:
- 拥有仪表盘编辑权限(Dashboard edit permission)。
- 已配置 Prometheus 数据源。

基本用法
Grafana 插件挂载在 init 与 edit 子命令上:
# 使用 grafana 插件初始化新项目
kubebuilder init --plugins grafana.kubebuilder.io/v1-alpha
# 在已有项目上启用 grafana 插件
kubebuilder edit --plugins grafana.kubebuilder.io/v1-alpha
插件会创建一个新目录并在其中生成 JSON 文件(例如 grafana/controller-runtime-metrics.json)。
使用演示
如下动图展示了在项目中启用该插件:

如何在 Grafana 中导入这些 Dashboard
- 复制 JSON 文件内容。
- 打开
<your-grafana-url>/dashboard/import,按指引导入新的仪表盘。 - 将 JSON 粘贴到 “Import via panel json”,点击 “Load”。

- 选择作为数据源的 Prometheus。

- 成功导入后,Dashboard 即可使用。
Dashboard 说明
Controller Runtime Reconciliation 总数与错误数
- 指标:
controller_runtime_reconcile_totalcontroller_runtime_reconcile_errors_total
- 查询:
sum(rate(controller_runtime_reconcile_total{job="$job"}[5m])) by (instance, pod)sum(rate(controller_runtime_reconcile_errors_total{job="$job"}[5m])) by (instance, pod)
- 描述:
- 近 5 分钟内 Reconcile 总次数的每秒速率。
- 近 5 分钟内 Reconcile 错误次数的每秒速率。
- 示例:

控制器 CPU 与内存使用
- 指标:
process_cpu_seconds_totalprocess_resident_memory_bytes
- 查询:
rate(process_cpu_seconds_total{job="$job", namespace="$namespace", pod="$pod"}[5m]) * 100process_resident_memory_bytes{job="$job", namespace="$namespace", pod="$pod"}
- 描述:
- 近 5 分钟内 CPU 使用率的每秒速率。
- 控制器进程的常驻内存字节数。
- 示例:

P50/90/99 工作队列等待时长(秒)
- 指标:
workqueue_queue_duration_seconds_bucket
- 查询:
histogram_quantile(0.50, sum(rate(workqueue_queue_duration_seconds_bucket{job="$job", namespace="$namespace"}[5m])) by (instance, name, le))
- 描述:
- 条目在工作队列中等待被取用的时长。
- 示例:

P50/90/99 工作队列处理时长(秒)
- 指标:
workqueue_work_duration_seconds_bucket
- 查询:
histogram_quantile(0.50, sum(rate(workqueue_work_duration_seconds_bucket{job="$job", namespace="$namespace"}[5m])) by (instance, name, le))
- 描述:
- 从工作队列中取出并处理一个条目所花费的时间。
- 示例:

Add Rate in Work Queue
- Metrics
- workqueue_adds_total
- Query:
- sum(rate(workqueue_adds_total{job=“$job”, namespace=“$namespace”}[5m])) by (instance, name)
- Description
- Per-second rate of items added to work queue
- Sample:

Retries Rate in Work Queue
- Metrics
- workqueue_retries_total
- Query:
- sum(rate(workqueue_retries_total{job=“$job”, namespace=“$namespace”}[5m])) by (instance, name)
- Description
- Per-second rate of retries handled by workqueue
- Sample:

Number of Workers in Use
- Metrics
- controller_runtime_active_workers
- Query:
- controller_runtime_active_workers{job=“$job”, namespace=“$namespace”}
- Description
- The number of active controller workers
- Sample:
WorkQueue Depth
- Metrics
- workqueue_depth
- Query:
- workqueue_depth{job=“$job”, namespace=“$namespace”}
- Description
- Current depth of workqueue
- Sample:
Unfinished Seconds
- Metrics
- workqueue_unfinished_work_seconds
- Query:
- rate(workqueue_unfinished_work_seconds{job=“$job”, namespace=“$namespace”}[5m])
- Description
- How many seconds of work has done that is in progress and hasn’t been observed by work_duration.
- Sample:
Visualize Custom Metrics
The Grafana plugin supports scaffolding manifests for custom metrics.
Generate Config Template
When the plugin is triggered for the first time, grafana/custom-metrics/config.yaml is generated.
---
customMetrics:
# - metric: # Raw custom metric (required)
# type: # Metric type: counter/gauge/histogram (required)
# expr: # Prom_ql for the metric (optional)
# unit: # Unit of measurement, examples: s,none,bytes,percent,etc. (optional)
Add Custom Metrics to Config
You can enter multiple custom metrics in the file. For each element, you need to specify the metric and its type.
The Grafana plugin can automatically generate expr for visualization.
Alternatively, you can provide expr and the plugin will use the specified one directly.
---
customMetrics:
- metric: memcached_operator_reconcile_total # Raw custom metric (required)
type: counter # Metric type: counter/gauge/histogram (required)
unit: none
- metric: memcached_operator_reconcile_time_seconds_bucket
type: histogram
Scaffold Manifest
Once config.yaml is configured, you can run kubebuilder edit --plugins grafana.kubebuilder.io/v1-alpha again.
This time, the plugin will generate grafana/custom-metrics/custom-metrics-dashboard.json, which can be imported to Grafana UI.
Show case:
See an example of how to visualize your custom metrics:

Subcommands
The Grafana plugin implements the following subcommands:
-
edit (
$ kubebuilder edit [OPTIONS]) -
init (
$ kubebuilder init [OPTIONS])
Affected files
The following scaffolds will be created or updated by this plugin:
grafana/*.json
Further resources
- Check out video to show how it works
- Checkout the video to show how the custom metrics feature works
- Refer to a sample of
serviceMonitorprovided by kustomize plugin - Check the plugin implementation
- Grafana Docs of importing JSON file
- The usage of serviceMonitor by Prometheus Operator
Helm 插件(helm/v1-alpha)
Helm 插件是一个可选插件,用于脚手架生成 Helm Chart,便于你通过 Helm 分发项目。
在默认脚手架下,用户可以先生成包含全部清单的打包文件:
make build-installer IMG=<some-registry>/<project-name:tag>
随后,项目使用者可以直接应用该打包文件安装:
kubectl apply -f https://raw.githubusercontent.com/<org>/project-v4/<tag or branch>/dist/install.yaml
不过在很多场景,你可能更希望提供 Helm Chart 的分发方式。这时就可以使用本插件在 dist 目录下生成 Helm Chart。
何时使用
- 你希望向用户提供 Helm Chart 来安装和管理你的项目。
- 你需要用最新的项目变更同步更新
dist/chart/下已生成的 Helm Chart:- 生成新清单后,使用
edit子命令同步 Helm Chart。 - 重要:如果你通过 DeployImage 插件创建了 Webhook 或 API,
需在(运行过
make manifests之后)使用--force标志执行edit,以基于最新清单重新生成 Helm Chart 的 values; 若你曾定制过dist/chart/values.yaml和templates/manager/manager.yaml,则在强制更新后需要手动把你的定制重新套上去。
- 生成新清单后,使用
如何使用
基本用法
Helm 插件挂载在 edit 子命令上,因为 helm/v1-alpha 依赖于先完成 Go 项目的脚手架。
# 初始化一个新项目
kubebuilder init
# 在已有项目上启用/更新 Helm Chart(先生成 config/ 下的清单)
make manifests
kubebuilder edit --plugins=helm/v1-alpha
子命令
Helm 插件实现了以下子命令:
- edit(
$ kubebuilder edit [OPTIONS])
影响的文件
本插件会创建或更新以下脚手架:
dist/chart/*
Kustomize v2
(默认脚手架)
Kustomize 插件用于与语言基础插件 base.go.kubebuilder.io/v4 搭配,脚手架生成全部 Kustomize 清单。
对于通过 go/v4(默认脚手架)创建的项目,它会在 config/ 目录下生成配置清单。
诸如 Operator-sdk 这类项目会把 Kubebuilder 当作库使用,并提供 Ansible、Helm 等其它语言的选项。 Kustomize 插件帮助它们在不同语言间保持一致的配置;同时也便于编写在默认脚手架之上做改动的插件, 避免在多种语言插件中手工同步更新。同样的思路还能让你创建可复用到不同项目与语言的“辅助”插件。
如何使用
如果希望你的语言插件使用 kustomize,可使用 Bundle Plugin 指定:由“你的语言插件 + kustomize 配置插件”组合而成,例如:
import (
...
kustomizecommonv2 "sigs.k8s.io/kubebuilder/v4/pkg/plugins/common/kustomize/v2"
golangv4 "sigs.k8s.io/kubebuilder/v4/pkg/plugins/golang/v4"
...
)
// 为 Kubebuilder go/v4 脚手架的 Golang 项目创建组合插件
gov4Bundle, _ := plugin.NewBundle(plugin.WithName(golang.DefaultNameQualifier),
plugin.WithVersion(plugin.Version{Number: 4}),
plugin.WithPlugins(kustomizecommonv2.Plugin{}, golangv4.Plugin{}), // 脚手架生成 config/ 与全部 kustomize 文件
)
也可以单独使用 kustomize/v2:
kubebuilder init --plugins=kustomize/v2
$ ls -la
total 24
drwxr-xr-x 6 camilamacedo86 staff 192 31 Mar 09:56 .
drwxr-xr-x 11 camilamacedo86 staff 352 29 Mar 21:23 ..
-rw------- 1 camilamacedo86 staff 129 26 Mar 12:01 .dockerignore
-rw------- 1 camilamacedo86 staff 367 26 Mar 12:01 .gitignore
-rw------- 1 camilamacedo86 staff 94 31 Mar 09:56 PROJECT
drwx------ 6 camilamacedo86 staff 192 31 Mar 09:56 config
或者与基础语言插件组合使用:
# 提供与 go/v4 相同的组合脚手架,但显式声明使用 kustomize/v2
kubebuilder init --plugins=kustomize/v2,base.go.kubebuilder.io/v4 --domain example.org --repo example.org/guestbook-operator
子命令
Kustomize 插件实现了以下子命令:
- init(
$ kubebuilder init [OPTIONS]) - create api(
$ kubebuilder create api [OPTIONS]) - create webhook(
$ kubebuilder create api [OPTIONS])
影响的文件
本插件会创建或更新以下脚手架:
config/*
延伸阅读
- kustomize 插件实现代码
- kustomize 文档
- kustomize 仓库
扩展 Kubebuilder
Kubebuilder 提供可扩展的插件架构用于脚手架生成项目。通过插件,你可以自定义 CLI 行为或集成新特性。
概览
你可以通过自定义插件扩展 Kubebuilder 的 CLI,以便:
- 构建新的脚手架。
- 增强已有脚手架。
- 为脚手架系统添加新的命令与功能。
这种灵活性让你可以按照具体需求搭建定制化的项目基线。
扩展方式
扩展 Kubebuilder 主要有两种途径:
-
扩展 CLI 能力与插件: 基于已有插件进行二次开发以扩展其能力。当一个工具已受益于 Kubebuilder 的脚手架体系、你仅需补齐特定能力时很有用。 例如 Operator SDK 复用了 kustomize 插件,从而为 Ansible/Helm 等语言提供支持,使项目只需维护语言相关的差异部分。
-
编写外部插件: 构建独立二进制的插件,可用任意语言实现,但需遵循 Kubebuilder 识别的执行约定。参见创建外部插件。
想进一步了解如何扩展 Kubebuilder,请阅读:
扩展 CLI 能力与插件
Kubebuilder 提供可扩展的插件架构用于脚手架生成项目。通过插件,你可以自定义 CLI 行为或集成新特性。
本文介绍如何扩展 CLI 能力、创建自定义插件以及对多个插件进行组合(Bundle)。
创建自定义插件
要创建自定义插件,你需要实现 Kubebuilder Plugin 接口。
该接口允许你的插件挂接 Kubebuilder 的命令(如 init、create api、create webhook 等),在执行时注入自定义逻辑。
自定义插件示例
你可以创建一个通过 Bundle Plugin 同时生成“语言相关脚手架 + 配置文件”的插件。下面示例将 Golang 插件与 Kustomize 插件进行组合:
import (
kustomizecommonv2 "sigs.k8s.io/kubebuilder/v4/pkg/plugins/common/kustomize/v2"
golangv4 "sigs.k8s.io/kubebuilder/v4/pkg/plugins/golang/v4"
)
mylanguagev1Bundle, _ := plugin.NewBundle(
plugin.WithName("mylanguage.kubebuilder.io"),
plugin.WithVersion(plugin.Version{Number: 1}),
plugin.WithPlugins(kustomizecommonv2.Plugin{}, mylanguagev1.Plugin{}),
)
这种组合可以:通过 Kustomize 提供通用配置基线,同时由 mylanguagev1 生成语言相关文件。
此外,你也可以借助 create api 与 create webhook 子命令,脚手架生成特定资源(如 CRD 与 Controller)。
插件子命令
插件需要实现在子命令调用时被执行的代码。你可以实现 Plugin 接口 来创建新插件。
除基础能力 Base 外,插件还应实现 SubcommandMetadata 接口以便经由 CLI 运行。可以选择自定义目标命令的帮助信息(若不提供则保留 cobra 默认帮助)。
Kubebuilder CLI 插件将脚手架与 CLI 能力封装为 Go 类型,由 kubebuilder 可执行文件(或任意导入该插件的可执行文件)运行。插件会配置以下命令之一的执行:
init:初始化项目结构。create api:脚手架生成新的 API 与控制器。create webhook:脚手架生成新的 Webhook。edit:编辑项目结构。
示例:使用自定义插件运行 init:
kubebuilder init --plugins=mylanguage.kubebuilder.io/v1
这会使用 mylanguage 插件初始化项目。
插件键(Plugin Key)
插件以 <name>/<version> 形式标识。指定插件有两种方式:
- 通过命令行设置:
kubebuilder init --plugins=<plugin key>; - 在脚手架生成的 PROJECT 配置文件 中设置
layout: <plugin key>(除init外,其它命令会读取该值并据此选择插件)。
默认情况下,<plugin key> 形如 go.kubebuilder.io/vX(X 为整数)。完整实现可参考 Kubebuilder 内置 go.kubebuilder.io 插件。
插件命名
插件名必须符合 DNS1123 标签规范,且应使用完全限定名(例如带 .example.com 后缀)。例如 go.kubebuilder.io。限定名可避免命名冲突。
插件版本
插件的 Version() 返回 plugin.Version,包含一个整数版本与可选阶段字符串(alpha 或 beta)。
- 不同整数表示不兼容版本;
- 阶段说明稳定性:
alpha变更频繁,beta仅小改动(如修复)。
模板与样板(Boilerplates)
Kubebuilder 内置插件通过模板生成代码文件。例如 go/v4 在初始化时会用模板脚手架生成 go.mod。
在自定义插件中,你可以基于 machinery 库 定义模板与文件生成逻辑:
- 定义文件 I/O 行为;
- 向模板中添加 markers;
- 指定模板内容并执行脚手架生成。
示例:go/v4 通过实现 machinery 接口对象来脚手架生成 go.mod,其原始模板在 Template.SetTemplateDefaults 的 TemplateBody 字段中定义:
/*
Copyright 2022 The Kubernetes Authors.
Licensed under the Apache License, Version 2.0 (the "License");
you may not use this file except in compliance with the License.
You may obtain a copy of the License at
http://www.apache.org/licenses/LICENSE-2.0
Unless required by applicable law or agreed to in writing, software
distributed under the License is distributed on an "AS IS" BASIS,
WITHOUT WARRANTIES OR CONDITIONS OF ANY KIND, either express or implied.
See the License for the specific language governing permissions and
limitations under the License.
*/
package templates
import (
"sigs.k8s.io/kubebuilder/v4/pkg/machinery"
)
var _ machinery.Template = &GoMod{}
// GoMod scaffolds a file that defines the project dependencies
type GoMod struct {
machinery.TemplateMixin
machinery.RepositoryMixin
ControllerRuntimeVersion string
}
// SetTemplateDefaults implements machinery.Template
func (f *GoMod) SetTemplateDefaults() error {
if f.Path == "" {
f.Path = "go.mod"
}
f.TemplateBody = goModTemplate
f.IfExistsAction = machinery.OverwriteFile
return nil
}
const goModTemplate = `module {{ .Repo }}
go 1.24.5
require (
sigs.k8s.io/controller-runtime {{ .ControllerRuntimeVersion }}
)
`
随后,该对象会被传入脚手架执行:
// Scaffold implements cmdutil.Scaffolder
func (s *initScaffolder) Scaffold() error {
log.Println("Writing scaffold for you to edit...")
scaffold := machinery.NewScaffold(s.fs,
machinery.WithConfig(s.config),
)
...
return scaffold.Execute(
...
&templates.GoMod{
ControllerRuntimeVersion: ControllerRuntimeVersion,
},
...
)
}
覆写已存在文件
当子命令执行时,如果你希望覆写已有文件,可以在模板定义中设置:
f.IfExistsAction = machinery.OverwriteFile
借助这些选项,你的插件可以接管并调整 Kubebuilder 默认脚手架生成的文件。
定制已有脚手架
Kubebuilder 提供了实用函数帮助你修改默认脚手架。借助插件工具集,你可以在文件中插入、替换或追加内容:
- 插入内容:在目标位置添加内容;
- 替换内容:查找并替换指定片段;
- 追加内容:在文件末尾追加,不影响既有内容。
示例:使用 InsertCode 向文件内注入自定义内容:
pluginutil.InsertCode(filename, target, code)
更多细节可参考 Kubebuilder 插件工具集。
Bundle Plugin
可将多个插件打包为 Bundle,以组合执行更复杂的脚手架流程:
myPluginBundle, _ := plugin.NewBundle(
plugin.WithName("myplugin.example.com"),
plugin.WithVersion(plugin.Version{Number: 1}),
plugin.WithPlugins(pluginA.Plugin{}, pluginB.Plugin{}, pluginC.Plugin{}),
)
上述 Bundle 会按顺序为各插件执行 init:
- pluginA
- pluginB
- pluginC
运行命令:
kubebuilder init --plugins=myplugin.example.com/v1
CLI 系统
插件由 CLI 对象运行:它将插件类型映射到子命令并调用插件方法。例如,向 CLI 注入一个 Init 插件并调用 CLI.Run(),就会在 kubebuilder init 时依次调用该插件的 SubcommandMetadata、UpdatesMetadata 与 Run,并传入用户参数。
示例程序:
package cli
import (
log "log/slog"
"github.com/spf13/cobra"
"sigs.k8s.io/kubebuilder/v4/pkg/cli"
cfgv3 "sigs.k8s.io/kubebuilder/v4/pkg/config/v3"
"sigs.k8s.io/kubebuilder/v4/pkg/plugin"
kustomizecommonv2 "sigs.k8s.io/kubebuilder/v4/pkg/plugins/common/kustomize/v2"
"sigs.k8s.io/kubebuilder/v4/pkg/plugins/golang"
deployimage "sigs.k8s.io/kubebuilder/v4/pkg/plugins/golang/deploy-image/v1alpha1"
golangv4 "sigs.k8s.io/kubebuilder/v4/pkg/plugins/golang/v4"
)
var (
// 你的 CLI 里可能会有的命令
commands = []*cobra.Command{
myExampleCommand.NewCmd(),
}
alphaCommands = []*cobra.Command{
myExampleAlphaCommand.NewCmd(),
}
)
// GetPluginsCLI 返回带插件的 CLI,用于你的 CLI 二进制
func GetPluginsCLI() (*cli.CLI) {
// 组合插件:Kubebuilder go/v4 的 Golang 项目脚手架
gov3Bundle, _ := plugin.NewBundleWithOptions(plugin.WithName(golang.DefaultNameQualifier),
plugin.WithVersion(plugin.Version{Number: 3}),
plugin.WithPlugins(kustomizecommonv2.Plugin{}, golangv4.Plugin{}),
)
c, err := cli.New(
// 你的 CLI 名称
cli.WithCommandName("example-cli"),
// 你的 CLI 版本
cli.WithVersion(versionString()),
// 注册可用于脚手架的插件(示例使用 Kubebuilder 提供的插件)
cli.WithPlugins(
gov3Bundle,
&deployimage.Plugin{},
),
// 设置默认插件(未指定时使用)
cli.WithDefaultPlugins(cfgv3.Version, gov3Bundle),
// 设置默认的项目配置版本(未通过 --project-version 指定时)
cli.WithDefaultProjectVersion(cfgv3.Version),
// 添加自定义命令
cli.WithExtraCommands(commands...),
// 添加自定义 alpha 命令
cli.WithExtraAlphaCommands(alphaCommands...),
// 开启自动补全
cli.WithCompletion(),
)
if err != nil {
log.Fatal(err)
}
return c
}
// versionString 返回 CLI 版本
func versionString() string {
// return your binary project version
}
该程序的运行方式示例:
默认行为:
# 使用默认的 Init 插件(例如 "go.example.com/v1")初始化项目,
# 该键会自动写入 PROJECT 配置文件
$ my-bin-builder init
# 读取配置文件中的键,使用 "go.example.com/v1" 的 CreateAPI 与 CreateWebhook
$ my-bin-builder create api [flags]
$ my-bin-builder create webhook [flags]
通过 --plugins 指定插件:
# 使用 "ansible.example.com/v1" 的 Init 插件初始化项目,并写入配置文件
$ my-bin-builder init --plugins ansible
# 读取配置文件中的键,使用 "ansible.example.com/v1" 的 CreateAPI 与 CreateWebhook
$ my-bin-builder create api [flags]
$ my-bin-builder create webhook [flags]
在 PROJECT 文件中跟踪输入
CLI 负责管理PROJECT 配置文件,用于记录由 CLI 脚手架生成的项目信息。
扩展 Kubebuilder 时,建议你的工具或外部插件正确读写该文件以追踪关键信息:
- 便于其它工具与插件正确集成;
- 便于基于已追踪的数据进行“二次脚手架”(如使用Alpha 命令升级项目结构)。
例如,插件可以据此判断是否支持当前项目的布局,并基于已记录的输入参数重新执行命令。
示例
使用 Deploy Image 插件为 API 及其控制器脚手架:
kubebuilder create api --group example.com --version v1alpha1 --kind Memcached --image=memcached:memcached:1.6.26-alpine3.19 --image-container-command="memcached,--memory-limit=64,-o,modern,-v" --image-container-port="11211" --run-as-user="1001" --plugins="deploy-image/v1-alpha" --make=false
PROJECT 文件中将新增:
...
plugins:
deploy-image.go.kubebuilder.io/v1-alpha:
resources:
- domain: testproject.org
group: example.com
kind: Memcached
options:
containerCommand: memcached,--memory-limit=64,-o,modern,-v
containerPort: "11211"
image: memcached:memcached:1.6.26-alpine3.19
runAsUser: "1001"
version: v1alpha1
- domain: testproject.org
group: example.com
kind: Busybox
options:
image: busybox:1.36.1
version: v1alpha1
...
通过检查 PROJECT 文件,就能了解插件如何被使用、传入了哪些参数。这样不仅可复现命令执行,也便于开发依赖这些信息的能力或插件。
为 Kubebuilder 创建外部插件
概览
Kubebuilder 的能力可以通过外部插件扩展。外部插件是可执行文件(可用任意语言实现),需遵循 Kubebuilder 识别的执行契约。Kubebuilder 通过 stdin/stdout 与插件交互。
为什么使用外部插件?
外部插件让第三方方案维护者将其工具与 Kubebuilder 集成。与 Kubebuilder 自身插件类似,外部插件是“可选启用”的,赋予用户工具选择的灵活性。把插件放在其自有仓库中,有助于与其 CI 流水线同步演进,并在其职责边界内管理变更。
如需此类集成,建议与你所依赖的第三方方案维护者协作。Kubebuilder 维护者也乐于支持扩展其能力。
如何编写外部插件
Kubebuilder 与外部插件通过标准 I/O 通信。只要遵循 PluginRequest 与 PluginResponse 结构,任何语言均可实现。
PluginRequest
PluginRequest 包含从 CLI 收集的参数与此前已执行插件的输出。Kubebuilder 会通过 stdin 以 JSON 发送给外部插件。
示例(执行 kubebuilder init --plugins sampleexternalplugin/v1 --domain my.domain 时发送的 PluginRequest):
{
"apiVersion": "v1alpha1",
"args": ["--domain", "my.domain"],
"command": "init",
"universe": {}
}
PluginResponse
PluginResponse 用于描述外部插件对项目所做的修改。Kubebuilder 通过 stdout 读取 JSON 格式的返回值。
示例 PluginResponse:
{
"apiVersion": "v1alpha1",
"command": "init",
"metadata": {
"description": "The `init` subcommand initializes a project via Kubebuilder. It scaffolds a single file: `initFile`.",
"examples": "kubebuilder init --plugins sampleexternalplugin/v1 --domain my.domain"
},
"universe": {
"initFile": "A file created with the `init` subcommand."
},
"error": false,
"errorMsgs": []
}
如何使用外部插件
前置条件
- Kubebuilder CLI 版本 > 3.11.0
- 外部插件的可执行文件
- 配置插件查找路径:使用
${EXTERNAL_PLUGINS_PATH},或采用默认的系统路径:- Linux:
$HOME/.config/kubebuilder/plugins/${name}/${version}/${name} - macOS:
~/Library/Application Support/kubebuilder/plugins/${name}/${version}/${name}
- Linux:
示例:Linux 上名为 foo.acme.io、版本 v2 的插件路径为 $HOME/.config/kubebuilder/plugins/foo.acme.io/v2/foo.acme.io。
支持的子命令
外部插件可支持以下子命令:
init:项目初始化create api:脚手架生成 Kubernetes API 定义create webhook:脚手架生成 Kubernetes Webhookedit:更新项目配置
可选的增强子命令:
metadata:配合--help提供描述与示例flags:声明支持的参数,便于提前做参数校验
配置插件路径
设置环境变量 $EXTERNAL_PLUGINS_PATH 指定自定义插件二进制路径:
export EXTERNAL_PLUGINS_PATH=<custom-path>
否则 Kubebuilder 会根据操作系统在默认路径下查找插件。
CLI 命令示例
# 使用名为 `sampleplugin` 的外部插件初始化项目
kubebuilder init --plugins sampleplugin/v1
# 查看该外部插件的 init 子命令帮助
kubebuilder init --plugins sampleplugin/v1 --help
# 使用自定义参数 `number` 创建 API
kubebuilder create api --plugins sampleplugin/v1 --number 2
# 使用自定义参数 `hooked` 创建 webhook
kubebuilder create webhook --plugins sampleplugin/v1 --hooked
# 使用外部插件更新项目配置
kubebuilder edit --plugins sampleplugin/v1
# 以链式顺序同时使用 v1 与 v2 两个外部插件创建 API
kubebuilder create api --plugins sampleplugin/v1,sampleplugin/v2
# 使用 go/v4 创建 API 后,再链式传递给外部插件处理
kubebuilder create api --plugins go/v4,sampleplugin/v1
延伸阅读
编写 E2E 测试
可以参考 Kubebuilder/v4/test/e2e/utils 包,其中提供了功能丰富的 TestContext:
- NewTestContext 用于定义:
- 临时项目目录;
- 临时 controller-manager 镜像;
- Kubectl 执行方法;
- CLI 可执行文件(
kubebuilder、operator-sdk或你扩展的 CLI)。
定义完成后,即可使用 TestContext:
-
搭建测试环境:
- 清理环境并创建临时目录,见 Prepare;
- 安装前置 CRD,见 InstallCertManager、InstallPrometheusManager。
-
校验插件行为:
- 触发插件绑定的子命令,见 Init、CreateAPI;
- 使用 PluginUtil 校验脚手架输出,见 InsertCode、ReplaceInFile、UncommentCode。
-
验证脚手架工程可工作:
- 执行
Makefile中的目标,见 Make; - 临时加载被测控制器镜像到 Kind,见 LoadImageToKindCluster;
- 使用 Kubectl 验证运行中的资源,见 Kubectl。
- 执行
-
清理测试资源:
- 卸载前置 CRD,见 UninstallPrometheusOperManager;
- 删除临时目录,见 Destroy。
参考:
生成测试样例
查看由你的插件生成的样例项目内容非常直接。
例如 Kubebuilder 基于不同插件生成样例项目以验证布局。
你也可以用 TestContext 生成由插件脚手架的项目目录结构。用到的命令与扩展 CLI 能力与插件中类似。
以下演示使用 go/v4 插件创建样例项目的一般流程(其中 kbc 是 TestContext 实例):
-
初始化一个项目:
By("initializing a project") err = kbc.Init( "--plugins", "go/v4", "--project-version", "3", "--domain", kbc.Domain, "--fetch-deps=false", ) Expect(err).NotTo(HaveOccurred(), "Failed to initialize a project") -
定义 API:
By("creating API definition") err = kbc.CreateAPI( "--group", kbc.Group, "--version", kbc.Version, "--kind", kbc.Kind, "--namespaced", "--resource", "--controller", "--make=false", ) Expect(err).NotTo(HaveOccurred(), "Failed to create an API") -
脚手架生成 webhook 配置:
By("scaffolding mutating and validating webhooks") err = kbc.CreateWebhook( "--group", kbc.Group, "--version", kbc.Version, "--kind", kbc.Kind, "--defaulting", "--programmatic-validation", ) Expect(err).NotTo(HaveOccurred(), "Failed to create an webhook")
插件版本管理
| 名称 | 示例 | 描述 |
|---|---|---|
| Kubebuilder 版本 | v2.2.0, v2.3.0, v2.3.1, v4.2.0 | Kubebuilder 项目的打标签版本,代表本仓库源码的变更。二进制请见 releases。 |
| 项目版本(Project version) | "1", "2", "3" | Project version 定义 PROJECT 配置文件的 schema,即 PROJECT 中的 version 字段。 |
| 插件版本(Plugin version) | v2, v3, v4 | 某个插件自身的版本以及其生成的脚手架版本。版本体现在插件键上,例如 go.kubebuilder.io/v2。详见设计文档。 |
版本递增(Incrementing versions)
关于 Kubebuilder 发布版本的规范,参见 semver。
仅当 PROJECT 文件的 schema 自身发生破坏性变更时,才应提升 Project version。Go 脚手架或 Kubebuilder CLI 的改动并不会影响 Project version。
类似地,引入新的插件版本往往只会带来 Kubebuilder 的次版本发布,因为 CLI 本身并未发生破坏性变更。只有当我们移除旧插件版本的支持时,才会对 Kubebuilder 本身构成破坏性变更。更多细节见插件设计文档的版本管理章节。
对插件引入变更
只有当改动会破坏由旧版本插件脚手架的项目时,才需要提升插件版本。一旦 vX 稳定(不再带有 alpha/beta 后缀),应创建一个新包并在其中提供 v(X+1)-alpha 版本的插件。通常做法是“语义上复制”:cp -r pkg/plugins/golang/vX pkg/plugins/golang/v(X+1),然后更新版本号与路径。随后所有破坏性变更都应只在新包中进行;vX 版本不再接受破坏性变更。
另外,你必须在 PR 中向 Kubebuilder Book 的 migrations 部分补充迁移指南,详细说明用户如何从 vX 升级到 v(X+1)-alpha。
常见问题(FAQ)
在初始化项目时通过 domain 参数传入的值(例如 kubebuilder init --domain example.com)有什么作用?
创建项目后,通常你会希望扩展 Kubernetes API,并定义由你的项目拥有的新 API。因此,该 domain 值会被记录在定义项目配置的 PROJECT 文件中,并作为域名用于创建 API 端点。请确保你理解Groups、Versions 与 Kinds,哇哦! 中的概念。
domain 用于作为 group 的后缀,用来直观地表示资源组的类别。例如,如果设置了 --domain=example.com:
kubebuilder init --domain example.com --repo xxx --plugins=go/v4
kubebuilder create api --group mygroup --version v1beta1 --kind Mykind
那么最终的资源组将是 mygroup.example.com。
如果没有设置 domain 字段,默认值为
my.domain。
我想自定义项目使用 klog,而不是 controller-runtime 提供的 zap。如何将 klog 或其他 logger 用作项目的日志器?
在 main.go 中你可以把:
opts := zap.Options{
Development: true,
}
opts.BindFlags(flag.CommandLine)
flag.Parse()
ctrl.SetLogger(zap.New(zap.UseFlagOptions(&opts)))
替换为:
flag.Parse()
ctrl.SetLogger(klog.NewKlogr())
执行 make run 后,我看到类似 “unable to find leader election namespace: not running in-cluster…” 的错误
你可以启用 leader election。不过,如果你在本地使用 make run 目标测试项目(该命令会让 manager 在集群外运行),那么你可能还需要设置创建 leader election 资源的命名空间,如下所示:
mgr, err := ctrl.NewManager(ctrl.GetConfigOrDie(), ctrl.Options{
Scheme: scheme,
MetricsBindAddress: metricsAddr,
Port: 9443,
HealthProbeBindAddress: probeAddr,
LeaderElection: enableLeaderElection,
LeaderElectionID: "14be1926.testproject.org",
LeaderElectionNamespace: "<project-name>-system",
如果你在集群中通过 make deploy 目标运行项目,则可能不希望添加此选项。因此,你可以使用环境变量自定义该行为,仅在开发时添加此选项,例如:
leaderElectionNS := ""
if os.Getenv("ENABLE_LEADER_ELECTION_NAMESPACE") != "false" {
leaderElectionNS = "<project-name>-system"
}
mgr, err := ctrl.NewManager(ctrl.GetConfigOrDie(), ctrl.Options{
Scheme: scheme,
MetricsBindAddress: metricsAddr,
Port: 9443,
HealthProbeBindAddress: probeAddr,
LeaderElection: enableLeaderElection,
LeaderElectionNamespace: leaderElectionNS,
LeaderElectionID: "14be1926.testproject.org",
...
在旧版本 Kubernetes 上部署项目时遇到错误 “open /var/run/secrets/kubernetes.io/serviceaccount/token: permission denied”,如何解决?
如果你遇到如下错误:
1.6656687258729894e+09 ERROR controller-runtime.client.config unable to get kubeconfig {"error": "open /var/run/secrets/kubernetes.io/serviceaccount/token: permission denied"}
sigs.k8s.io/controller-runtime/pkg/client/config.GetConfigOrDie
/go/pkg/mod/sigs.k8s.io/controller-runtime@v0.13.0/pkg/client/config/config.go:153
main.main
/workspace/main.go:68
runtime.main
/usr/local/go/src/runtime/proc.go:250
当你在 Kubernetes 较旧版本(可能 <= 1.21)上运行项目时,这可能由该问题导致,原因是挂载的 token 文件权限为 0600,解决方案见此 PR。临时解决办法是:
在 manager.yaml 中添加 fsGroup:
securityContext:
runAsNonRoot: true
fsGroup: 65532 # 添加该 fsGroup 以使 token 文件可读
不过请注意,该问题已被修复;若你将项目部署在更高版本(可能 >= 1.22),则不会出现此问题。
运行 make install 应用 CRD 清单时出现 Too long: must have at most 262144 bytes 错误。如何解决?为什么会出现该错误?
尝试运行 make install 应用 CRD 清单时,可能会遇到 Too long: must have at most 262144 bytes 错误。该错误源于 Kubernetes API 实施的大小限制。注意:make install 目标会使用 kubectl apply -f - 应用 config/crd 下的 CRD 清单。因此,当使用 apply 命令时,API 会为对象添加包含完整先前配置的 last-applied-configuration 注解。如果该配置过大,就会超出允许的字节大小。(更多信息)
理想情况下,使用 client-side apply 看似完美,因为不需要把完整对象配置作为注解(last-applied-configuration)存储在服务端。然而,需要注意的是,目前 controller-gen 与 kubebuilder 尚不支持该特性。更多内容参见:Controller-tool 讨论。
因此,你可以使用以下方式之一来规避该问题:
移除 CRD 中的描述(description):
你的 CRD 是由 controller-gen 生成的。通过使用 maxDescLen=0 选项来移除描述,可以减小大小,从而可能解决该问题。为此,你可以按以下示例修改 Makefile,然后调用 make manifest 目标以重新生成不包含描述的 CRD,如下所示:
.PHONY: manifests
manifests: controller-gen ## Generate WebhookConfiguration, ClusterRole and CustomResourceDefinition objects.
# 注意:在默认脚手架中加入了 maxDescLen=0 选项以解决 “Too long: must have at most 262144 bytes” 问题。
# 使用 kubectl apply 创建/更新资源时,K8s API 会创建注解以存储资源的最新版本(kubectl.kubernetes.io/last-applied-configuration)。
# 该注解有大小限制,如果 CRD 过大且描述很多,就会导致失败。
$(CONTROLLER_GEN) rbac:roleName=manager-role crd:maxDescLen=0 webhook paths="./..." output:crd:artifacts:config=config/crd/bases
重新设计你的 API:
你可以审视 API 的设计,看看是否违反了例如单一职责原则而导致规格过多,从而考虑对其进行重构。
如何高效地校验和解析 CRD 中的字段?
为提升用户体验,编写 CRD 时建议使用 OpenAPI v3 schema 进行校验。不过,这种方式有时需要额外的解析步骤。 例如,考虑如下代码:
type StructName struct {
// +kubebuilder:validation:Format=date-time
TimeField string `json:"timeField,omitempty"`
}
这种情况下会发生什么?
- 如果用户尝试以非法的 timeField 值创建 CRD,Kubernetes API 会返回错误提示。
- 对于开发者,字符串值在使用前需要手动解析。
有更好的方式吗?
为了同时提供更好的用户体验与更顺畅的开发体验,建议使用诸如 metav1.Time 这样的预定义类型。例如:
type StructName struct {
TimeField metav1.Time `json:"timeField,omitempty"`
}
这种情况下会发生什么?
- 对非法的
timeField值,用户仍会从 Kubernetes API 获得错误提示。 - 开发者可以直接使用已解析的 TimeField,而无需额外解析,从而降低错误并提升效率。